Free original lessons
Gorilla Head Drawing: Brow, Muzzle, and Ear Construction
Learn to place a gorilla's brow, muzzle, and ears using simple boxes and marks. Build a proportional head from basic shapes with clear checks.
Free lesson
Four exercises
Worked answers
Object Drawing Lessons
This guide teaches a repeatable method for constructing a gorilla head using three anchor zones: the brow ridge, the muzzle, and the ear positions. You will work from a head-shape guide, place brow and muzzle boxes, mark ear positions, and then refine the outline. The method uses a simple convention: x-height is measured from baseline to midline, and letter styles vary, so treat all marks as adjustable guides rather than fixed rules. All measurements are hypothetical examples; measure your own paper and tools. The goal is a believable gorilla head, not a full-body pose or knuckle-walk anatomy.
Practice materials: Printable downloads are not available for this lesson yet. Use the instructions and four exercises below.
Reference illustration
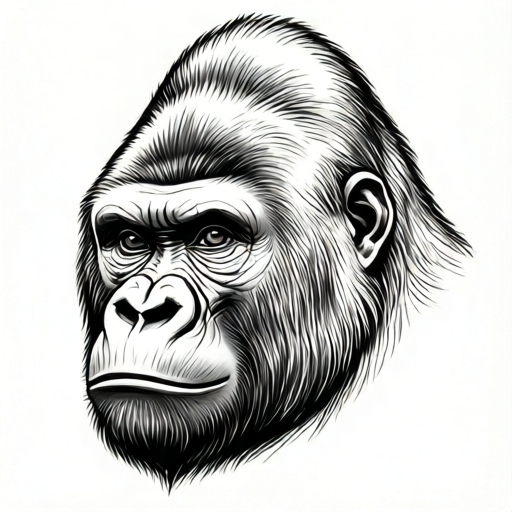
Use the stated measurements and conventions for each exercise.
Set the head-shape guide and baseline
Begin with a light oval or rounded rectangle for the cranium. Mark a baseline at the bottom of the chin area and a midline through the center of the head. The distance from baseline to midline is your x-height reference; use it to compare vertical placements. Keep lines light so they can be adjusted.
Decide the overall head width and height in simple units, such as finger-widths or a ruler. For example, a hypothetical head height of 12 units and width of 9 units gives a clear proportion to check. These numbers are examples only; choose values that fit your paper.
- Draw a light oval for the cranium, wider at the top than the jaw.
- Mark a baseline at the chin and a midline through the center.
- Label the baseline-to-midline distance as your x-height reference.
- Check that the oval is symmetrical left and right before adding features.
Place the brow and muzzle boxes
The brow ridge sits above the eyes and spans most of the face width. Draw a shallow box for the brow, centered on the midline. The muzzle is a rounded box below the brow, narrower than the brow and centered. Leave a small gap between brow and muzzle for the nose bridge.
Use the x-height reference to space these boxes. A hypothetical brow box height of 2 units and muzzle height of 4 units can be checked against the head height. Adjust until the brow looks heavy and the muzzle looks forward-projecting.
- Draw a brow box centered on the midline, about two-thirds of the face width.
- Draw a muzzle box below it, about half the face width and rounded at the bottom.
- Check that both boxes are centered and that the gap between them is consistent.
- Lightly shade the brow box to suggest the ridge without committing to final lines.
Mark ear positions and refine the outline
Gorilla ears sit on the sides of the head, roughly level with the brow or slightly lower. Mark two short vertical ticks on the head outline at the ear level. The ears are small relative to the head and should not extend far beyond the cranium.
Refine the outline by connecting the cranium, brow, muzzle, and ear marks. Keep the jaw strong and the muzzle rounded. Check symmetry by comparing left and right distances from the midline.
- Mark ear-level ticks on both sides of the head outline.
- Draw small ear shapes that sit just outside the cranium.
- Connect the brow and muzzle boxes to the head outline with smooth curves.
- Compare left and right sides against the midline and adjust any uneven marks.
Check proportions and finalize
Use simple arithmetic to verify placements. For example, if the head height is 12 units and the brow box top is 4 units from the top, the brow should sit about one-third down. If the muzzle bottom is 2 units above the baseline, the chin area remains clear.
Finalize by darkening the most important lines: brow ridge, muzzle outline, and ear shapes. Keep construction marks light or erase them. The result should read as a gorilla head with a heavy brow, forward muzzle, and side-set ears.
- Measure key distances from the baseline and midline and compare with your planned units.
- Darken the brow, muzzle, and ear outlines.
- Erase or lighten construction boxes and ticks.
- Do a final symmetry check before calling the drawing complete.
Worked example
A head guide is 12 units tall and 9 units wide. The brow box top is 4 units from the top, and the muzzle bottom is 2 units above the baseline. Where should the ear ticks sit?
Worked answer
Place ear ticks at about brow level, roughly 4 to 5 units from the top, on both sides of the head outline. Check that left and right ticks are equal distances from the midline.
Four practice exercises
Exercise 1
A head guide is 10 units tall. The brow box top is 3 units from the top. What fraction of the head height is above the brow box?
Show answer and check
3/10 of the head height.
Why: The brow box top is 3 units from the top out of 10 total units, so the fraction is 3 divided by 10.
Check: Measure the top-to-brow distance and the total head height; divide and compare with 0.3.
Exercise 2
A muzzle box is 4 units tall and its bottom is 2 units above the baseline. How far is the muzzle box top from the baseline?
Show answer and check
6 units.
Why: Add the muzzle height to the bottom distance: 4 plus 2 equals 6 units from the baseline.
Check: Measure from baseline to muzzle top and confirm it equals muzzle height plus bottom gap.
Exercise 3
A head is 8 units wide. Ear ticks are placed 3 units from the midline on each side. How much width remains outside the ear ticks on each side?
Show answer and check
1 unit on each side.
Why: Half the head width is 4 units. Subtract the 3-unit ear tick distance: 4 minus 3 equals 1 unit.
Check: Measure from each ear tick to the outer head edge and confirm both are equal.
Exercise 4
A brow box is 6 units wide and centered on a 9-unit-wide head. How wide is the gap on each side of the brow box?
Show answer and check
1.5 units on each side.
Why: Subtract brow width from head width: 9 minus 6 equals 3 units total gap. Divide by 2 sides to get 1.5 units per side.
Check: Measure both side gaps and confirm they are equal and sum to 3 units.
Common mistakes
- Placing the muzzle too high, crowding the brow. Lower the muzzle box so a clear nose-bridge gap remains between brow and muzzle.
- Making the ears too large or too far from the head. Shrink the ear shapes and move them closer to the cranium outline at brow level.
- Ignoring the midline and creating left-right imbalance. Re-measure distances from the midline and adjust boxes and ear ticks to match.
- Treating hypothetical unit values as fixed rules. Measure your actual paper and adjust units to fit; use numbers only as checkable examples.
Self-check rubric
- Brow box is centered and spans most of the face width.
- Muzzle box is centered, narrower than the brow, and below it with a clear gap.
- Ear ticks are level with or slightly below the brow and close to the cranium.
- Left and right placements are balanced against the midline.
- Construction marks are light and final lines emphasize brow, muzzle, and ears.
- Measurements use consistent units and are checked with simple arithmetic.
Questions and answers
Do I need to draw a full gorilla body?
No. This method focuses only on the head, brow, muzzle, and ear placement.
What does x-height mean here?
It is the baseline-to-midline distance used as a vertical reference for placing features.
Can I use different letter styles or marks?
Yes. The convention defines x-height only; letter styles and mark shapes can vary as long as placements remain checkable.
Are the unit numbers required?
No. They are hypothetical examples. Measure your own paper and choose consistent units.