Free original lessons
Hand Grip Drawing: Palm, Wrapping Fingers, and Thumb Placement
Learn to draw a hand gripping an object by building a palm block, wrapping fingers in sequence, and placing the thumb for believable contact and pressure.
Free lesson
Four exercises
Worked answers
Object Drawing Lessons
A convincing hand grip depends on three relationships: the palm block that anchors the hand, the fingers that wrap around the object in a clear sequence, and the thumb that opposes them to show pressure. This lesson treats the grip as a structural problem rather than a contour to copy. You will define a simple object, place a palm block beside it, wrap four fingers around it in order, and position the thumb so it reads as opposing the fingers. The convention used here is that finger length is measured from the visible knuckle line to the fingertip along the wrap, and that any finger may be foreshortened by the object. Letter styles and hand proportions vary, so the rubric rewards consistent structure and contact, not a single universal outline.
Practice materials: Printable downloads are not available for this lesson yet. Use the instructions and four exercises below.
Reference illustration
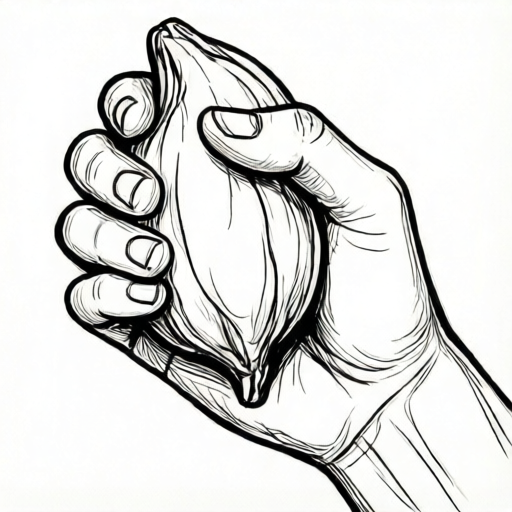
Use the stated measurements and conventions for each exercise.
Build the palm block and object relationship
Start with the object as a simple closed shape, such as a cylinder or a rounded box. Mark its centerline and its widest visible edge. The palm block is a rounded rectangle placed behind or beside the object, sized so the object sits against the palm's heel and the knuckle line runs roughly parallel to the object's long axis. Keep the palm block wider than the object where the object presses into the palm.
Decide the viewing angle before drawing fingers. A three-quarter view shows the thumb side and part of the back of the hand; a side view hides most of the palm and emphasizes the finger wrap. Mark the knuckle line as a gentle curve, not a straight line, because knuckles sit at slightly different depths. Label the thumb side so you do not reverse the hand later.
- Draw the object as a simple closed shape and mark its centerline.
- Place a rounded palm block so the object touches the palm heel.
- Draw a curved knuckle line parallel to the object's long axis.
- Label the thumb side and the back-of-hand side before adding fingers.
Wrap the fingers in sequence
Wrap the index finger first because it usually sits highest and establishes the spacing for the others. Each finger is drawn as a tapered tube that crosses the object's surface, bends at the visible joint, and ends with a fingertip that presses into the object or curls past its edge. Draw the near fingers before the far fingers so overlaps read correctly. If a finger passes behind the object, stop its contour at the object's edge and resume it on the other side only if the fingertip is visible.
Use the convention that finger length is measured along the wrap from the visible knuckle to the fingertip. Foreshortening is allowed: a finger pointing toward the viewer may appear shorter. Keep the spacing between adjacent fingers consistent with the knuckle line, and vary fingertip contact points slightly so the grip does not look mechanical.
- Draw the index finger from the knuckle line across the object.
- Add the middle, ring, and little fingers in order, checking spacing.
- Stop contours at the object's edge where a finger passes behind it.
- Mark each fingertip contact point and adjust pressure by curving the tip.
Place the thumb and check opposition
The thumb opposes the fingers. Place it on the side of the object opposite the finger wrap, angled so its tip points toward the index or middle finger. The thumb's base should connect to the palm block near the heel, and its visible joint should bend around the object's curve. If the thumb floats away from the object, the grip looks weak; if it crosses the fingers, the hand looks twisted.
Check opposition by drawing a short line from the thumb tip toward the nearest fingertip. That line should cross the object's surface and show compression. Adjust the thumb's angle until it reads as pressing inward. Keep the thumb shorter than the index finger in most views, but allow variation because hand proportions differ.
- Attach the thumb base to the palm block near the heel.
- Angle the thumb toward the index or middle finger.
- Bend the visible thumb joint around the object's curve.
- Draw a check line from thumb tip to nearest fingertip to confirm opposition.
Refine contact, pressure, and overlap
Refine the grip by darkening contact edges where the object presses into the palm and fingertips. Add small creases at the knuckles and at the thumb base only where they support the wrap. Overlaps should be clear: a finger in front of the object hides part of the object's edge, while a finger behind the object is hidden by it. Erase any contour that contradicts these overlaps.
Finally, check that the object still reads as a single solid shape. If the fingers distort the object's outline too much, redraw the object's hidden edges lightly and confirm that each finger crosses the surface at a believable angle. The grip should look like it could hold the object, not like the object is floating between fingers.
- Darken contact edges at palm heel and fingertips.
- Add creases only where they explain the wrap.
- Correct any overlap that contradicts front and behind.
- Confirm the object reads as one solid shape under the grip.
Worked example
Draw a hand gripping a vertical cylinder about two finger-widths wide, seen from a three-quarter view with the thumb side toward the viewer. Use the palm block, finger-wrap sequence, and thumb opposition described in the lesson.
Worked answer
The cylinder is drawn as a closed rounded rectangle with a centerline. A rounded palm block sits behind it, touching the cylinder at the palm heel. The knuckle line curves gently parallel to the cylinder's long axis. The index finger wraps first, crossing the cylinder and bending at its visible joint, with its tip pressing into the far edge. Middle, ring, and little fingers follow in order, each tapered and spaced from the knuckle line. The thumb attaches near the palm heel on the viewer's side, angles toward the index finger, and bends around the cylinder's curve. A check line from thumb tip to index fingertip crosses the cylinder surface. Contact edges at the palm heel and fingertips are darkened, and overlaps are corrected so no finger passes through the cylinder.
Four practice exercises
Exercise 1
A hand grips a horizontal rounded box. The palm block is behind the box, and the knuckle line runs along the box's top edge. Describe where the index finger should be drawn first and how its contour should stop if it passes behind the box.
Show answer and check
Draw the index finger first from the knuckle line across the box's top surface, bending at its visible joint. If the finger passes behind the box, stop its contour at the box's near edge and do not continue it unless the fingertip reappears on the far side.
Why: The index finger sets spacing for the other fingers, and stopping the contour at the object's edge preserves the overlap so the finger does not appear to pass through the box.
Check: Confirm the index finger starts at the knuckle line, crosses the box surface, and has no contour segment that contradicts the box's near edge.
Exercise 2
In a side view, the thumb is drawn on the same side as the wrapping fingers and points away from them. State the correction and describe one check line that would confirm the fix.
Show answer and check
Move the thumb to the opposite side of the object and angle its tip toward the index or middle finger. Draw a short line from the thumb tip to the nearest fingertip; it should cross the object's surface and show compression.
Why: The thumb must oppose the fingers to create a believable grip. A thumb on the same side as the wrap removes opposition and makes the hand look twisted.
Check: Verify the thumb base connects near the palm heel on the opposite side, and the thumb-to-fingertip line crosses the object rather than running parallel to it.
Exercise 3
A grip drawing shows four fingers as equal-length parallel tubes with no joint bends, and the fingertips float above the object. List two specific changes that would improve the grip.
Show answer and check
Taper each finger toward its tip and bend it at the visible joint so it follows the object's curve. Curve each fingertip slightly into the object's surface and darken the contact point so the fingers appear to press rather than float.
Why: Parallel equal tubes ignore taper and joint structure, while floating tips remove contact. Tapering, bending, and curving the tips restore the wrap and pressure.
Check: Check that each finger narrows toward the tip, shows at least one joint bend, and has a marked contact point on the object.
Exercise 4
A small object is gripped so tightly that the fingertips curl past its far edge. The thumb is placed near the palm heel and angles toward the middle finger. Describe how to check that the object still reads as one solid shape and that the grip is believable.
Show answer and check
Lightly redraw the object's hidden edges and confirm that each finger either contacts the visible surface or is hidden behind the far edge. Draw a line from the thumb tip to the nearest fingertip and confirm it crosses the object. Darken contact edges at the palm heel and at each fingertip that presses the object.
Why: A small object can be partly hidden by curled fingers, so the object's solidity must be checked through hidden edges and consistent overlaps. Thumb opposition and contact edges confirm pressure.
Check: Verify no finger contour passes through the object, the thumb-to-fingertip line crosses the object, and at least one contact edge is marked at the palm heel and at a fingertip.
Common mistakes
- Drawing fingers as parallel lines with no taper or joint bend. Taper each finger toward the tip and bend it at the visible joint so it follows the object's curve.
- Placing the thumb on the same side as the finger wrap. Move the thumb to the opposite side and angle its tip toward the index or middle finger to show opposition.
- Letting fingertips float above the object instead of contacting it. Curve each fingertip slightly into the object's surface and darken the contact point.
- Ignoring overlap so fingers appear to pass through the object. Stop a finger's contour at the object's edge when it goes behind, and resume only where the fingertip is visible.
Self-check rubric
- Palm block is present and the object touches the palm heel.
- Knuckle line is curved and roughly parallel to the object's long axis.
- Four fingers are drawn in sequence with taper and visible joint bends.
- Fingertips contact the object or are clearly hidden behind it.
- Thumb opposes the fingers and its tip angles toward the index or middle finger.
- Overlaps are consistent: no finger passes through the object.
- Contact edges are marked to show pressure.
- Valid alternatives are accepted when structure and contact remain consistent, including varied finger lengths and foreshortening.
Questions and answers
How do I know which finger to draw first?
Draw the index finger first because it usually sits highest and sets the spacing for the others. Then add middle, ring, and little fingers in order.
Can I change finger lengths to match a real hand?
Yes. The convention measures finger length along the wrap from visible knuckle to fingertip, and foreshortening is allowed. Keep spacing consistent with the knuckle line rather than forcing equal lengths.
What if the object is very small?
Use the same palm block and wrap sequence, but let fingertips curl past the object's far edge. The thumb still opposes the fingers, and contact points may be closer together.
How do I check the grip without a model?
Draw a short line from the thumb tip to the nearest fingertip. It should cross the object's surface and show compression. Also check that every finger either contacts the object or is clearly hidden behind it.