Free original lessons
Draw a Multi-Head Hydra: Body Mass and Head Placement
Learn to draw a hydra with a shared body mass, multiple necks, and varied head placement using simple guides and a repeatable construction order.
Free lesson
Four exercises
Worked answers
Object Drawing Lessons
A hydra is not a dragon with extra heads glued on. Its body must support several necks that emerge from a common mass, and each head needs a clear connection to that mass. This lesson gives a construction order: body mass first, neck connection lines second, head placement circles third, then final head shapes. You will use a simple convention for head size and neck thickness so the drawing stays coherent even when the head count changes. All measurements are hypothetical examples; measure your own paper and tools.
Practice materials: Printable downloads are not available for this lesson yet. Use the instructions and four exercises below.
Reference illustration
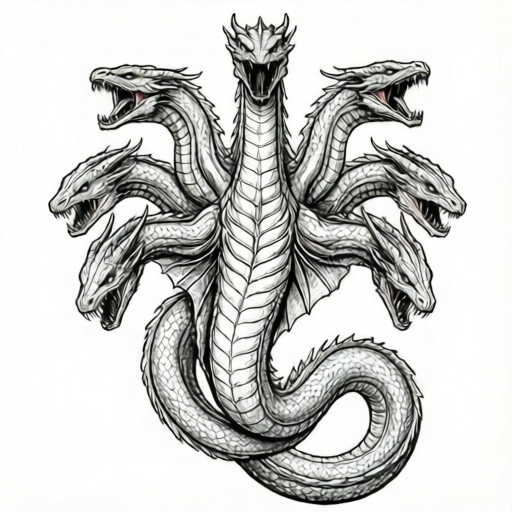
Use the stated measurements and conventions for each exercise.
Build the shared body mass first
Start with a single rounded body mass, wider at the chest and tapering toward the tail. This mass is the anchor for every neck. Draw it lightly so you can adjust it. A useful convention is to treat the body mass as an oval whose width is about three head-widths and whose height is about two head-widths. These numbers are hypothetical; choose values that fit your paper.
Mark a shoulder zone along the top edge of the body mass. All necks will originate from this zone, not from scattered points. This keeps the hydra readable as one creature rather than a bundle of separate snakes.
- Draw a light oval for the body mass.
- Mark a shoulder zone along the top third of the oval.
- Add a tail taper from the rear of the oval.
- Check that the body mass is wide enough for the planned number of necks.
Place neck connection lines before heads
Each neck needs a connection line from the shoulder zone to a head placement circle. Draw these lines as gentle curves, not straight spokes. Spread the origins across the shoulder zone so necks do not overlap at the base. A practical convention is to keep neck thickness roughly equal to one-third of head width; this is a chosen value, not a standard.
Number the connection lines lightly. This helps you keep track when adding heads and lets you vary head count without redrawing the body.
- Draw one curved connection line per planned head.
- Space the origins evenly across the shoulder zone.
- Keep neck thickness consistent using the one-third head-width convention.
- Number each line for reference.
Add head placement circles and final head shapes
Place a circle at the end of each connection line. The circle marks head size and position before you draw details. Vary the circle positions slightly in height and angle so the heads do not look stamped. Then draw each head inside its circle using a simple wedge or rounded shape, with the jaw line facing outward from the body.
Because head styles vary, the rubric accepts any clear head shape that fits its circle and connects visibly to its neck. The goal is readable connection, not a single correct head design.
- Draw one placement circle per connection line.
- Vary circle height and angle slightly.
- Draw each head inside its circle.
- Confirm every head connects to a neck and every neck connects to the body mass.
Vary head count with the blank hydra box
To practice variation, draw a blank rectangular box beside your hydra. Inside it, sketch the same body mass but change the number of connection lines and placement circles. Use the same conventions so the new version stays coherent. This box is a planning space, not a finished drawing.
When changing head count, recheck that the shoulder zone can hold all neck origins without crowding. If origins overlap, widen the body mass or reduce neck thickness slightly.
- Draw a blank box beside the main drawing.
- Sketch the body mass again inside the box.
- Add a different number of connection lines and circles.
- Compare crowding at the shoulder zone and adjust.
Worked example
A hydra body mass is 12 cm wide and 8 cm tall. Using the hypothetical convention that body width equals three head-widths, find the head width. Then state how many necks of one-third head width can fit if each origin needs 1 cm of shoulder zone.
Worked answer
Head width = 12 ÷ 3 = 4 cm. Neck thickness = 4 ÷ 3 ≈ 1.33 cm. Shoulder zone length is hypothetical at 8 cm; 8 ÷ 1 = 8 origins maximum. So up to 8 necks fit by this spacing rule.
Why: Divide body width by three to get head width. Divide head width by three for neck thickness. Divide shoulder zone length by required spacing per origin.
Check: Multiply head width by three to recover body width: 4 × 3 = 12 cm. Multiply neck thickness by three to recover head width: 1.33 × 3 ≈ 4 cm.
Four practice exercises
Exercise 1
A body mass is 15 cm wide. Using the three-head-width convention, find head width and neck thickness at one-third head width.
Show answer and check
Head width = 5 cm; neck thickness ≈ 1.67 cm.
Why: 15 ÷ 3 = 5 cm head width. 5 ÷ 3 ≈ 1.67 cm neck thickness.
Check: 5 × 3 = 15 cm body width; 1.67 × 3 ≈ 5 cm head width.
Exercise 2
A shoulder zone is 9 cm long and each neck origin needs 1.5 cm spacing. How many necks fit?
Show answer and check
6 necks.
Why: 9 ÷ 1.5 = 6.
Check: 6 × 1.5 = 9 cm.
Exercise 3
A hydra has 4 heads. If each neck is 6 cm long and the body mass is 10 cm tall, what is the total vertical span from body bottom to the highest head circle if one head circle sits 2 cm above its neck end? Use hypothetical values.
Show answer and check
18 cm.
Why: Body height 10 cm plus neck length 6 cm plus 2 cm offset = 18 cm.
Check: 10 + 6 + 2 = 18 cm.
Exercise 4
You plan 5 necks with 1.2 cm spacing per origin. What minimum shoulder zone length is needed?
Show answer and check
6 cm.
Why: 5 × 1.2 = 6 cm.
Check: 6 ÷ 1.2 = 5 origins.
Common mistakes
- Drawing heads first and forcing the body to fit them. Draw the body mass and shoulder zone first, then place heads.
- Scattering neck origins across the whole body. Keep all origins inside the marked shoulder zone.
- Making necks different thicknesses without reason. Apply the one-third head-width convention consistently.
- Placing all head circles at the same height and angle. Vary height and angle slightly while keeping connections clear.
Self-check rubric
- Body mass is drawn first and is wide enough for the planned necks.
- A shoulder zone is marked and all neck origins lie inside it.
- Each neck has a connection line from the shoulder zone to a placement circle.
- Neck thickness follows a stated convention consistently.
- Each head fits inside its placement circle and connects visibly to its neck.
- Head positions vary slightly in height or angle.
- The blank hydra box shows a different head count using the same conventions.
- Valid alternative head styles and neck thickness conventions are accepted if stated and consistent.
Questions and answers
How many heads should a hydra have?
Any number that fits your shoulder zone. The construction method works for three or more; choose a count you can space evenly.
Do all necks need the same length?
No. Vary length for interest, but keep each neck visibly connected to the body mass.
What if my head shapes look different from each other?
That is acceptable. The rubric checks clear connection and fit inside the placement circle, not identical head styles.
Can I use a different neck thickness convention?
Yes, as long as you state your chosen value and apply it consistently. The one-third value is a hypothetical example.