Free original lessons
Draw a Peace Hand Sign: Finger Placement and Palm Angle
Learn to draw the two-finger peace gesture with clear spacing, thumb fold, and palm orientation from front and side views using a simple convention.
Free lesson
Four exercises
Worked answers
Object Drawing Lessons
This lesson teaches a single focused drawing skill: the peace hand sign made with the index and middle fingers extended and separated, the ring and little fingers folded, and the thumb folded across them. You will use a defined line convention so that finger spacing and palm angle are checkable rather than subjective. The convention is: draw the palm as a rounded rectangle, the wrist as a short cylinder, extended fingers as tapered capsules with a visible gap, and folded fingers as small arcs tucked behind the thumb. X-height means the distance from the baseline to the midline of a letter; here we borrow the term to mean the height of the folded-finger arcs above the palm baseline. Letter styles vary, so treat all numerical values as hypothetical examples you can adjust after measuring your own paper and pencil. The goal is a readable gesture, not a photorealistic hand.
Practice materials: Printable downloads are not available for this lesson yet. Use the instructions and four exercises below.
Reference illustration
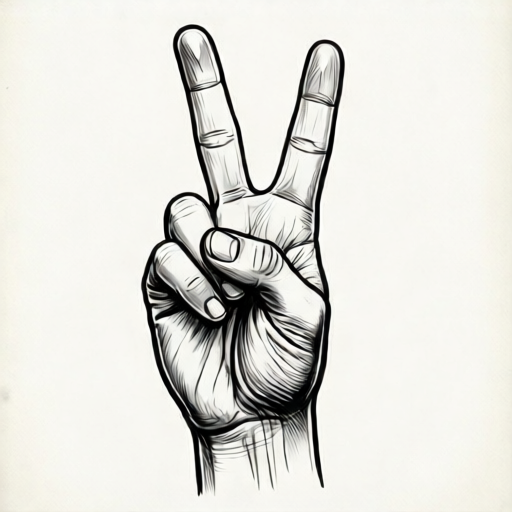
Use the stated measurements and conventions for each exercise.
Set the palm and wrist frame
Begin with a rounded rectangle for the palm, wider than it is tall. A hypothetical example is 7 cm wide and 6 cm tall on A4 paper. Draw a short cylinder below it for the wrist, about 3 cm tall, centered under the palm. Mark a baseline at the bottom of the palm and a midline halfway up the palm; these guide finger placement.
Decide palm orientation before adding fingers. For a front view, the palm faces the viewer and the thumb sits on the left or right depending on which hand you draw. For a side view, the palm becomes a narrow wedge and the extended fingers overlap slightly. Keep the wrist cylinder aligned with the palm so the gesture reads as one hand.
- Draw the palm rounded rectangle and label its baseline and midline.
- Add the wrist cylinder below the palm, centered.
- Choose front or side view and sketch a light center line through the palm.
- Check that the palm width is greater than its height using a ruler.
Place the two extended fingers
The index and middle fingers rise from the top edge of the palm. Draw each as a tapered capsule: a rounded tip, straight sides, and a base that meets the palm. Leave a visible gap between them. A hypothetical gap is 1 cm at the base and 1.5 cm at the tips, but measure your own drawing and keep the gap consistent. The middle finger is usually slightly longer; a hypothetical difference is 0.5 cm.
Finger spacing is the key check. The gap should be wide enough to see the background between the fingers and narrow enough that the two fingers still read as a pair. If the gap closes at the tips, redraw the capsules with parallel sides. If the gap is wider than one finger width, bring the bases closer together.
- Mark two base points on the palm top edge, separated by the chosen gap.
- Draw the index finger capsule from its base to a rounded tip.
- Draw the middle finger capsule beside it, slightly longer if you choose.
- Measure the gap at base and tip and adjust until it is visible and even.
Fold the ring and little fingers and the thumb
Fold the ring and little fingers into small arcs that sit behind the thumb. Use the x-height convention: the arcs rise from the palm baseline to the midline, so their height equals half the palm height. A hypothetical arc height is 3 cm on a 6 cm palm. Draw each folded finger as a short curved line with a rounded end, not a full finger.
The thumb folds across the folded fingers. Draw it as a thicker capsule lying diagonally from the side of the palm toward the center. Its tip should overlap the folded-finger arcs without hiding them completely. Check that the thumb does not cross the extended fingers; it stays below them.
- Draw two small arcs from the palm baseline to the midline for the folded fingers.
- Draw the thumb capsule diagonally across the folded arcs.
- Check that the thumb tip overlaps but does not cover the arcs entirely.
- Confirm the extended fingers remain clear above the thumb.
Check palm angle and side view
Palm angle controls whether the gesture looks relaxed or stiff. For the front view, keep the palm vertical and the extended fingers pointing upward. For the side view, tilt the palm wedge about 30 degrees from vertical as a hypothetical example, and let the extended fingers lean slightly forward. The thumb fold should still be visible from the side as a short diagonal.
Use a simple check: draw a light line from the wrist center to the gap between the extended fingers. In the front view this line should be nearly vertical; in the side view it should tilt consistently with the palm. If the line bends sharply, adjust the wrist or finger bases so the gesture reads as one continuous hand.
- Draw a guide line from wrist center to the finger gap.
- Compare the guide line angle with your chosen palm angle.
- Redraw the wrist or finger bases if the line bends sharply.
- Repeat for the side view using a narrower palm wedge.
Worked example
Draw a front-view peace hand sign on a 7 cm wide by 6 cm tall palm with a 1 cm base gap and 1.5 cm tip gap. The middle finger is 0.5 cm longer than the index finger. Fold the ring and little fingers to the midline and place the thumb diagonally across them.
Worked answer
Palm rounded rectangle 7 cm wide by 6 cm tall; wrist cylinder 3 cm tall centered below. Index finger capsule 5 cm long, middle finger 5.5 cm long, bases separated by 1 cm and tips by 1.5 cm. Folded-finger arcs rise 3 cm from baseline to midline. Thumb capsule lies diagonally from the palm side toward the center, tip overlapping the arcs but not the extended fingers. Guide line from wrist center to finger gap is nearly vertical.
Four practice exercises
Exercise 1
A front-view palm is 8 cm tall. Using the x-height convention, how high should the folded-finger arcs rise from the baseline?
Show answer and check
4 cm.
Why: The convention sets the arcs from baseline to midline, and the midline is half the palm height. Half of 8 cm is 4 cm.
Check: Measure the palm height with a ruler, divide by two, and compare with the drawn arc height.
Exercise 2
An index finger capsule is 6 cm long and the middle finger is 6.5 cm long. The base gap is 1 cm and the tip gap is 1.5 cm. What is the total width across the two fingertips if each fingertip is 1 cm wide?
Show answer and check
3.5 cm.
Why: Add the two fingertip widths (1 cm + 1 cm = 2 cm) and the tip gap (1.5 cm): 2 + 1.5 = 3.5 cm.
Check: Measure the drawn tip gap and both fingertip widths, then add them in the same units.
Exercise 3
A side-view palm wedge is tilted 30 degrees from vertical. The guide line from wrist center to finger gap should tilt consistently. If the guide line tilts 10 degrees, is the drawing consistent?
Show answer and check
No, it is inconsistent.
Why: The guide line should follow the palm angle. A 10-degree tilt differs from the chosen 30-degree palm angle by 20 degrees, which is a sharp bend.
Check: Measure both angles with a protractor and compare; adjust the wrist or finger bases if the difference is large.
Exercise 4
A thumb capsule overlaps the folded-finger arcs by 1 cm. The arcs rise 3 cm above the baseline, and the extended fingers begin 5 cm above the baseline. Does the thumb tip stay below the extended fingers?
Show answer and check
Yes, the thumb tip stays below the extended fingers.
Why: The thumb tip reaches 1 cm above the arc top, so its highest point is 3 + 1 = 4 cm above the baseline. The extended fingers begin at 5 cm above the baseline. Since 4 cm is less than 5 cm, the thumb tip remains 1 cm below the extended fingers.
Check: Measure the arc height, the thumb overlap above the arc top, and the height where the extended fingers begin, all from the same baseline. Add arc height plus overlap and confirm the sum is less than the extended-finger base height; redraw if the tip enters the finger gap.
Common mistakes
- The two extended fingers touch at the tips, closing the gap. Redraw the capsules with parallel sides and measure the gap at both base and tip; keep it visible.
- The thumb crosses over the extended fingers instead of folding below them. Lower the thumb capsule so its tip overlaps only the folded-finger arcs, not the index or middle finger.
- The folded fingers are drawn as full-length fingers. Use the x-height convention: draw short arcs from baseline to midline only.
- The palm and wrist are misaligned, making the hand look broken. Center the wrist cylinder under the palm and check with a vertical guide line.
Self-check rubric
- Palm and wrist are aligned and the palm is wider than tall.
- Two extended fingers are separated by a visible gap at base and tip.
- Folded fingers are drawn as short arcs from baseline to midline.
- Thumb folds across the folded fingers without crossing the extended fingers.
- Palm angle is consistent with the chosen front or side view.
- Valid alternatives are accepted if the gesture reads clearly and the gap and fold checks pass.
Questions and answers
Which hand should I draw?
Either hand is valid. Choose one and keep the thumb on the correct side for that hand in both front and side views.
How wide should the finger gap be?
There is no universal value. Measure your own drawing and keep the gap visible at base and tip; a hypothetical example is 1 cm at the base and 1.5 cm at the tips.
Can I use different finger lengths?
Yes. Letter styles and hand shapes vary. Keep the middle finger slightly longer if you choose, and check that both fingers still read as a pair.
What does x-height mean here?
It is borrowed from lettering to mean the height of the folded-finger arcs above the palm baseline. In this lesson the arcs rise from baseline to midline.