Free original lessons
Draw a Penny: Rim, Profile and Lettering Layout
Learn to draw a penny face with a clear rim, a centered profile portrait and evenly spaced lettering zones using simple measured steps.
Free lesson
Four exercises
Worked answers
Object Drawing Lessons
This lesson teaches a reliable way to draw a penny face: an outer rim, an inner field, a profile portrait placed with measured spacing, and lettering arranged in readable zones. You will use a defined drawing convention so that valid variations in letter style and profile detail are accepted. All measurements are hypothetical examples; measure your own paper and coin reference to set real values. The goal is a clean, balanced coin face that reads clearly at a glance, not a perfect replica of any specific minted coin.
Practice materials: Printable downloads are not available for this lesson yet. Use the instructions and four exercises below.
Reference illustration
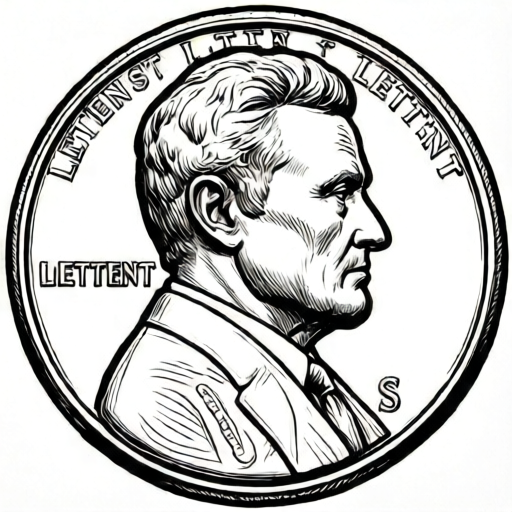
Use the stated measurements and conventions for each exercise.
Set the coin boundary and rim
Begin by deciding the overall coin diameter on your paper. For this lesson, assume a hypothetical coin diameter of 80 mm. Mark the center and draw a light construction circle at that diameter. The rim is the raised border; represent it as a band between the outer circle and an inner circle. A hypothetical rim thickness of 4 mm gives an inner field diameter of 72 mm. Keep these values consistent throughout the drawing.
Draw the rim as two concentric circles, not as a single thick line. The outer circle defines the coin edge; the inner circle defines the field where the profile and lettering sit. Lightly sketch both, then darken the outer edge only after the profile and lettering are placed. This order prevents the rim from crowding the portrait.
- Mark the center point and draw a light circle at the chosen diameter.
- Draw a second circle inside the first at the chosen rim thickness.
- Label the outer band as rim and the inner area as field.
- Check that the gap between circles is even all around before continuing.
Place the profile portrait
The profile sits inside the field and faces one direction. Use a vertical centerline and a horizontal midline to position the head. A simple convention: the profile occupies about two-thirds of the field height, with the top of the head near the upper field edge and the neck ending near the lower field edge. Leave a small margin between the profile and the inner rim so the rim remains visible.
Build the profile from large shapes first: an oval for the skull, a wedge for the nose and brow, and a curved neck. Add the eye, ear and hair mass only after the outline is balanced. Letter styles and profile details vary between valid drawings; the rubric rewards clear placement and readable spacing rather than a single exact face.
- Draw a vertical centerline and a horizontal midline inside the field.
- Sketch the skull oval, then the brow and nose wedge.
- Add the neck curve and check the profile stays inside the field margin.
- Refine the eye, ear and hair mass without touching the inner rim circle.
Lay out lettering zones
Lettering on a coin face usually follows the rim. Define two lettering zones: an upper arc and a lower arc, each set just inside the inner rim circle. Use a light guide arc for each zone. Place letters with even spacing along the arc, keeping the baseline on the guide and the x-height between baseline and midline. Because letter styles vary, accept any clear sans-serif or serif style as long as spacing is even and letters do not cross the rim.
For a hypothetical layout, place six to eight characters on the upper arc and four to six on the lower arc. Mark tick marks along each guide arc at equal intervals before drawing letters. This makes spacing checkable: count the gaps, not the letters, and confirm each gap is approximately equal.
- Draw a light guide arc inside the upper rim and another inside the lower rim.
- Mark equal tick intervals along each arc for the chosen number of characters.
- Draw letters with the baseline on the guide and x-height between baseline and midline.
- Check that no letter crosses the inner rim circle and gaps are even.
Refine and check the drawing
Erase construction lines only after the rim, profile and lettering are stable. Darken the outer rim edge, then the inner rim circle, then the profile outline. Keep lettering lighter than the rim so the coin reads as a face first and text second. A final check uses simple arithmetic: outer diameter minus twice the rim thickness should equal the inner field diameter. For the hypothetical values, 80 minus 8 equals 72 mm.
Compare the drawing against the rubric: rim even, profile centered and inside the field, lettering on guide arcs with even gaps, and no element crossing the rim. Valid alternatives include different letter styles, slightly different profile details and different character counts, provided spacing and placement remain clear.
- Erase construction lines and darken the rim circles.
- Darken the profile outline and keep lettering lighter.
- Measure or visually check rim thickness is even around the coin.
- Confirm the inner field diameter using the arithmetic check.
Worked example
A learner draws a coin with an outer diameter of 60 mm and a rim thickness of 3 mm. They place a profile that touches the inner rim circle and lettering with uneven gaps. Identify the inner field diameter and two fixes.
Worked answer
Inner field diameter is 60 minus 2 times 3, which equals 54 mm. Fix one: shrink or shift the profile to leave a margin inside the inner circle. Fix two: draw guide arcs with equal tick intervals and place letters on the ticks so gaps are even.
Four practice exercises
Exercise 1
A coin has an outer diameter of 70 mm and a rim thickness of 5 mm. Calculate the inner field diameter and state one placement rule for the profile.
Show answer and check
Inner field diameter is 70 minus 10, which equals 60 mm. The profile should sit inside the 60 mm field with a small margin from the inner rim circle.
Why: Rim thickness appears on both sides, so subtract twice the thickness from the outer diameter. Placement keeps the rim visible and the profile balanced.
Check: Recompute 70 minus 2 times 5 and confirm the result is 60 mm; visually check the profile does not touch the inner circle.
Exercise 2
You plan eight characters on the upper guide arc. Describe how to mark spacing before lettering and one check that gaps are even.
Show answer and check
Mark eight equal tick intervals along the guide arc, then place one character on each tick. Check by counting the gaps between adjacent characters and confirming each gap is approximately equal.
Why: Tick marks convert spacing into a countable pattern, making even gaps checkable before letters are drawn.
Check: Count the gaps, not the letters; compare adjacent gaps visually or with a small paper strip.
Exercise 3
A drawing has an outer diameter of 90 mm and an inner field diameter of 80 mm. What rim thickness was used, and does the arithmetic check pass?
Show answer and check
Rim thickness is 5 mm because 90 minus 80 equals 10, and 10 divided by 2 equals 5. The check passes: 90 minus 2 times 5 equals 80 mm.
Why: The difference between outer and inner diameters is twice the rim thickness. Dividing by two gives the single-side thickness.
Check: Multiply the rim thickness by 2 and subtract from the outer diameter; confirm the result matches the inner diameter.
Exercise 4
A learner's lettering crosses the inner rim circle and the profile is off-center. List two fixes and one rubric item that addresses each fix.
Show answer and check
Fix one: redraw guide arcs inside the inner circle and move letters inward; rubric item: lettering stays inside the inner rim circle. Fix two: use the vertical centerline to reposition the profile; rubric item: profile placed inside the field with a visible margin.
Why: Each fix targets a specific placement error, and the rubric names the observable condition that confirms the fix.
Check: After redrawing, check no letter crosses the inner circle and the profile is balanced around the centerline.
Common mistakes
- Drawing the rim as one thick line instead of two circles. Draw an outer circle and an inner circle separated by the chosen rim thickness, then check the gap is even.
- Letting the profile touch or cross the inner rim circle. Leave a small margin between the profile and the inner circle; shrink the profile slightly if needed.
- Spacing letters by eye without guide arcs or tick marks. Draw light guide arcs and equal tick intervals before lettering, then place each character on a tick.
- Making lettering darker than the rim and profile. Keep lettering lighter so the coin reads as a face first and text second.
Self-check rubric
- Rim drawn as two concentric circles with an even gap all around.
- Profile placed inside the field with a visible margin from the inner rim circle.
- Lettering follows guide arcs with even gaps and stays inside the inner rim circle.
- Lettering is lighter than the rim and profile so the face reads first.
- Arithmetic check for inner field diameter is correct and units are consistent.
- Valid alternatives in letter style, profile detail and character count are accepted when placement and spacing are clear.
Questions and answers
Do I need an exact coin reference to draw a penny?
No. Use a simple reference for proportions, but the lesson teaches placement and spacing. Valid drawings may vary in profile detail and letter style.
What does x-height mean here?
X-height is the distance from the baseline to the midline of lowercase letters. Keep letters between baseline and midline on the guide arc.
How many letters should I place on each arc?
Choose a count that fits your guide arc with even gaps. A hypothetical layout uses six to eight on the upper arc and four to six on the lower arc.
Are the millimeter values required?
No. They are hypothetical examples. Measure your own paper and reference, then keep your chosen values consistent.