Free original lessons
Realistic Banana Drawing: Curvature, Ridges, and Shading
Learn to draw a realistic banana by mapping its curve, placing longitudinal ridges, and shading the tip and body with simple, checkable steps.
Free lesson
Four exercises
Worked answers
Object Drawing Lessons
A realistic banana is defined by three visible cues: a smooth, asymmetric curve; several longitudinal ridges that run from stem to tip; and shading that makes those ridges read as rounded volume. This lesson breaks the banana into a curved centerline, ridge lines, and a small set of tonal zones. You will use a defined convention for line placement and a rubric that accepts valid stylistic variation, so the goal is believable structure rather than one exact copy. All measurements are hypothetical examples; measure your own paper and tools before drawing.
Practice materials: Printable downloads are not available for this lesson yet. Use the instructions and four exercises below.
Reference illustration
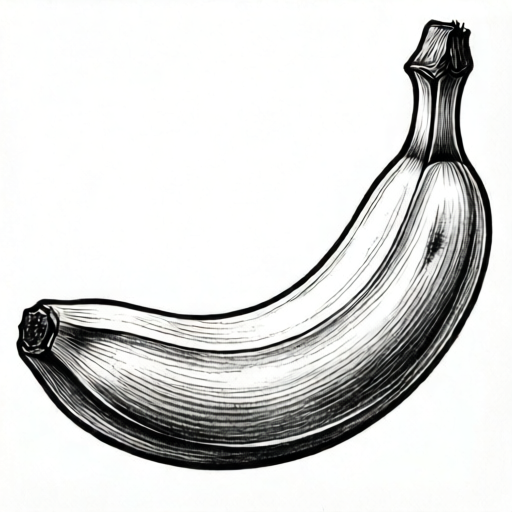
Use the stated measurements and conventions for each exercise.
Map the curve and body outline
Start by drawing a single curved centerline that bends like a shallow crescent. The banana is not a symmetrical arc: one side is usually fuller near the middle, and the ends taper differently. Mark a stem end and a tip end on the centerline, then sketch the outer contour as two unequal curves around it. Keep the body widest slightly past the midpoint toward the fuller side.
Use light pencil so the contour can be adjusted. Check the curve by comparing the distance from the centerline to each side at three points: near the stem, at the widest part, and near the tip. The two sides should not mirror each other exactly. A common error is making the banana too straight or too symmetrical, which removes the natural crescent feel.
- Draw a shallow crescent centerline and label stem and tip ends.
- Mark three width points along the centerline: near stem, widest, near tip.
- Sketch the fuller side with a gentle outward bulge.
- Sketch the flatter side with a subtler curve.
- Refine the taper at both ends so neither end looks cut off.
Place longitudinal ridges
Bananas show several lengthwise ridges that follow the curve. Use a simple convention: draw three to five ridge lines that run roughly parallel to the centerline, spaced unevenly. Ridges are not perfectly straight; they bow slightly with the body and converge near the tip. Place the most visible ridge slightly off-center on the fuller side, then add one or two fainter ridges on the flatter side.
Ridge lines should stop before the very tip and fade near the stem. Do not draw them as hard, uniform stripes. Vary line weight: stronger where the ridge catches a shadow edge, lighter where it fades. This convention allows different ridge counts and spacing while keeping the banana-specific structure.
- Choose three to five ridge paths following the centerline curve.
- Space them unevenly, with one dominant ridge off-center.
- Bow each ridge slightly and taper it near the tip.
- Fade ridge lines near the stem end.
- Vary line weight to suggest rounded ridges.
Shade ridges, body, and tip
Shading makes the ridges read as rounded forms. Decide on a single light direction, for example from the upper left. The fuller side facing the light gets the lightest tone; the opposite side and the gaps between ridges get darker tone. Shade along the ridge direction, not across it, so the pencil strokes support the lengthwise structure.
The tip usually darkens and narrows. Add a small darker zone at the tip and a soft transition into the body. The stem end can be slightly darker as well. Keep the midbody lightest to suggest a rounded surface. Use a hypothetical value scale of 1 to 5, where 1 is paper white and 5 is dark pencil, and aim for no more than three values on the body plus one darker tip value.
- Choose one light direction and mark it lightly outside the banana.
- Shade the side away from the light with value 3 or 4.
- Leave the lit fuller side at value 1 or 2.
- Darken the gaps beside the dominant ridge with value 3.
- Add a small value 4 or 5 zone at the tip and soften the transition.
Check realism and refine
Step back and check three things: the curve reads as a crescent, the ridges follow the body rather than crossing it, and the shading creates a rounded volume. If the banana looks flat, increase contrast between the lit side and the shadow side. If it looks striped, soften ridge lines and reduce the number of hard edges.
Refine the tip so it tapers to a small point or blunt end, not a wide cut. Check that the stem end is narrower than the widest body point. Erase any construction lines that compete with the final contour. The drawing is successful when a viewer can identify the banana from its curve, ridges, and shading without labels.
- Compare the curve to a shallow crescent.
- Trace each ridge to confirm it follows the body.
- Squint to check whether shading reads as volume.
- Soften any ridge line that looks like a stripe.
- Erase construction marks and confirm the tip taper.
Worked example
A learner draws a banana with a centerline that bows downward, a fuller left side, and three ridge lines. The light is from the upper right. Describe a shading plan using values 1 to 5 and a check for realism.
Worked answer
Keep the upper-right side of the body at value 1 or 2. Shade the lower-left side and the gaps between ridges at value 3. Add value 4 at the tip and a small value 3 near the stem. Check that the ridge lines bow with the centerline and fade near both ends. Squint: the lit side should read lighter than the shadow side, and the tip should be the darkest small zone.
Four practice exercises
Exercise 1
On a blank sheet, draw only the curved centerline and two outer contour lines for a banana. Make the left side fuller near the middle and the right side flatter. Mark stem and tip ends. Do not add ridges or shading.
Show answer and check
A shallow crescent with a fuller left bulge near the middle, a flatter right side, and tapered ends. The widest point sits slightly past the midpoint toward the left.
Why: This isolates the banana-specific curve and unequal side widths before adding surface detail.
Check: Measure the distance from the centerline to each side at three points. The left distance at the widest point should be greater than the right, and both ends should taper.
Exercise 2
Using your outline from the first exercise, add three to five longitudinal ridge lines. Space them unevenly, bow them with the body, and fade them near the stem and tip. State how many ridges you used.
Show answer and check
Any count from three to five is valid if the ridges follow the curve, are unevenly spaced, and fade near the ends. One ridge should be more prominent than the others.
Why: Ridge count and spacing vary, so the check focuses on banana-specific structure rather than an exact pattern.
Check: Trace each ridge with your finger: it should run roughly parallel to the centerline and not cross it. Confirm the lines soften near both ends.
Exercise 3
Choose a light direction and shade the banana from the second exercise using values 1 to 5. Keep the lit side at 1 or 2, the shadow side at 3, and the tip at 4. Describe your light direction in one sentence.
Show answer and check
A valid response states one light direction, keeps the lit side lighter, shades the opposite side and ridge gaps at value 3, and darkens the tip to value 4.
Why: Shading is checked against the learner's stated light direction, allowing different valid choices.
Check: Squint at the drawing. The side facing the stated light should be lighter than the opposite side, and the tip should be the darkest small zone.
Exercise 4
Draw a complete realistic banana from memory using the convention in this lesson. Include the curve, three to five ridges, and shading with a consistent light direction. Then write one sentence explaining how your tip taper supports realism.
Show answer and check
A complete banana with a shallow crescent, unequal side widths, three to five bowed ridges, and shading that matches a stated light direction. The tip should narrow and darken slightly.
Why: This combines all banana-specific cues and asks the learner to justify the tip treatment.
Check: Use the rubric: check curve, ridge placement, shading consistency, and tip taper. The explanation should mention narrowing or darkening at the tip.
Common mistakes
- Drawing a symmetrical arc with equal sides. Make one side fuller near the middle and keep the opposite side flatter; check widths at three points.
- Drawing ridge lines as straight, evenly spaced stripes. Bow the ridges with the body, space them unevenly, and fade them near the ends.
- Shading across the banana instead of along the ridges. Direct pencil strokes lengthwise so shading supports the ridge structure.
- Making the tip wide or blunt like a cut stem. Taper the tip to a small point or narrow blunt end and darken it slightly.
Self-check rubric
- Curve reads as a shallow crescent with unequal side widths.
- Widest point is slightly past the midpoint toward the fuller side.
- Three to five ridge lines follow the body curve and fade near the ends.
- Ridge spacing is uneven and at least one ridge is dominant.
- Shading uses a consistent light direction and supports rounded volume.
- Tip tapers and is slightly darker than the midbody.
- No hard stripe-like ridge lines or symmetrical arc.
- Construction lines are erased or subordinate to the final contour.
Questions and answers
How many ridges should a realistic banana show?
Three to five visible ridge lines is a practical convention. The exact number varies by banana and view, so choose a count that fits your curve and keep spacing uneven.
Do I need to measure the banana exactly?
No. Use simple relative checks: the widest point is past the midpoint toward the fuller side, and the stem end is narrower than the body. Any numerical values in this lesson are hypothetical examples.
Can I use a different light direction?
Yes. Choose one light direction and keep it consistent. The rubric checks whether shading matches your stated direction, not a single universal direction.
What if my banana looks like a crescent moon?
Add the ridge lines and uneven side widths. A crescent lacks the longitudinal structure and the fuller middle that make a banana read as a banana.