Free original lessons
Realistic Crab Drawing: Anatomy, Texture, and Shading
Learn crab-specific anatomy, species-reference-led surface texture, and shading to draw a realistic crab with carapace, claws, and legs.
Free lesson
Four exercises
Worked answers
Object Drawing Lessons
This lesson builds a realistic crab drawing from a carapace, claws, jointed legs, texture, and shading. Use a named species reference when anatomy or surface marks matter: limb forms differ, and shell and claw textures vary. For example, NOAA’s Blue Crab page distinguishes three pairs of walking legs from a rear swimmer pair. The generic four-pair walking-leg pattern below is only a worksheet convention; copy texture marks only where they appear in the selected reference. All dimensions are hypothetical drawing examples.
Practice materials: Printable downloads are not available for this lesson yet. Use the instructions and four exercises below.
Reference illustration
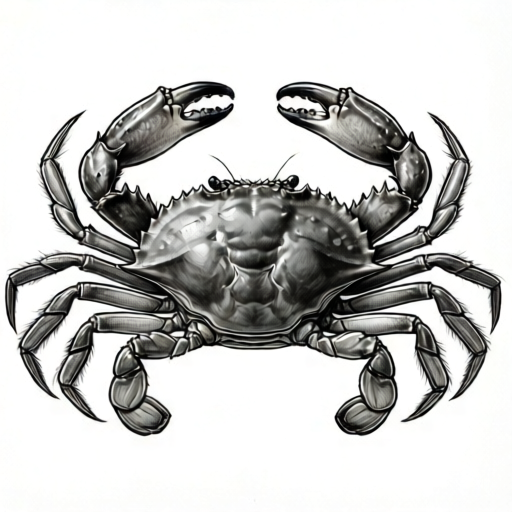
Use the stated measurements and conventions for each exercise.
Crab Anatomy: Carapace, Claws, and Legs
The carapace is the hard upper shell over the main body; the abdomen is folded underneath. A practice drawing can use a broad, slightly domed carapace with a curved or toothed front edge, but outline details vary by species. Keep the shell asymmetrical enough to avoid a perfect-oval look, and compare its front margin with the selected reference.
For this generic true-crab practice pattern, show one pair of claws and four pairs of walking legs, with the main joints drawn as short segments. This is a convention for the worksheet, not a count to impose on every crab. NOAA's Blue Crab species page shows three pairs of walking legs and a rear swimmer pair; identify swimming paddles separately when drawing that species. A named reference also helps with joint shapes and leg angles.
- Draw a broad carapace with a slight front dip and a species-appropriate margin.
- For the generic practice pattern, mark four walking-leg attachment points on each side.
- Sketch one pair of claws extending from the front sides.
- Add visible joint segments and compare their number and angles with the selected species reference.
Copy Species-Specific Crab Surface Texture
Crab surfaces do not share one universal texture. A primary species description calls the dorsal carapace of Gecarcinus nobilii smooth while noting weak granules along particular margins; Virginia Institute of Marine Science describes the Atlantic rock crab carapace and pincer ridges as granulated. Choose one named reference and copy only the surface features it shows. Use short marks that follow the form where texture is visible, and leave smooth areas clean; do not add generic bumps, pits, or ridges to every crab.
Claw and leg surface details are also reference-specific. Do not add bumps, spines, or setae by default. Copy those marks only when they are visible in the chosen species reference; otherwise define the appendages with their contours and joints. Keep texture secondary to the observed silhouette and use shading separately to show the chosen light direction.
- Lightly sketch the main contour of the carapace and claws.
- Copy only carapace marks visible in the named reference; leave smooth regions unmarked.
- Add claw ridges or granulation only where the chosen species reference shows them.
- Add short marks for spines or setae only if they are visible in the chosen species reference; otherwise keep the leg surfaces untextured.
Shading for Depth and Realism
Shading gives the crab a three-dimensional appearance. Determine a light source, for example from the upper left. The carapace will have a highlight on the upper left, midtones across the center, and shadows on the lower right and underneath. Use a range of pencil pressures: light for highlights, medium for midtones, and dark for shadows. Blend gently with a tortillon or your finger to smooth transitions, but keep some texture visible.
The claws and legs also need shading. The underside of the claws and the inner sides of the legs are in shadow. Cast shadows on the ground plane help anchor the crab. Pay attention to the joints: they often have a darker crease. Use cross-hatching or stippling for textured areas, but keep the shading consistent with the form. A common mistake is to shade everything evenly; instead, vary the intensity to show curvature.
- Decide on a light source and mark the highlight areas lightly.
- Shade the carapace from light to dark, following its curvature.
- Add shadows under the claws and legs, and darken the joints.
- Draw a cast shadow on the ground to ground the crab.
Putting It Together: From Sketch to Finished Drawing
Start with a light pencil sketch, establishing the carapace, claws, and legs. Check anatomy against your chosen species reference: in this hypothetical worksheet example, carapace width is about twice claw length, and the legs extend far enough to support the body. Once the basic shapes are correct, refine the contours and copy only texture visible in that reference. Apply shading gradually, building layers from the stated light source. Add eye stalks and other surface details only when the same reference shows them. Erase unnecessary guides.
Remember that realism comes from observation and practice. Use the rubric to assess your work, focusing on anatomy, texture, and shading. The exercises below provide structured practice to reinforce these skills.
- Sketch the basic shapes lightly and check proportions.
- Refine contours and add only texture details visible in the selected species reference.
- Apply shading in layers, from light to dark.
- Review and adjust using the rubric criteria.
Worked example
Draw a top-down practice crab with a hypothetical 10 cm carapace width, 5 cm claw length, and 15 cm leg span. Use an Atlantic rock crab surface reference described as having a granulated carapace and granulated pincer ridges. Light the drawing from the upper left; copy only those described texture areas and do not invent leg hairs.
Worked answer
Begin with a light sketch: draw a carapace 10 cm wide and 6 cm tall. For this worksheet convention, mark four leg attachment points on each side; verify the actual limb form against the selected species reference. Draw claws extending forward, each 5 cm long, and arrange the legs to reach a total span of 15 cm. For texture, copy the granulated carapace and pincer ridges described for the Atlantic rock crab; leave other surfaces unmarked unless the reference shows additional details. With light from upper left, keep the upper-left carapace lighter, midtone the center, and shade the lower right and undersides. Check the hypothetical proportions: carapace width is twice claw length and leg span is 1.5 times carapace width.
Four practice exercises
Exercise 1
Sketch a crab carapace from a top-down view. Make the carapace 8 cm wide and 5 cm tall. Along each side, mark four leg attachment points as small dots, spaced at roughly equal intervals between the front margin and the rear: place the first dot about 1 cm back from the front edge and the last dot about 1 cm forward of the rear edge, so the four dots lie within the middle 3 cm of the 5 cm height. Draw the claws extending forward from the front sides, each 4 cm long. Use light pencil lines.
Show answer and check
A correct sketch shows an oval 8 cm wide and 5 cm tall, with a slight front dip. Eight leg attachment points (four per side) are marked along the sides, spaced at roughly equal intervals between about 1 cm back from the front edge and about 1 cm forward of the rear edge. Claws extend forward from the front sides, each 4 cm long, with fingers slightly open. Proportions: carapace width twice claw length.
Why: The carapace dimensions and claw length are given; spacing leg points evenly ensures natural arrangement. The front dip adds realism.
Check: Measure the carapace width (8 cm) and height (5 cm) with a ruler; verify each claw is 4 cm long; count eight leg attachment dots (four per side). On each side, check that the first dot is about 1 cm back from the front edge and the last is about 1 cm forward of the rear edge, so the four dots lie within a 3 cm span, and that they are roughly evenly spaced within that span.
Exercise 2
Draw a top-down crab with an 8 cm by 5 cm carapace and two 4 cm forward claws. Use this named reference description: the Atlantic rock crab carapace and pincer ridges are granulated. Add small marks only to those areas, and leave other surfaces unmarked unless a visible reference detail is specified.
Show answer and check
The outline remains clear. Small surface marks indicate the Atlantic rock crab’s granulated carapace and pincer ridges; no generic bumps or leg hairs are added where the reference does not show them.
Why: The named reference limits which textures belong in this practice drawing. The VIMS description identifies granulation on the carapace and pincer ridges, while details on other surfaces should be copied only if visible.
Check: Compare every texture mark with the named Atlantic rock crab reference. Keep granulation on the described carapace and pincer-ridge areas; remove marks that are not supported by the image or description.
Exercise 3
Draw a top-down crab with an 8 cm by 5 cm carapace, four walking-leg attachment points on each side, and two 4 cm forward claws. Use a light source from the upper left. Add a highlight on the upper left of the carapace, midtones in the center, shadows on the lower right and under the claws, and a cast shadow on the ground.
Show answer and check
Shading shows a gradient from light upper left to dark lower right on the carapace. Claws have shadows underneath. A cast shadow extends to the lower right on the ground.
Why: Consistent light source creates depth. Cast shadow anchors the crab.
Check: Verify that the lightest area is upper left and darkest is lower right; cast shadow direction matches light source.
Exercise 4
Draw a crab from a side view using this named reference description: the Atlantic rock crab carapace and pincer ridges are granulated. Show the domed carapace profile, one forward claw, and three visible legs with at least three segments each. Use hypothetical dimensions of 4 cm carapace height, 5 cm claw length, and about 2 cm per leg segment. Add marks only on the described areas and shade with light from above.
Show answer and check
The side view shows the stated carapace, claw, and visible jointed legs. Copy only reference-visible granulation or ridges; leave unsupported leg surfaces unmarked. Keep the highlight on top and shadows underneath for the stated light direction.
Why: The exercise separates anatomy, reference-led texture, and the chosen shading convention. The named source constrains surface marks; the light direction controls tone.
Check: Measure the stated dimensions and count at least three segments per visible leg. Compare each texture mark with the selected reference, then confirm the lightest values are on top and shadows below.
Common mistakes
- Drawing the carapace as a perfect circle or oval. Compare the outline with a named species reference and copy its visible irregularities; do not invent bumps as a substitute for the observed shape.
- Placing legs too close together or in a straight line. Space leg attachments evenly along the sides, and angle legs outward with slight variations in direction to show natural stance.
- Applying uniform shading without considering light source. Choose a consistent light source and vary shading intensity: lighter on the lit side, darker on the shadow side and underneath.
- Overdoing texture so it obscures the form. Copy only texture shown in the chosen species reference. Use the stated light direction for shading rather than adding marks to every shadow area.
Self-check rubric
- Carapace shape is wider than tall and shows slight natural irregularities.
- Claws are proportionate and show fixed and movable fingers.
- Legs attach in the locations and with the segment forms shown by the selected species reference.
- Surface marks, if present, match the selected species reference; smooth areas stay clean and texture does not obscure form.
- Shading indicates a consistent light source with highlights, midtones, and shadows.
- Overall drawing conveys a realistic crab, not a cartoon or other crustacean.
Questions and answers
What is the difference between a crab's carapace and its abdomen?
The carapace is the hard upper shell over the body. The abdomen is a separate region folded underneath; its visibility and shape depend on the species and view.
How many legs does a crab have, and how are they arranged?
Crab appendages vary by species. The generic practice pattern in this lesson uses a claw pair and four walking-leg pairs, but NOAA's blue-crab reference shows three walking pairs plus a rear swimmer pair. Match the species reference and identify paddles separately.
What pencil grades are useful for shading a crab drawing?
A range from 2H to 4B is sufficient: 2H for light highlights, HB for midtones, and 2B–4B for shadows. Use a blending tool for smooth transitions.
How can I make the shell texture look realistic without overcomplicating?
Use a named species reference as the guide. Some references show a smooth dorsal carapace while others describe granulation on the shell or pincer ridges; add those marks only where they occur. Draw leg spines or setae only if the same reference clearly shows them.