Free original lessons
Pencil Scary Scene: Doorway, Shadows, and Silhouette
Learn to compose a scary pencil scene with a doorway, shadow zones, and a silhouette. Includes layout, shading steps, common fixes, and four practice tasks.
Free lesson
Four exercises
Worked answers
Object Drawing Lessons
This lesson teaches a simple but effective scary scene in pencil: a doorway as the focal point, deliberate shadow zones to hide and reveal, and a silhouette to create unease. You will plan the composition first, then shade in layers, and finally check contrast and placement. The approach works on any paper and with any pencil; all numerical values are hypothetical examples to adapt to your own tools. The goal is a readable, atmospheric scene, not a cartoon or a single spooky object.
Practice materials: Printable downloads are not available for this lesson yet. Use the instructions and four exercises below.
Reference illustration
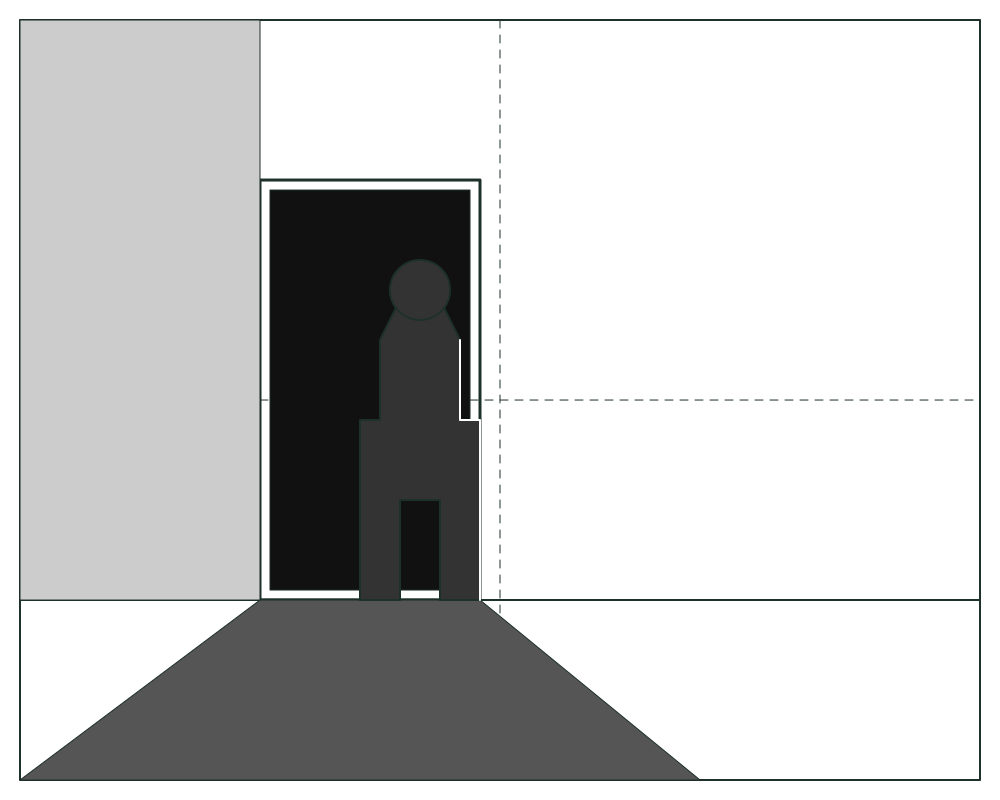
Use the stated measurements and conventions for each exercise.
Plan the composition before shading
Start with a light rectangle for your scene area. Place the doorway off-center, roughly one-third from a side edge, so the composition feels unstable rather than balanced. Mark a vertical midline and a horizontal midline to judge placement. The doorway should occupy about one-quarter to one-third of the scene height; this is a hypothetical proportion, so adjust to your paper size.
Define three shadow zones: a deep shadow inside the doorway, a mid-shadow band on the floor leading toward the viewer, and a soft shadow along one wall. Keep at least one lighter area so the silhouette reads against it. The silhouette should overlap the doorway edge or stand just inside it, never floating in the middle of empty space.
- Draw a light border rectangle for the scene.
- Mark vertical and horizontal midlines lightly.
- Place the doorway rectangle off-center; check its height against the scene height.
- Sketch the floor line and a wall line to establish depth.
- Mark shadow zones with light outlines: deep, mid, and soft.
- Place the silhouette so it overlaps the doorway edge or stands just inside.
Build shadows in layers
Shade with the side of the pencil for broad areas and the tip for edges. Work from light to dark: first a soft wall shadow, then the mid-shadow on the floor, then the deep shadow inside the doorway. Keep the silhouette darker than the mid-shadow but not necessarily the darkest area; the doorway interior can be darkest to suggest depth.
Use consistent pencil pressure and direction. For a checkable example, if your darkest doorway shading uses five light passes and the floor mid-shadow uses three, the silhouette can use four. These numbers are hypothetical; the principle is that values step gradually. Leave a lighter rim around the silhouette where it meets the doorway so the shape separates.
- Shade the soft wall shadow with light diagonal strokes.
- Shade the floor mid-shadow with slightly firmer strokes toward the doorway.
- Shade the doorway interior with layered passes until it is the darkest zone.
- Shade the silhouette with a value between the floor and doorway.
- Add a thin lighter rim where the silhouette overlaps the doorway.
- Check that at least one light area remains for contrast.
Refine the silhouette and doorway edges
A silhouette reads best when its outline is simple and its interior is mostly flat. Avoid detailed facial features; suggest posture with shoulders, head tilt, and arm position. The doorway edge should be crisp on the lit side and softer on the shadowed side. If the silhouette stands inside the doorway, keep its feet grounded on the floor line.
Check the scene by squinting: the doorway, silhouette, and main shadow band should still be distinguishable. If the silhouette disappears, lighten the area behind it or darken the silhouette slightly. If the doorway looks flat, add a subtle gradient inside it, darker at the back and lighter near the threshold.
- Simplify the silhouette outline to head, shoulders, and body mass.
- Ground the silhouette on the floor line or threshold.
- Crisp the lit doorway edge and soften the shadowed edge.
- Add a subtle gradient inside the doorway.
- Squint-check that the three main shapes remain readable.
Worked example
Compose a scene on a rectangle 12 cm wide and 16 cm tall. Place the doorway 4 cm from the left edge, 6 cm tall, and 4 cm wide. Put the silhouette just inside the doorway, overlapping its right edge. Mark a floor mid-shadow band 3 cm deep leading toward the viewer. Use hypothetical shading passes: doorway 5, silhouette 4, floor 3, wall 1.
Worked answer
The doorway sits off-center left, occupying about 6/16 of the height. The silhouette overlaps the right doorway edge and stands on the threshold. The floor band runs from the threshold toward the viewer, 3 cm deep. Values step from wall 1 to floor 3 to silhouette 4 to doorway 5, so the silhouette separates from the doorway. A lighter rim is left where the silhouette overlaps the doorway edge.
Four practice exercises
Exercise 1
On a 10 cm by 14 cm rectangle, place a doorway 3 cm from the right edge, 5 cm tall and 3 cm wide. Put a silhouette just inside the doorway, overlapping its left edge. Mark a floor shadow band 2 cm deep. Describe the placement and the value order using hypothetical passes: doorway 4, silhouette 3, floor 2, wall 1.
Show answer and check
Doorway off-center right, 5/14 of the height. Silhouette overlaps the left doorway edge and stands on the threshold. Floor band 2 cm deep toward the viewer. Values: wall 1, floor 2, silhouette 3, doorway 4. A lighter rim separates the silhouette from the doorway.
Why: Off-center placement creates unease; overlapping the doorway ties the silhouette to the focal point; gradual values keep the silhouette readable.
Check: Measure the doorway distance from the right edge and its height against the rectangle. Squint to confirm the silhouette separates from the doorway and the floor band is visible.
Exercise 2
A scene has a doorway centered and a silhouette floating 2 cm above the floor line. The doorway and silhouette are both shaded with 5 passes. List two fixes and state the new value order using hypothetical passes: doorway 5, silhouette 4, floor 3, wall 1.
Show answer and check
Fix 1: move the doorway off-center. Fix 2: ground the silhouette on the floor line. New order: wall 1, floor 3, silhouette 4, doorway 5, with a lighter rim where they overlap.
Why: Centering is static; floating breaks the ground plane; equal values collapse the silhouette into the doorway.
Check: Confirm the doorway is not centered, the silhouette touches the floor line, and squinting still shows three distinct values.
Exercise 3
Design a scene on a 12 cm by 18 cm rectangle. The doorway is 5 cm tall and 4 cm wide, placed 3 cm from the left edge. The silhouette stands inside the doorway, overlapping the right edge, and is 4 cm tall. The floor band is 3 cm deep. Assign hypothetical passes: doorway 5, silhouette 4, floor 2, wall 1. Describe one lighter area and where it sits.
Show answer and check
Doorway off-center left, 5/18 of the height. Silhouette 4 cm tall inside the doorway, overlapping the right edge, grounded on the threshold. Floor band 3 cm deep. Values: wall 1, floor 2, silhouette 4, doorway 5. The lighter area is the wall near the top-left, kept at 1 pass.
Why: The lighter wall area gives contrast; the silhouette is between floor and doorway in value; grounding and overlap tie the shapes together.
Check: Measure doorway height and silhouette height against the rectangle. Squint to confirm the top-left wall remains lighter and the silhouette separates from the doorway.
Exercise 4
A drawing has a doorway 6 cm tall on a 16 cm tall rectangle, a silhouette overlapping the doorway edge, and a floor band 4 cm deep. The doorway uses 5 passes, the silhouette 5 passes, the floor 3 passes, and the wall 1 pass. Identify the main problem and propose a corrected value order with a lighter rim.
Show answer and check
Problem: doorway and silhouette share 5 passes, so the silhouette disappears. Corrected order: wall 1, floor 3, silhouette 4, doorway 5, plus a lighter rim at the overlap.
Why: Equal values collapse the silhouette into the doorway; a stepped order and rim restore separation.
Check: Squint to see whether the silhouette reads against the doorway. If not, lighten the rim or adjust one value by one pass.
Common mistakes
- Centering the doorway and silhouette, making the scene feel static. Shift the doorway off-center and let the silhouette overlap its edge.
- Shading everything equally dark so the silhouette disappears. Keep a lighter area behind the silhouette and step values gradually.
- Adding facial details that break the silhouette effect. Keep the silhouette mostly flat and suggest posture instead.
- Floating the silhouette above the floor line. Ground the feet on the threshold or floor line.
Self-check rubric
- Doorway is off-center and occupies a plausible proportion of the scene.
- Three shadow zones are present and step gradually in value.
- Silhouette overlaps the doorway edge or stands just inside it.
- Silhouette is grounded on the floor line or threshold.
- At least one lighter area remains for contrast.
- Silhouette outline is simple and mostly flat.
- Doorway edge is crisper on the lit side and softer on the shadowed side.
- Scene reads when squinting: doorway, silhouette, and shadow band remain distinguishable.
Questions and answers
Do I need special pencils?
No. A single pencil works. If you have several, use softer ones for dark areas and harder ones for light shading, but the lesson does not require specific grades.
How dark should the doorway be?
Dark enough to suggest depth, but you can leave a faint gradient. The silhouette should still separate from it, so avoid making both equally dark.
Can the silhouette be outside the doorway?
Yes, as long as it overlaps the doorway edge or stands just inside. Avoid placing it in empty space away from the doorway.
How do I check my values without tools?
Squint at the drawing. The doorway, silhouette, and main shadow band should remain distinguishable. If not, adjust one value.