Free original lessons
Draw a Skeleton with Joint and Limb Landmark Checks
Learn to draw a proportional skeleton using joint landmarks and limb checks. Includes a convention, worked example, four practice tasks, and a rubric for valid alternatives.
Free lesson
Four exercises
Worked answers
Object Drawing Lessons
This lesson teaches a repeatable method for drawing a human skeleton with believable proportions. You will place joint landmarks first, then build limb segments and check them with simple arithmetic. The convention is explicit: x-height is measured from baseline to midline of each letter, and letter styles may vary. All measurements use the same unit, such as centimeters on your paper. Numerical values in examples are hypothetical; measure your own equipment and paper. The goal is not a single correct drawing but a defensible one that passes landmark and proportion checks.
Practice materials: Printable downloads are not available for this lesson yet. Use the instructions and four exercises below.
Reference illustration
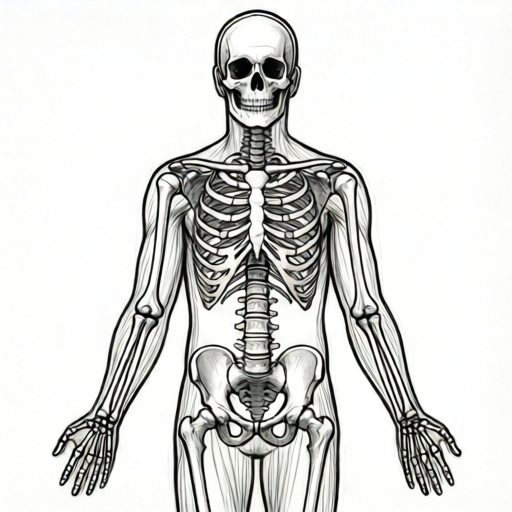
Use the stated measurements and conventions for each exercise.
Set the convention and measure your paper
Before drawing, define your unit. Use centimeters or millimeters consistently. Measure the usable height of your paper with a ruler and record it. For this lesson, suppose a hypothetical paper height of 24 cm and a skeleton height of 18 cm; these are examples, not standards.
X-height is baseline to midline. When you label letters or check spacing, measure from the baseline of the letter to its midline, not to the top. Letter styles vary, so accept any legible style that keeps the midline consistent.
Mark a vertical centerline and a baseline for the feet. Place the top of the skull at the chosen skeleton height above the baseline. Divide the total height into eight equal bands; these bands guide joint placement.
- Measure paper height and width; write the values in your unit.
- Choose skeleton height as a fraction of paper height, such as three-quarters.
- Draw a vertical centerline and a foot baseline.
- Divide the skeleton height into eight equal bands and label them 1 to 8 from top to bottom.
Place joint landmarks before bones
Joint landmarks are points, not shapes. Place the skull center, shoulder joints, elbow joints, wrist joints, hip joints, knee joints, and ankle joints. Use the eight bands to locate them: shoulders near band 2, hips near band 4, knees near band 6, ankles near band 8.
Keep left and right joints symmetric about the centerline unless you intentionally draw a pose. For a front view, set each shoulder joint about two band widths from the centerline (about 4.5 cm when band height is 2.25 cm), so the distance between the two shoulder joints is about 9 cm. Make each hip joint slightly less than two band widths from the centerline, so the distance between the two hip joints is slightly less than the distance between the shoulder joints. These are proportional guides, not fixed rules.
Check each joint against the band lines. If a joint sits more than half a band away from its guide, adjust it before drawing limbs.
- Mark skull center at the top of the height.
- Mark shoulder joints on band 2, symmetric about the centerline.
- Mark hip joints on band 4, slightly narrower than shoulders.
- Mark knee joints on band 6 and ankle joints on band 8.
- Mark elbow joints about one band above the hip band; mark wrist joints near the hip band.
Build limb segments and run arithmetic checks
Draw each limb as two segments meeting at a joint. The upper arm runs from shoulder to elbow; the forearm from elbow to wrist. The thigh runs from hip to knee; the shin from knee to ankle. Keep segment lengths consistent with your band spacing.
Use simple arithmetic to check proportions. If skeleton height is 18 cm and there are eight bands, each band is 2.25 cm. The upper arm should be about one and a half bands, or 3.375 cm in this hypothetical example. Measure your drawn segment and compare; a difference under 0.5 cm is acceptable for a sketch.
Check limb landmarks: the elbow should sit about one band above the hip band, the wrist near the hip band, the knee on band 6, and the ankle on band 8. If a segment is too long or short, adjust the joint, not the whole limb.
- Draw upper arm and forearm; measure each against band arithmetic.
- Draw thigh and shin; measure each against band arithmetic.
- Verify elbow about one band above the hip band, wrist near the hip band, knee on band 6, ankle on band 8.
- Record any difference greater than 0.5 cm and correct the joint placement.
Add bones and final landmark review
With joints placed, add simple bone shapes: a long bone for each limb segment, a ribcage oval, a pelvis shape, and a skull oval. Keep bone outlines inside the joint landmarks so the skeleton reads clearly.
Run a final review: all joints on or near their bands, left-right symmetry within one band width, limb segments within 0.5 cm of the arithmetic check, and x-height labels measured baseline to midline. Accept valid alternatives such as slightly wider shoulders or a different letter style if the landmark checks still pass.
Erase guide lines only after the checks pass. Label each joint with a letter and record its measured distance from the baseline.
- Draw long bones between joint pairs.
- Add ribcage, pelvis, and skull outlines inside landmarks.
- Measure each joint distance from baseline and compare to band guides.
- Label joints and note any accepted alternative proportions.
Worked example
On hypothetical 24 cm paper, draw an 18 cm skeleton. Place joints using eight bands, draw limbs, and check upper arm length. Show the arithmetic and one correction.
Worked answer
Each band is 18 divided by 8, or 2.25 cm. Shoulders on band 2, hips on band 4, knees on band 6, ankles on band 8. Upper arm target is 1.5 bands, or 3.375 cm. Suppose the first upper arm measures 4.0 cm, a difference of 0.625 cm, which exceeds 0.5 cm. Move the elbow joint up by 0.6 cm and redraw; the new length is about 3.4 cm, which passes. Record the correction and label the elbow about one band above the hip band.
Four practice exercises
Exercise 1
Hypothetical paper height 20 cm; skeleton height 15 cm. Divide into eight bands. Where should the knee joint sit, and what is the band height?
Show answer and check
Band height is 15 divided by 8, or 1.875 cm. The knee sits on band 6, which is 6 times 1.875, or 11.25 cm below the top of the skeleton. Check: 11.25 cm is less than 15 cm, and measuring from the top of the drawn skeleton to the knee should give about 11.25 cm.
Why: Eight equal bands scale the skeleton height. Counting bands 1 to 8 from the top, band 6 is the knee guide in this convention, so the knee is six band heights below the top.
Check: Multiply band height by 6 and confirm the result is less than 15 cm; then measure the drawn knee distance from the top of the skeleton and compare it to 11.25 cm.
Exercise 2
A drawn upper arm measures 3.2 cm. Skeleton height is 16 cm. Using eight bands and a target of 1.5 bands, does it pass the 0.5 cm check?
Show answer and check
Band height is 16 divided by 8, or 2.0 cm. Target upper arm is 1.5 times 2.0, or 3.0 cm. The difference is 3.2 minus 3.0, or 0.2 cm, which is under 0.5 cm, so it passes.
Why: Compute band height by dividing skeleton height by 8, multiply by 1.5 for the target upper arm, then subtract the measured length to get the difference.
Check: Re-measure the upper arm from shoulder joint to elbow joint, recompute the target as 1.5 times band height, and confirm the absolute difference is under 0.5 cm.
Exercise 3
In a front-view sketch, the left shoulder is 4.5 cm from the centerline and the right shoulder is 5.2 cm. The band height is 2.0 cm. Is the symmetry acceptable under a one-band-width rule?
Show answer and check
The difference is 5.2 minus 4.5, or 0.7 cm. One band width is 2.0 cm, and 0.7 cm is less than 2.0 cm, so the symmetry is acceptable. Note the asymmetry and keep the landmark check.
Why: Symmetry tolerance is one band width in this convention; compare the absolute difference between the two shoulder distances to the band height.
Check: Measure both shoulder distances from the centerline again, subtract the smaller from the larger, and confirm the result is under 2.0 cm.
Exercise 4
A wrist joint is placed 1.0 cm above the hip band. The band height is 1.5 cm. Does it pass the half-band landmark check?
Show answer and check
Half a band is 1.5 divided by 2, or 0.75 cm. The wrist is 1.0 cm from the hip band, and 1.0 cm exceeds 0.75 cm, so it fails. Move the wrist at least 0.25 cm toward the hip band and recheck.
Why: The half-band rule limits how far a joint may sit from its guide; compare the vertical distance to half the band height.
Check: Measure the vertical distance from the wrist joint to the hip band, divide the band height by 2, and confirm the distance is no more than that half-band value.
Common mistakes
- Drawing bones first and forcing joints to fit. Place all joint landmarks first, then draw bones between them.
- Measuring x-height from baseline to top of letter. Measure baseline to midline; accept any legible letter style.
- Using different units for paper and skeleton measurements. Choose one unit and write it on the page before measuring.
- Treating hypothetical numerical examples as fixed standards. Measure your own paper and equipment; label chosen values as examples.
Self-check rubric
- All major joints are marked before bones are drawn.
- Joint landmarks sit within half a band of their guides.
- Limb segment lengths are within 0.5 cm of the band arithmetic check.
- X-height labels are measured baseline to midline and letter style is legible.
- Valid alternatives, such as slightly wider shoulders, are accepted if landmark checks pass.
- Measurements use one consistent unit and chosen values are labeled as examples.
Questions and answers
Do I need anatomical accuracy?
No. This lesson checks joint landmarks and limb proportions, not organ placement or medical accuracy.
What if my letter style changes the x-height?
X-height is baseline to midline. Any legible style is valid if you measure consistently to the midline.
Can I use a pose instead of a front view?
Yes, but keep joint landmarks and limb arithmetic checks; symmetry checks apply only to front views.
How close must measurements be?
For a sketch, a difference under 0.5 cm from your band arithmetic is acceptable; record larger differences and adjust.