Free original lessons
Draw a Witch on a Broomstick: Silhouette, Hat and Bristle Detail
Build a clear witch-on-broomstick figure using silhouette shapes, a structured hat, cape flow and broom-bristle detail, with checks and practice tasks.
Free lesson
Four exercises
Worked answers
Object Drawing Lessons
This lesson teaches a repeatable way to draw a witch on a broomstick. You will work from large silhouette shapes to small details: first the body and broom as one readable outline, then the hat, cape and bristles. The method uses simple geometry and a defined convention for judging proportions, so you can check your own drawing without needing a finished reference. All measurements are hypothetical examples; measure your own paper and tools before drawing.
Practice materials: Printable downloads are not available for this lesson yet. Use the instructions and four exercises below.
Reference illustration
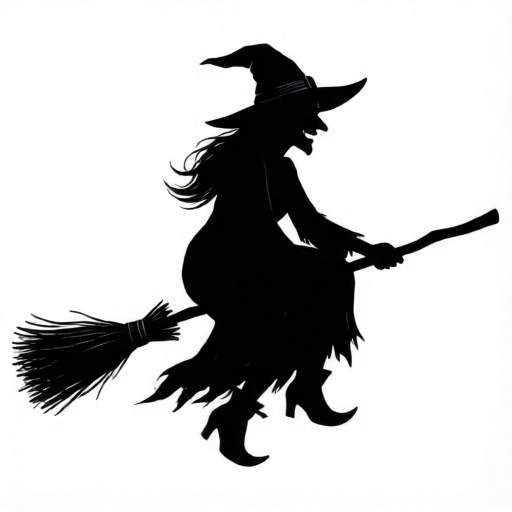
Use the stated measurements and conventions for each exercise.
Start with the silhouette as one shape
A silhouette is the outer boundary of the figure with no internal lines. For a witch on a broomstick, the silhouette should read as a single connected shape: the rider sits slightly forward, the broom handle runs diagonally, and the bristles fan out behind. Begin by drawing a light bounding box on your paper. For example, on a 20 cm by 28 cm sheet, a hypothetical figure box of 14 cm wide and 18 cm tall leaves room for the bristles and hat. Mark the box corners lightly so you can erase them later.
Inside the box, place three anchor points: the seat (where the rider meets the broom), the hat tip, and the bristle end. Connect these with a loose outline. Keep the rider's torso as a rounded wedge and the legs as a bent shape that overlaps the broom handle. The broom handle is a long narrow rectangle or tapered line; the bristles are a fan of short strokes attached to the handle end. Do not add facial features or fabric folds yet.
- Draw a light bounding box and mark its centre line.
- Place the seat anchor slightly left of centre and the bristle end at the lower right.
- Outline the torso as a rounded wedge leaning forward.
- Add bent legs that overlap the broom handle.
- Draw the broom handle as a narrow tapered shape from seat to bristle end.
- Fan short bristle strokes from the handle end, keeping them inside the box.
Build the hat with a brim and cone
The hat is the strongest vertical element. Draw the brim as a flattened oval or a shallow curve that sits on the head. The cone rises from the brim and may bend. A useful convention is to treat the hat height as roughly one-third of the figure box height; this is a hypothetical proportion, not a rule. If your figure box is 18 cm tall, the hat cone would be about 6 cm from brim to tip. Adjust to your own design.
Keep the brim edge clear of the face area so the silhouette stays readable. The cone can lean toward the direction of travel or away from it; either is valid if the outline remains connected. Add a small band where the cone meets the brim, but keep it as a single line so the silhouette is not broken.
- Draw the brim as a shallow curve or flattened oval on the head.
- Mark the cone height using your chosen proportion.
- Draw two tapering lines from the brim to the tip.
- Bend the tip slightly for character, keeping the outline continuous.
- Add a single band line at the brim junction.
Add cape flow and broom-bristle detail
The cape connects the hat area to the seat and gives the figure motion. Draw it as a curved triangle or a set of two or three overlapping curved panels. The cape should not cover the broom handle completely; leave a gap so the handle remains visible. For bristles, use a fan of short strokes that start at the handle end and spread outward. Vary stroke length slightly, but keep the fan within the bounding box.
Bristle detail is the smallest element, so add it last. Use a simple convention: each bristle stroke is a single line, and the fan is judged by whether it reads as a brush rather than a solid block. You may group bristles into three or four clusters. This is a design choice, not a universal answer.
- Draw the cape as two or three curved panels from shoulder to seat.
- Leave a visible gap between cape and broom handle.
- Mark the bristle fan width at the handle end.
- Draw three or four bristle clusters with short strokes.
- Vary stroke length slightly and keep the fan inside the box.
Check proportions and readability
Use simple arithmetic to check your drawing. Measure the figure box width and height in centimetres. The hat cone height should be about one-third of the box height; the bristle fan width should be about one-quarter of the box width. These are hypothetical examples. If your box is 14 cm wide, the bristle fan might be about 3.5 cm wide. Record your actual measurements and compare.
Readability check: view the drawing from about one metre away. The silhouette should still read as a witch on a broomstick. If the hat merges with the cape or the bristles merge with the handle, redraw those boundaries with a slightly stronger line. Keep all units consistent in centimetres.
- Measure the figure box width and height.
- Calculate one-third of the height for the hat cone.
- Calculate one-quarter of the width for the bristle fan.
- Compare your drawn measurements to these targets.
- View from one metre and adjust any merged boundaries.
Worked example
On a 20 cm by 28 cm sheet, draw a witch on a broomstick using a 14 cm by 18 cm figure box. The hat cone is one-third of the box height and the bristle fan is one-quarter of the box width. Describe the construction and give the calculated measurements.
Worked answer
Hat cone height = 18 cm divided by 3 = 6 cm. Bristle fan width = 14 cm divided by 4 = 3.5 cm. Draw the box, place the seat anchor slightly left of centre, outline the torso as a rounded wedge, add bent legs overlapping the handle, draw the handle from seat to lower right, fan the bristles to about 3.5 cm wide, build the hat to about 6 cm tall, and add two cape panels leaving a gap at the handle. Check by viewing from one metre: the silhouette should read as a witch on a broomstick.
Four practice exercises
Exercise 1
A figure box is 16 cm wide and 20 cm tall. Using the lesson proportions, calculate the hat cone height and bristle fan width.
Show answer and check
Hat cone height = 20 divided by 3 = about 6.7 cm. Bristle fan width = 16 divided by 4 = 4 cm.
Why: The hat cone is one-third of the box height and the bristle fan is one-quarter of the box width. These are hypothetical proportions from the lesson.
Check: Recompute 20 divided by 3 and 16 divided by 4. Confirm both answers are in centimetres and match the stated proportions.
Exercise 2
Describe how to place the seat anchor and broom handle so the rider and broom form one silhouette. Use a bounding box and at least two anchor points.
Show answer and check
Draw a bounding box and mark the seat anchor slightly left of centre. Mark the bristle end at the lower right. Draw the torso as a rounded wedge from the seat, add bent legs overlapping the handle, and draw the handle from the seat to the bristle end. The overlap at the seat connects the shapes into one silhouette.
Why: A single connected outline requires the rider and broom to share at least one boundary point. The seat anchor provides that connection.
Check: Trace the outer boundary with your finger. If you can travel from hat to bristles without crossing a gap, the silhouette is connected.
Exercise 3
A drawing has a hat cone 7 cm tall on a figure box 18 cm tall, and a bristle fan 5 cm wide on a box 14 cm wide. Compare these to the lesson proportions and state whether each is larger or smaller.
Show answer and check
Target hat cone = 18 divided by 3 = 6 cm; 7 cm is larger by 1 cm. Target bristle fan = 14 divided by 4 = 3.5 cm; 5 cm is larger by 1.5 cm.
Why: Subtract the target from the drawn measurement to find the difference. Positive differences mean larger than the lesson proportion.
Check: Recalculate 18 divided by 3 and 14 divided by 4, then subtract. Confirm the differences are 1 cm and 1.5 cm.
Exercise 4
List three changes that would make a bristle fan read as a solid block, and give one fix for each.
Show answer and check
1. Strokes are too close together; fix by spacing them slightly. 2. Strokes are all the same length and angle; fix by varying length and angle within the fan. 3. The fan outline is filled with shading; fix by removing fill and keeping separate strokes.
Why: A solid block loses the brush-like readability of separate strokes. Spacing, variation and avoiding fill preserve the fan structure.
Check: View the fan from one metre. If you can see individual strokes rather than a continuous mass, the fix has worked.
Common mistakes
- Drawing the rider and broom as separate shapes that do not touch. Make the seat anchor a single point where torso, legs and handle overlap.
- Making the hat cone too wide so it reads as a triangle rather than a hat. Taper the cone gradually and keep the brim wider than the cone base.
- Filling the bristle fan as a solid block. Use separate short strokes grouped into three or four clusters.
- Letting the cape cover the entire broom handle. Leave a visible gap between the cape edge and the handle.
Self-check rubric
- Silhouette reads as one connected figure from one metre away.
- Hat has a clear brim and a tapering cone; direction may vary.
- Bristles read as a fan of separate strokes, not a solid block.
- Cape panels connect shoulder to seat and leave the handle visible.
- Proportions are measured and recorded in consistent units.
- Valid alternatives are accepted if the silhouette remains readable.
Questions and answers
Do I need to draw a face?
No. The brief focuses on silhouette, hat and bristle detail. A face can be omitted or kept minimal so the outline stays readable.
Can the hat lean in either direction?
Yes. Either direction is valid if the outline remains connected and the hat still reads as a hat.
How many bristle strokes should I use?
There is no fixed number. Use enough strokes to read as a brush, grouped into three or four clusters. Judge by readability, not by a count.
What if my paper is a different size?
Measure your own paper and scale the hypothetical proportions. Keep all measurements in the same unit, such as centimetres.