Free original lessons
Draw an Eyebrow: Arch, Hair Strokes, and Eye Placement
Learn to draw a believable eyebrow using a clear arch plan, directional hair strokes, and a measured brow-to-eye placement guide with pencil.
Free lesson
Four exercises
Worked answers
Object Drawing Lessons
An eyebrow reads as convincing when three things agree: the arch shape follows a simple plan, the hair strokes travel in one consistent direction, and the brow sits at a believable distance above the eye. This lesson separates those three decisions so you can practise each one, then combine them. You will use a pencil, paper, and a ruler or straight edge. All measurements below are hypothetical examples chosen for practice; measure your own paper and drawing space and adjust the numbers to suit. The convention used here is that x-height means the distance from the baseline to the midline of a letter or symbol, and letter styles vary, so treat any letter-based guide as a flexible reference rather than a fixed rule.
Practice materials: Printable downloads are not available for this lesson yet. Use the instructions and four exercises below.
Reference illustration
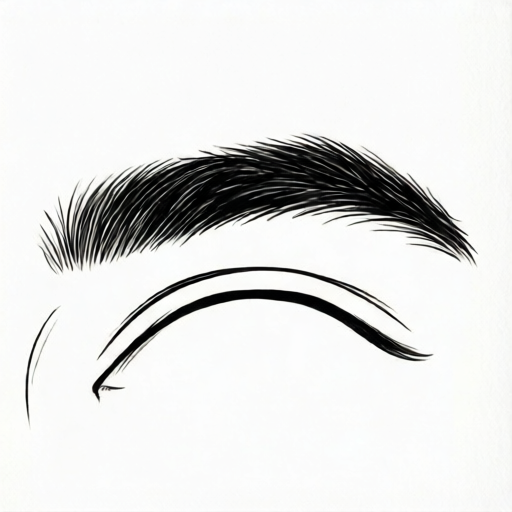
Use the stated measurements and conventions for each exercise.
Plan the arch before drawing hair
Start with three points: the inner start, the highest point of the arch, and the outer tail. Place them lightly so they can be moved. A common practice proportion is to make the arch peak roughly two-thirds of the way from the inner start to the outer tail, but this is a hypothetical example, not a standard. Check the shape by looking at it from a short distance; the curve should rise smoothly and fall without a sharp corner.
Keep the brow width consistent. If the inner start is narrow and the tail is wide, the arch will look unbalanced. Draw the lower edge first, then the upper edge, and compare the gap between them at three places: near the start, at the peak, and near the tail.
- Mark the inner start, arch peak, and outer tail with three light dots.
- Draw a smooth lower curve through the three dots.
- Draw the upper curve parallel to the lower curve, keeping the gap even.
- Check the peak position and adjust before adding any hair strokes.
Direct hair strokes with a single travel rule
Hair strokes should follow the direction the brow grows. Use one rule for the whole brow: strokes near the inner start lean upward and slightly inward; strokes at the peak lean upward and outward; strokes near the tail lean outward and slightly down. This creates a fan-like flow without needing a fixed template.
Draw each stroke as a short taper: firmer at the start, lighter at the end. Vary length and spacing so the brow does not look like a comb. Leave small gaps between strokes; the skin showing through helps the brow read as hair rather than a solid block.
- Draw five strokes near the inner start, following the inward-upward lean.
- Draw five strokes at the peak, following the outward-upward lean.
- Draw five strokes near the tail, following the outward-downward lean.
- Compare the three groups and soften any stroke that changes direction too abruptly.
Place the brow relative to the eye
Draw the eye first, then place the brow above it. A simple placement guide is to leave a gap between the top of the eye and the lower edge of the brow that is about half the height of the eye. This is a hypothetical example; measure your own drawing and choose a gap that looks natural for the face you are drawing.
The inner start of the brow should sit roughly above the inner corner of the eye, and the outer tail should extend slightly past the outer corner. Check this by holding a straight edge vertically from the eye corners up to the brow. Adjust the brow rather than redrawing the eye.
- Draw the eye shape and mark its inner and outer corners.
- Measure the eye height and mark a gap above the eye equal to about half that height.
- Place the brow's lower edge at that gap and align the inner start above the inner corner.
- Extend the tail slightly past the outer corner and check the alignment with a straight edge.
Refine and self-check
Refinement is about removing contradictions. If the arch peak is too sharp, soften it. If the hair strokes cross the brow edge, shorten them. If the brow sits too close to the eye, raise it slightly. Keep your light construction marks visible until the final check so you can compare the plan with the result.
Use a simple three-question check: Does the arch rise and fall smoothly? Do the hair strokes follow one travel rule? Is the brow-to-eye gap consistent from inner start to outer tail? If any answer is no, adjust that single feature and check again.
- Soften any sharp corner at the arch peak.
- Shorten strokes that extend beyond the brow edges.
- Re-measure the brow-to-eye gap at three places.
- Erase construction marks only after all three checks pass.
Worked example
Draw an eyebrow above an eye using a hypothetical eye height of 20 mm. Place the brow's lower edge 10 mm above the top of the eye, put the arch peak about two-thirds of the way from the inner start to the outer tail, and add hair strokes following the travel rule.
Worked answer
The eye is drawn first with a height of 20 mm. A gap of 10 mm is marked above the top of the eye, and the brow's lower edge is drawn at that height. The inner start sits above the inner corner, the outer tail extends slightly past the outer corner, and the arch peak is placed about two-thirds along the brow. Hair strokes near the start lean inward and upward, strokes at the peak lean outward and upward, and strokes near the tail lean outward and downward. The final check confirms a smooth arch, consistent brow width, and a 10 mm gap at the start, peak, and tail.
Four practice exercises
Exercise 1
An eye is drawn with a height of 18 mm. Mark a brow-to-eye gap of 9 mm above the top of the eye. Describe where the brow's lower edge should be placed and how you would check the gap at three points.
Show answer and check
The brow's lower edge is placed 9 mm above the top of the eye. Check the gap at the inner start, at the arch peak, and near the outer tail using a ruler or straight edge; all three should read about 9 mm.
Why: The gap is half the eye height in this hypothetical example. Measuring at three points catches a brow that slopes or drifts.
Check: Measure vertically from the top of the eye to the brow's lower edge at three marked points and compare the readings.
Exercise 2
A brow is 40 mm long from inner start to outer tail. Place the arch peak about two-thirds of the way along the brow. Calculate the distance from the inner start to the peak and from the peak to the outer tail.
Show answer and check
Two-thirds of 40 mm is about 26.7 mm, so the peak is about 26.7 mm from the inner start and about 13.3 mm from the outer tail.
Why: Multiply the total length by two-thirds for the first distance, then subtract from the total for the second. The numbers are hypothetical examples.
Check: Add the two distances: 26.7 mm plus 13.3 mm equals 40 mm.
Exercise 3
Describe the direction of five hair strokes near the inner start, five at the arch peak, and five near the outer tail, using the travel rule from the lesson.
Show answer and check
Near the inner start, strokes lean upward and slightly inward. At the peak, strokes lean upward and outward. Near the tail, strokes lean outward and slightly downward.
Why: The travel rule keeps the hair flow consistent and prevents a comb-like appearance.
Check: Compare each group of five strokes to the rule and confirm no stroke changes direction abruptly between groups.
Exercise 4
A practice brow has a lower edge that is 6 mm above the eye at the inner start, 10 mm at the peak, and 8 mm near the tail. Identify the problem and state one adjustment.
Show answer and check
The brow-to-eye gap is inconsistent. Raise the inner start or lower the peak so the gap is closer to a single value, then re-measure at all three points.
Why: A brow that drifts up or down relative to the eye looks unstable. Adjusting one end and re-measuring restores consistency.
Check: Measure the gap at the three points again after the adjustment and confirm the readings are within a small, chosen range.
Common mistakes
- Drawing the arch as a sharp triangle instead of a smooth curve. Replace the corner with a short rounded curve and check the peak from a distance.
- Making all hair strokes parallel, which looks like a comb. Apply the travel rule: inward-upward near the start, outward-upward at the peak, outward-downward near the tail.
- Placing the brow directly on the eye or too far above it. Measure the eye height and use a gap of about half that height as a starting point, then adjust.
- Making the brow too wide or too narrow along its length. Compare the gap between the upper and lower edges at the start, peak, and tail, and even it out.
Self-check rubric
- Arch shape rises and falls smoothly without a sharp corner.
- Brow width is consistent at the start, peak, and tail.
- Hair strokes follow one travel rule across the whole brow.
- Brow-to-eye gap is measured and consistent at three points.
- Inner start and outer tail align believably with the eye corners.
- Construction marks are light and can be adjusted before final strokes.
- Valid alternatives are accepted when the three checks pass, even if the arch peak is not centred.
Questions and answers
Do I need a special pencil for eyebrow drawing?
No. A standard graphite pencil works. Use light pressure for construction marks and slightly firmer pressure for final hair strokes.
How many hair strokes should an eyebrow have?
There is no fixed number. Aim for enough strokes to suggest hair without filling the shape solid. Fifteen to twenty-five short strokes is a practical starting range for practice.
Can I use a ruler for the brow-to-eye gap?
Yes. A ruler or straight edge helps you compare the gap at different points. Measure your own drawing rather than relying on a fixed number.
What if my arch peak is not in the middle?
That can be valid. The peak position varies between brows and faces. Check that the curve still rises and falls smoothly and that the brow width stays consistent.