Free original lessons
Drawing Thorns on a Curved Stem: Spike Placement and Curve
Learn to place thorns along a curved stem with alternating sides, taper direction, and consistent spacing using a simple convention and checkable steps.
Free lesson
Four exercises
Worked answers
Object Drawing Lessons
This lesson teaches a reliable method for drawing thorns on a curved stem. You will define a stem guide, mark thorn placement points at regular intervals, alternate sides, and construct each thorn from a broad base to a sharp tip. The convention is explicit: x-height is measured from baseline to midline, and letter styles vary, so valid alternatives are allowed. All numerical values are hypothetical examples; measure your own paper and tools. The goal is a clear, readable drawing of thorns, not a botanical illustration.
Practice materials: Printable downloads are not available for this lesson yet. Use the instructions and four exercises below.
Reference illustration
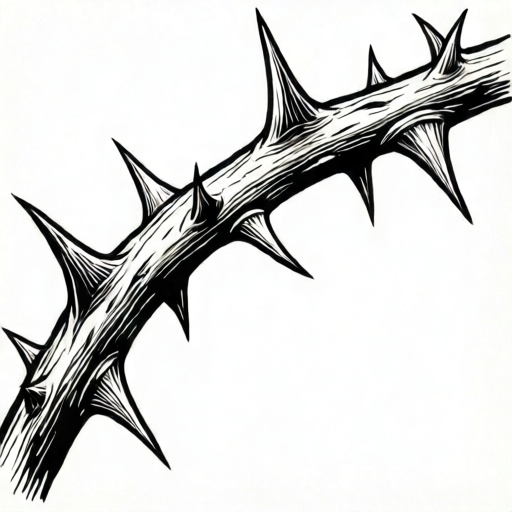
Use the stated measurements and conventions for each exercise.
Set the stem guide and placement convention
Draw a single curved line to represent the stem centerline. Choose a curve that is smooth and easy to follow, such as a gentle S-curve. Mark a baseline at the bottom of the page and a midline at the top of your working area. The x-height is the distance from baseline to midline; use it as your reference for thorn size and spacing. For example, if your x-height is 20 mm, a thorn length of about 10 mm and spacing of about 15 mm are hypothetical starting values.
Decide on a placement convention before drawing any thorn. A simple convention is alternating sides: first thorn on the left of the stem, second on the right, third on the left, and so on. Mark placement points along the centerline at equal intervals. At each point, draw a short tick perpendicular to the stem curve to show the side. This tick is a guide, not part of the final thorn.
- Draw a smooth curved centerline for the stem.
- Mark baseline and midline; measure x-height.
- Choose a spacing interval and mark equal placement points along the curve.
- At each point, tick the chosen side, alternating left and right.
Construct each thorn from base to tip
Each thorn is a tapered spike. Start with a broad base centered on the placement tick. The base should sit against the stem edge, not float away from it. Draw two short base lines that meet the stem at a small angle. Then draw two curved sides that taper to a single sharp tip. The tip should point away from the stem and follow the general direction of the stem curve, not against it.
Taper direction matters. On a curved stem, thorns on the outside of the curve point outward and slightly along the curve; thorns on the inside point inward but still away from the stem surface. Keep the taper smooth: the widest part is at the base, and the sides narrow steadily to the tip. Avoid bulbous middles or blunt ends.
- Center the thorn base on the placement tick.
- Draw two short base lines meeting the stem edge.
- Draw two curved sides tapering to one sharp tip.
- Check that the tip points away from the stem and follows the curve direction.
Check spacing, alternation, and curve consistency
After drawing all thorns, check three things. First, spacing: measure the distance between neighboring thorn bases along the stem. They should be approximately equal. Second, alternation: confirm that sides alternate left and right. Third, curve consistency: each thorn tip should point away from the stem and not cross the centerline. If a thorn crosses the centerline, redraw it with a shorter tip or a different angle.
Use a simple arithmetic check. If you have 6 placement points and a total stem length of 90 mm, the spacing is 90 divided by 5 intervals, which equals 18 mm. This is a hypothetical example; measure your actual stem length and count intervals. Adjust the number of thorns so the spacing stays readable and does not crowd.
- Measure spacing between neighboring thorn bases.
- Confirm left-right alternation.
- Check that no tip crosses the stem centerline.
- Recount intervals and adjust spacing if needed.
Worked example
A curved stem has a measured length of 80 mm along its centerline. You choose a hypothetical spacing of 16 mm and alternating sides. How many intervals and how many thorn placement points result?
Worked answer
80 divided by 16 equals 5 intervals. With 5 intervals, there are 6 placement points. Place thorns at points 1 through 6, alternating left and right.
Four practice exercises
Exercise 1
A curved stem centerline measures 60 mm. You choose a hypothetical spacing of 12 mm and alternating sides. How many intervals and placement points do you mark?
Show answer and check
5 intervals and 6 placement points.
Why: 60 divided by 12 equals 5 intervals. The number of points is intervals plus one, so 6 points.
Check: Recount intervals between points and confirm 5 gaps and 6 points.
Exercise 2
You have 8 placement points on a stem. How many intervals are between the first and last point?
Show answer and check
7 intervals.
Why: Intervals equal points minus one. 8 minus 1 equals 7.
Check: Count the gaps between consecutive points from first to last.
Exercise 3
A thorn base is centered on a left-side tick. The thorn tip is drawn crossing the stem centerline to the right. Is this acceptable under the lesson convention?
Show answer and check
No. The tip should point away from the stem and not cross the centerline.
Why: Crossing the centerline makes the thorn read as belonging to the opposite side and breaks the placement convention.
Check: Trace the tip relative to the centerline; if it crosses, shorten or reangle the tip.
Exercise 4
A stem has 4 intervals of 15 mm each. What is the total centerline length used for spacing?
Show answer and check
60 mm.
Why: 4 intervals multiplied by 15 mm equals 60 mm.
Check: Add the four intervals: 15 plus 15 plus 15 plus 15 equals 60.
Common mistakes
- Placing all thorns on one side of the stem. Use alternating ticks before drawing thorns; check left-right sequence.
- Making thorn bases float away from the stem edge. Start each base on the stem edge and draw short base lines that meet the stem.
- Drawing blunt or bulbous tips instead of tapered spikes. Keep the widest part at the base and narrow steadily to a single sharp tip.
- Letting thorn tips cross the stem centerline. Shorten the tip or change its angle so it points away from the stem.
Self-check rubric
- Stem centerline is smooth and clearly drawn.
- Placement points are marked at approximately equal intervals.
- Thorns alternate sides according to the stated convention.
- Each thorn has a broad base meeting the stem edge.
- Each thorn tapers to a single sharp tip pointing away from the stem.
- No thorn tip crosses the stem centerline.
- Spacing arithmetic is shown or checkable.
- Valid alternative conventions are accepted if stated and consistent.
Questions and answers
How many thorns should I draw on a curved stem?
Choose a number that gives equal spacing without crowding. For a hypothetical 90 mm stem with 18 mm spacing, 6 thorns fit at 5 intervals. Measure your own stem and adjust.
Must thorns alternate left and right?
Alternation is the convention used here because it is easy to check. Other valid conventions exist, but state your convention before drawing and apply it consistently.
What does x-height mean in this lesson?
X-height is the distance from baseline to midline. It is a reference for thorn size and spacing, not a universal standard. Letter styles vary, so measure your own working area.
Can thorn tips point in different directions?
Yes, as long as each tip points away from the stem and follows the general curve direction. Valid alternatives are allowed if the taper and placement remain clear.