Free original lessons
Phalanx Formation Drawing: Overlapping Shields and Spear Angles
Learn to draw a phalanx formation with overlapping shields, consistent spear angles, and clear row spacing using a simple grid and angle convention.
Free lesson
Four exercises
Worked answers
Object Drawing Lessons
This lesson teaches a repeatable method for drawing a phalanx formation as a coordinated unit rather than a crowd of separate warriors. You will establish a ground line, set row spacing, overlap shields in a staggered pattern, and draw spears at consistent angles. The convention used here is a simple side-on view: each shield is a rounded rectangle, each spear is a straight line, and angles are measured from the vertical. Because letter styles and hand proportions vary, the rubric rewards consistent spacing and clear overlap rather than a single perfect shape. All measurements are hypothetical examples; measure your own paper and tools before drawing.
Practice materials: Printable downloads are not available for this lesson yet. Use the instructions and four exercises below.
Reference illustration
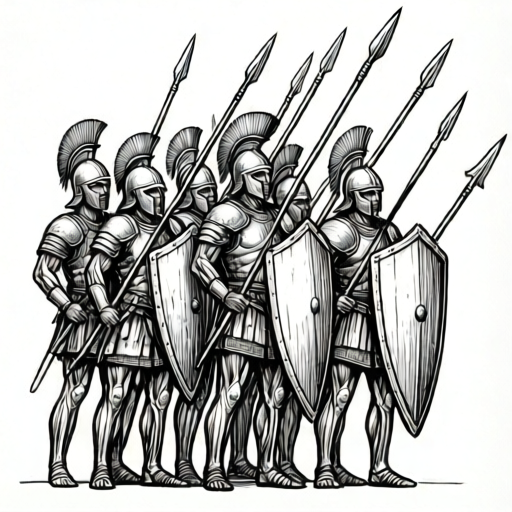
Use the stated measurements and conventions for each exercise.
Set the ground line and row spacing
Begin with a horizontal ground line across the lower third of your page. Mark four evenly spaced row positions along it so the marks define three equal intervals. For a hypothetical example, if your ground line is 18 cm long, place row marks at 0, 6, 12, and 18 cm. These marks are starting points, not strict rules.
Above each row mark, decide a shield height. A hypothetical shield height of 4 cm works on a 18 cm line, leaving room for three overlapping rows. Measure your actual paper first and adjust so the top row does not touch the page edge.
- Draw a light horizontal ground line.
- Mark four evenly spaced row positions with small ticks.
- Choose a shield height and write it in the margin as a reminder.
- Check that the top row plus spear length fits inside the page.
Draw overlapping shields in a staggered pattern
Each shield is a rounded rectangle drawn side-on. Overlap means the right edge of one shield sits in front of the left edge of the next. Stagger alternate rows by half a shield width so the formation reads as layered, not as a single flat wall.
Use a consistent overlap amount. A hypothetical overlap of 1 cm per shield keeps the pattern clear. If your shield width is 3 cm, the visible part of each shield is 2 cm. Mark the overlap lightly before drawing final edges.
- Draw the back row shields first, left to right.
- Offset the next row by half a shield width.
- Draw each shield as a rounded rectangle with a clear front edge.
- Erase overlap guide marks only after all rows are complete.
Set spear angles with a simple convention
Measure spear angles from the vertical. A spear pointing straight up is 0 degrees. A spear tilted forward is a positive angle; tilted back is negative. For this drawing, use one angle per row and keep it constant within that row.
A hypothetical example: back row at 15 degrees forward, middle row at 10 degrees, front row at 5 degrees. Draw each spear as a straight line from behind the shield to above the head area. Check the angle with a protractor or by comparing to a folded paper corner.
- Write the chosen angle for each row in the margin.
- Draw one spear per row as a test line.
- Compare the test line to your angle reference.
- Repeat the same angle for every spear in that row.
Add spacing marks and final checks
Spacing marks are small ticks between shields that show equal gaps. They help you keep the formation readable. Place one tick at the midpoint between each pair of adjacent shields in the same row.
Before finishing, check three things: every row has the same number of shields, every spear in a row has the same angle, and the overlap direction is consistent. If one shield breaks the pattern, redraw only that shield rather than the whole row.
- Add midpoint ticks between adjacent shields.
- Count shields per row and record the counts.
- Check spear angles row by row.
- Confirm overlap direction is the same across the formation.
Worked example
Draw a three-row phalanx on an 18 cm ground line with four shields per row, a hypothetical shield height of 4 cm, and row angles of 15, 10, and 5 degrees forward from vertical.
Worked answer
Ground line drawn at 18 cm with four row marks at 0, 6, 12, and 18 cm, giving three equal 6 cm intervals. Back row shields drawn first at 4 cm height with 1 cm overlap. Middle row offset by half a shield width. Front row offset again. Spears drawn at 15, 10, and 5 degrees from vertical, one angle per row. Midpoint ticks added between adjacent shields. Final check: four shields per row, consistent overlap direction, and one angle per row.
Four practice exercises
Exercise 1
On a 12 cm ground line, place four row marks evenly so they define three equal intervals. What is the spacing between adjacent marks?
Show answer and check
4 cm between adjacent marks.
Why: 12 cm divided by three equal intervals gives 4 cm per interval, so marks sit at 0, 4, 8, and 12 cm.
Check: Measure each gap with a ruler; all three gaps should read 4 cm, and the marks should land at 0, 4, 8, and 12 cm.
Exercise 2
A shield is 3 cm wide with a 1 cm overlap. What is the visible width of each shield after overlap?
Show answer and check
2 cm visible width.
Why: Subtract the overlap from the full width: 3 cm minus 1 cm equals 2 cm.
Check: Draw two adjacent shields and measure the exposed front edge; it should be 2 cm.
Exercise 3
A row has spears at 10 degrees forward from vertical. If you draw four spears, how many different angles should appear in that row?
Show answer and check
One angle: 10 degrees.
Why: The convention uses one constant angle per row.
Check: Compare each spear to the same test line; all four should match.
Exercise 4
You have a 20 cm ground line and want four shields per row with a 2 cm overlap. If each shield is 5 cm wide, what total ground length do the shields cover before overlap?
Show answer and check
20 cm before overlap.
Why: Four shields at 5 cm each equals 20 cm total width before overlap is applied.
Check: Multiply shield count by shield width and compare to the ground line length.
Common mistakes
- Drawing shields as separate, non-overlapping rectangles. Offset each shield by a fixed overlap amount and draw the front edge last so the overlap is visible.
- Changing spear angles within a row. Write one angle per row in the margin and use a test line before repeating it.
- Making rows too tall so the top row touches the page edge. Measure your paper first and reduce shield height or spear length until the top row has clear space.
- Staggering rows in the same direction every time. Alternate the stagger by half a shield width so the formation reads as layered.
Self-check rubric
- Ground line is horizontal and row marks are evenly spaced.
- Shields overlap consistently in the same direction.
- Alternate rows are staggered by about half a shield width.
- Each row uses one constant spear angle measured from vertical.
- Spacing marks are present and evenly placed.
- The formation fits inside the page with clear margins.
Questions and answers
Do I need a protractor?
No. You can use a folded paper corner as an angle reference, but a protractor makes checking easier.
How many shields should each row have?
Choose a number that fits your page. Four shields per row is a hypothetical example; keep the count consistent across rows.
Can I use different shield shapes?
Yes. The convention uses rounded rectangles, but any clear side-on shape works if the overlap and spacing stay consistent.
What if my spear angle is slightly off?
Small differences are acceptable. The rubric checks that angles are consistent within a row, not that they match an exact number.