Free original lessons
Planter Drawing: Pot Shape, Soil Line, and Plant Stems
Learn to draw a planter with a clear pot silhouette, a visible soil line, and stems that rise naturally from the soil.
Free lesson
Four exercises
Worked answers
Object Drawing Lessons
A planter drawing reads clearly when three elements agree: the pot's shape, the soil line inside it, and the stems that emerge from that soil. This lesson treats those elements as a small system rather than a single cartoon. You will set a baseline and midline for the pot, place a soil line that follows the pot's interior curve, and route stems from the soil surface upward with believable spacing. The convention used here is simple: the pot's rim sits on a horizontal baseline, the pot's vertical midline marks its center, and the soil line is drawn as a shallow curve that dips slightly at the center to suggest depth. Letter styles and plant species vary, so the rubric rewards consistent proportions and clear relationships, not a single correct outline. All measurements below are hypothetical examples; measure your own paper and tools before drawing.
Practice materials: Printable downloads are not available for this lesson yet. Use the instructions and four exercises below.
Reference illustration
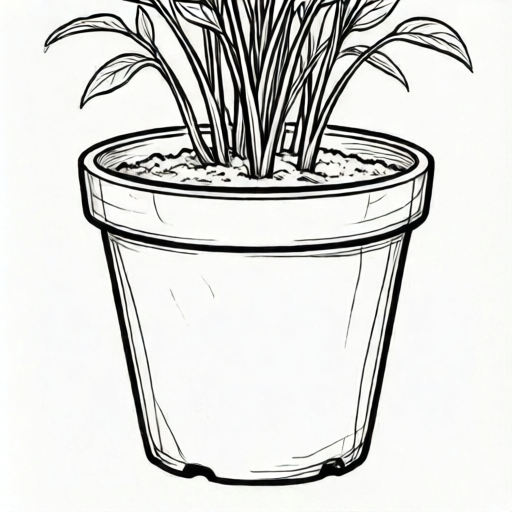
Use the stated measurements and conventions for each exercise.
Set the pot's frame with baseline and midline
Begin by drawing a light horizontal baseline for the pot's rim and a vertical midline through its center. These two lines fix the pot's width and height relationship before any curve is committed. A common working proportion is a rim width of about 8 cm and a pot height of about 7 cm on a 15 cm square practice area, but treat those numbers as hypothetical examples and adjust to your paper.
Mark the rim's left and right ends on the baseline, then mark the pot's base width on a second horizontal line below. The base is usually narrower than the rim; a base width of about 5 cm against an 8 cm rim gives a stable taper. Keep both marks equidistant from the midline so the pot does not lean.
- Draw a light baseline and a vertical midline crossing it.
- Mark rim ends at equal distances from the midline.
- Mark the base line below and set base ends closer to the midline.
- Check symmetry by comparing left and right distances before drawing curves.
Draw the pot silhouette and interior soil line
Connect the rim ends to the base ends with gentle curves that taper inward. The rim itself can be a shallow ellipse or a simple horizontal band; either is valid if the soil line inside remains consistent with it. Draw the soil line as a shallow curve across the pot's interior, slightly below the rim, dipping at the center to suggest that soil sits lower in the middle.
The soil line should touch the pot's inner walls at both sides and stay parallel in feel to the rim curve. If the rim is drawn as an ellipse, the soil line is a flatter ellipse segment; if the rim is a straight band, the soil line is a gentle arc. Label the soil surface clearly so stems have a starting plane.
- Curve from each rim end down to the matching base end.
- Draw the rim band or shallow ellipse across the top.
- Place the soil line below the rim, touching both inner walls.
- Darken the soil line slightly so it reads as a surface, not a shadow.
Route stems from soil to foliage
Stems begin at the soil line, not at the rim. Space their starting points unevenly across the soil surface to avoid a comb-like look, and let each stem rise with a slight lean. A simple planter might carry three stems: one near the center rising nearly vertical, one leaning left, and one leaning right. Keep stem thickness consistent and taper slightly toward the top.
Where stems cross the rim's visual plane, they should pass in front of the back rim and behind the front rim if the rim is drawn as an ellipse. For a flat rim band, stems simply rise above it. Add two or three simple leaves at different heights so the plant reads as a plant rather than a set of lines.
- Mark three to five stem starts on the soil line.
- Draw each stem upward with a slight individual lean.
- Pass stems correctly relative to the rim's front and back edges.
- Add leaves at varied heights and check that no stem floats above the soil.
Refine relationships and check the drawing
Step back and check three relationships: the pot's taper, the soil line's contact with both inner walls, and each stem's contact with the soil surface. A planter drawing fails most often when the soil line floats above the pot's interior or when stems begin at the rim instead of the soil. Correct those first, then adjust leaf placement.
Use a simple arithmetic check on proportions. If the rim is 8 cm and the base is 5 cm, the taper difference is 3 cm, or 1.5 cm per side. Measure your drawn rim and base widths and confirm the difference is split evenly. This check is hypothetical but keeps units consistent.
- Measure rim and base widths and compare the taper on each side.
- Confirm the soil line touches both inner walls.
- Confirm every stem starts on the soil line.
- Adjust leaves so they do not hide the soil line completely.
Worked example
A planter has a rim width of 10 cm and a base width of 6 cm. The soil line sits 2 cm below the rim. Three stems start on the soil line at 3 cm, 5 cm, and 7 cm from the left inner wall. Describe the taper check and the stem spacing check.
Worked answer
Taper difference is 10 minus 6 equals 4 cm, so each side tapers 2 cm. Stem starts at 3, 5, and 7 cm give gaps of 2 cm and 2 cm, which is even; to avoid a comb look, shift the middle stem to 4.5 cm so gaps become 1.5 cm and 2.5 cm. The soil line at 2 cm below the rim must touch both inner walls.
Why: The taper check confirms symmetry by splitting the width difference evenly. The spacing check uses simple subtraction between stem positions and shows that uneven gaps read more naturally while all starts remain on the soil line.
Check: Measure rim and base widths, subtract, and divide by two. Measure stem start positions from the same inner wall and subtract consecutive values. Confirm the soil line's ends meet both inner walls.
Four practice exercises
Exercise 1
A planter has a rim width of 9 cm and a base width of 5 cm. Calculate the taper per side and state where the soil line should sit relative to the rim.
Show answer and check
Taper difference is 4 cm, so each side tapers 2 cm. The soil line should sit below the rim and touch both inner walls; a hypothetical depth of 1.5 cm below the rim is reasonable.
Why: Subtract base from rim to get total taper, then divide by two for per-side taper. The soil line placement is a relationship rule, not a fixed number.
Check: Re-subtract 9 minus 5 equals 4, divide by 2 equals 2. Confirm the soil line's ends meet both inner walls in the drawing.
Exercise 2
Three stems start on a soil line at 2 cm, 6 cm, and 8 cm from the left inner wall. Are the gaps even? If so, suggest one shift to make them uneven while keeping all starts on the soil line.
Show answer and check
Gaps are 4 cm and 2 cm, so they are already uneven. No shift is required; if a more balanced look is wanted, move the middle stem from 6 cm to 5 cm, giving gaps of 3 cm and 3 cm, which is even again, so instead move it to 4.5 cm for gaps of 2.5 cm and 3.5 cm.
Why: Subtract consecutive positions to find gaps. The first pair is already uneven, so the drawing already avoids a comb look. Any shift must keep the start on the soil line.
Check: Subtract 6 minus 2 equals 4 and 8 minus 6 equals 2. After any shift, re-subtract consecutive positions and confirm each value is greater than zero and the start remains on the soil line.
Exercise 3
A cylindrical pot has a rim width of 7 cm and a base width of 7 cm. A soil line is drawn 1 cm below the rim. Two stems start at 2 cm and 5 cm from the left inner wall. Describe the taper check and whether the stem spacing is even.
Show answer and check
Taper difference is 0 cm, so the pot is cylindrical and symmetric by definition. Stem gaps are 3 cm, a single gap, so evenness is not meaningful with two stems; the spacing is acceptable as long as both starts are on the soil line.
Why: For a cylindrical pot, rim minus base equals zero, so no per-side taper exists. With two stems there is only one gap, so the comb-look concern does not apply.
Check: Subtract 7 minus 7 equals 0. Subtract 5 minus 2 equals 3. Confirm both stem starts lie on the soil line and the soil line touches both inner walls.
Exercise 4
A planter drawing shows a soil line that ends 1 cm short of the right inner wall and a stem that starts at the rim. Identify both faults and state the correction for each.
Show answer and check
Fault one: the soil line does not touch the right inner wall; extend its right end to meet the wall. Fault two: the stem starts at the rim instead of the soil line; erase the lower end and redraw it beginning on the soil surface.
Why: The soil line must contact both inner walls to read as a surface inside the pot. Stems must begin on the soil line so the plant appears rooted in the soil.
Check: Trace the soil line to both inner walls and confirm contact. Trace each stem downward and confirm its lowest point lies on the soil line, not on the rim.
Common mistakes
- Stems start at the rim instead of the soil line. Erase the lower stem ends and redraw them beginning on the soil surface, then rejoin them to the existing upper stems.
- The soil line floats above the pot's inner walls. Extend the soil line's ends until they meet both inner walls, keeping the shallow center dip.
- The pot leans because rim and base marks are not equidistant from the midline. Re-measure left and right distances from the midline at both rim and base, and shift marks to match.
- Stems are spaced evenly like a comb. Move one or two stem starts closer together and leave a wider gap elsewhere, keeping all starts on the soil line.
Self-check rubric
- Pot silhouette tapers consistently and is symmetric about the midline.
- Soil line touches both inner walls and reads as a surface inside the pot.
- Every stem begins on the soil line, not at the rim.
- Stem spacing is uneven but balanced, and stems lean naturally.
- Leaves are placed at varied heights without hiding the soil line completely.
- Valid alternatives are accepted: cylindrical or tapered pots, curved or straight soil lines, and different stem counts within the stated range.
Questions and answers
Does the soil line have to curve?
No. A straight soil line is valid if the rim is drawn as a flat band. The key is that the soil line touches both inner walls and reads as a surface inside the pot.
How many stems should a planter drawing have?
Three to five stems is a practical range for a simple plant. Fewer can look sparse; more can obscure the soil line. Choose a number that keeps the soil surface visible.
Can the pot be cylindrical instead of tapered?
Yes. A cylindrical pot uses equal rim and base widths. The soil line and stem rules stay the same; only the taper check changes.
What if my plant is a trailing species?
Stems can begin on the soil line and then curve over the rim. Keep the starting points on the soil surface and let the trailing portion cross the rim clearly.