Free original lessons
Realistic Donut Drawing: Torus Form and Glaze Highlights
Learn to draw a realistic donut using a torus form, with glaze highlights and shadow. Includes steps, common mistakes, and practice exercises.
Free lesson
Four exercises
Worked answers
Object Drawing Lessons
Drawing a realistic donut starts with understanding its torus shape: a ring with a central hole, curved surfaces, and a glaze that catches light. This guide breaks the process into clear steps, from blocking the torus to placing glaze highlights and shadows. You will practice with self-contained exercises and use a simple convention for judging your work. All measurements are hypothetical examples; measure your own paper and tools. The goal is a believable donut study, not a perfect replica.
Practice materials: Printable downloads are not available for this lesson yet. Use the instructions and four exercises below.
Reference illustration
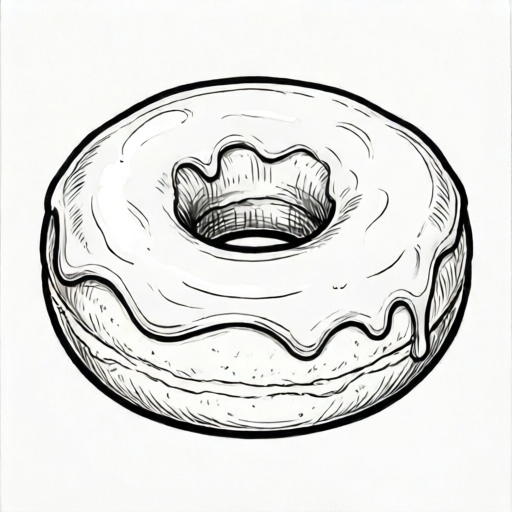
Use the stated measurements and conventions for each exercise.
Blocking the Torus Form
Begin by drawing a light oval for the donut's outer edge. Inside it, draw a smaller oval for the hole, offset slightly upward to suggest the ring's tilt. Connect the two ovals with curved lines that follow the torus surface. Keep lines light so you can adjust proportions.
A torus has two main curves: the outer bulge and the inner dip toward the hole. Imagine the donut as a thick ring seen at a slight angle. The top surface curves over the hole, and the sides curve down to the base. Use a soft pencil and check that the hole is centered enough to look stable.
- Draw a light horizontal oval for the outer boundary.
- Draw a smaller oval inside, shifted up slightly for the hole.
- Connect the ovals with two curved lines on each side to show the ring's thickness.
- Check that the hole's width is about one-third of the outer oval's width (hypothetical proportion).
Shading the Torus Surface
Shade the donut as a curved form. Light usually falls from above, so the top surface is lighter and the underside is darker. The inner edge near the hole catches less light and often shows a shadow. Use gentle gradients, not flat fills.
Build tone in layers: first a light overall shading, then darker areas under the ring and inside the hole. Keep the outer edge slightly darker than the top to show roundness. Blend with a soft tool or light pencil strokes. Avoid outlining the whole donut with a hard line; let shading define the form.
- Identify a light direction, for example from the upper left.
- Shade the underside and the inner hole edge with medium tone.
- Add a darker band where the ring meets the surface below.
- Soften transitions and leave the top surface lighter.
Adding Glaze and Highlights
Glaze is a glossy layer that follows the torus surface. Draw glaze as a slightly irregular band over the top and sides, not as a perfect ring. Its edge can drip slightly, but keep drips small and consistent with gravity.
Highlights are the brightest spots where light reflects. On a glossy glaze, highlights appear as soft white or light shapes along the top curve and near the inner edge. Place one main highlight on the upper left and a smaller one near the hole. Use the white of the paper or a light pencil, and keep highlight edges soft. A few tiny sparkles can suggest shine, but avoid scattering them randomly.
- Draw the glaze boundary as a wavy line over the top surface.
- Leave the glaze area slightly lighter than the bare donut.
- Place a main highlight on the upper curve, following the torus direction.
- Add a secondary highlight near the inner edge and blend edges softly.
Shadow and Final Check
Add a cast shadow under the donut to ground it. The shadow should be darker near the base and softer farther away. Its shape follows the donut's outer curve and the light direction. Keep the shadow simple and avoid making it too large.
Finally, check the drawing against the torus form: does the hole look like a hole, not a flat circle? Does the glaze sit on the curved surface? Are highlights placed where light would reflect? Adjust contrast so the donut reads as a solid ring with a glossy top.
- Sketch a soft shadow shape under the donut, opposite the light source.
- Darken the contact area slightly and blend outward.
- Compare the hole and outer edge for consistent curvature.
- Refine highlights and shadows until the form reads clearly.
Worked example
Draw a donut seen from a slight angle with light from the upper left. Show the torus form, a glaze band with one main highlight, and a cast shadow.
Worked answer
Start with a light oval for the outer edge and a smaller oval shifted up for the hole. Connect them with curved lines to show thickness. Shade the underside and inner hole edge with medium tone, leaving the top lighter. Draw a wavy glaze boundary over the top and sides, leaving the glaze slightly lighter. Place a soft highlight on the upper left curve and a smaller one near the hole. Add a soft shadow under the donut to the lower right. Check that the hole has depth and highlights follow the light.
Four practice exercises
Exercise 1
Draw a donut from directly above. Show the torus form with a centered hole and a glaze band. Place one highlight on the upper left of the ring.
Show answer and check
A top view shows two concentric ovals: a larger outer oval and a smaller inner oval for the hole. The glaze band sits between them, slightly wavy. The highlight is a soft light shape on the upper left of the glaze, following the ring's curve. Shading is minimal but the inner edge is slightly darker to show depth.
Why: From above, the torus appears as a ring. The hole is centered, and the glaze covers the top surface. A single highlight on the upper left matches light from that direction. Darkening the inner edge suggests the hole's depth.
Check: Check that the hole is centered and the highlight is on the upper left. The glaze edge should be slightly irregular, not a perfect circle. The inner edge should be darker than the top surface.
Exercise 2
Draw a donut tilted so the hole appears as an ellipse. Light comes from the right. Add a glaze highlight on the right side and a cast shadow to the left.
Show answer and check
The outer edge is an oval, and the hole is a smaller ellipse shifted toward the top. The right side of the ring is lighter, and a soft highlight sits on the right curve. The left underside is darker, and a cast shadow extends to the left. The glaze band follows the tilted surface.
Why: Tilting the donut makes the hole elliptical. Light from the right means highlights on the right and shadow on the left. The cast shadow falls opposite the light. Shading the left underside reinforces the tilt.
Check: Verify that the hole is elliptical and shifted up. The highlight should be on the right, and the shadow on the left. The glaze should follow the tilt, not appear flat.
Exercise 3
Draw a donut with a thick glaze that drips slightly over the outer edge. Use light from above. Show one main highlight on the top and a smaller one near the hole. Add a simple cast shadow.
Show answer and check
The torus form is drawn with a clear hole. The glaze covers the top and drips down the outer edge in small, downward curves. The main highlight is a soft shape on the top curve, and a smaller highlight sits near the inner edge. The cast shadow is directly under the donut, slightly darker at the contact point.
Why: Light from above places highlights on the top and near the inner edge. Drips follow gravity and the outer curve. The cast shadow under the donut grounds it. Keeping drips small maintains realism.
Check: Check that drips point downward and are not too large. Highlights should be on the top and near the hole. The shadow should be under the donut and darker at the base.
Exercise 4
Draw two donuts side by side, both seen from a slight angle. Light comes from the upper left. Give each a glaze highlight and a cast shadow. Keep the forms consistent.
Show answer and check
Both donuts have similar outer ovals and shifted holes. The left donut's highlight is on its upper left curve, and its shadow falls to the lower right. The right donut has a highlight on its upper left and a shadow to the lower right, slightly overlapping the left donut's shadow if close. Shading is consistent on both.
Why: Consistent light direction means highlights on the upper left and shadows to the lower right for both donuts. Similar proportions keep the forms believable. Overlapping shadows can show spatial relationship.
Check: Compare both donuts: highlights should be on the upper left, shadows to the lower right. Holes should be similarly shifted. Check that the glaze bands follow each torus surface.
Common mistakes
- Drawing the hole as a flat circle without thickness. Show the inner edge curving down into the hole and shade it darker to suggest depth.
- Making glaze a perfect ring with no variation. Let the glaze edge wave slightly and follow the torus surface, with small drips if desired.
- Placing highlights randomly across the donut. Place highlights along the top curve and near the inner edge, consistent with a single light direction.
- Using a hard outline around the whole donut. Soften edges and let shading define the form; keep outlines light and broken.
Self-check rubric
- Torus form is clear: outer curve and hole read as a ring with thickness.
- Shading shows curvature: top lighter, underside and inner edge darker.
- Glaze follows the surface and has a believable edge.
- Highlights are placed consistently with a single light direction.
- Cast shadow grounds the donut and matches the light.
- Edges are mostly soft; hard outlines are avoided.
- Valid alternatives: any light direction is acceptable if consistent; glaze color and drip style may vary; highlight shapes may differ as long as they follow the form.
Questions and answers
Do I need special pencils for glaze highlights?
No. A regular pencil and eraser work. You can leave paper white for highlights or use a light pencil. Measure your own tools if you want consistent results.
How do I know if my donut looks realistic?
Check that the torus form reads clearly: the hole has depth, the surface curves, and highlights follow the light. Use the rubric to judge form, shading, glaze, and shadow.
Can I draw a donut without a reference?
Yes. The torus form and light direction are enough. Practice the steps and use the exercises to build confidence.
What if my glaze drips look wrong?
Keep drips small and downward. They should follow gravity and the curved surface. If a drip looks odd, simplify it or remove it.