Free original lessons
Realistic Flying Eagle Drawing: Spread Wings and Feather Rows
Learn to draw a realistic flying eagle with spread wings by building feather rows, wing guides, and a clear body structure step by step.
Free lesson
Four exercises
Worked answers
Object Drawing Lessons
A realistic flying eagle drawing depends less on shading tricks than on structure: the spread wing silhouette, the layered feather rows, and the body mass that connects them. This lesson treats the eagle as a construction problem. You will place a wing-spread guide, block the body and head, then build primary and secondary feather rows from the shoulder outward. The convention used here is simple: feather rows are drawn as overlapping bands, and each band is checked against the wing guide rather than against a single perfect outline. Letter styles and line weights vary, so the rubric rewards proportion and row logic, not identical marks. All measurements below are hypothetical examples; measure your own paper and tools before drawing.
Practice materials: Printable downloads are not available for this lesson yet. Use the instructions and four exercises below.
Reference illustration
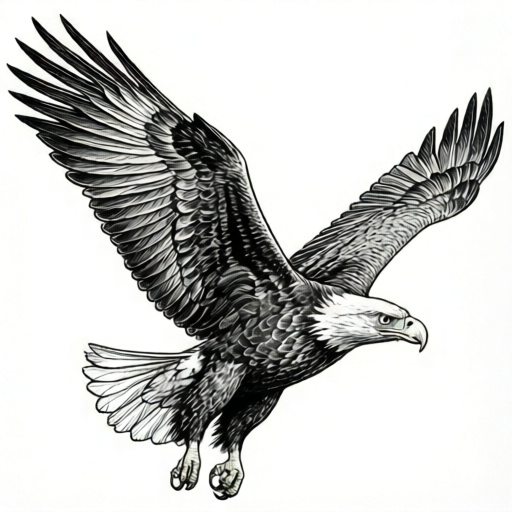
Use the stated measurements and conventions for each exercise.
Set the wing-spread guide before any feathers
Start with a horizontal guide line across the middle of the page. Mark a center point for the body. On each side, mark a wingtip point at equal distance from the center; for example, if the body center is at 10 cm and each wingtip at 18 cm, the spread is 16 cm total. These numbers are hypothetical, so adjust to your paper.
Draw a shallow arc from each wingtip back to the shoulder area, then a second arc for the trailing edge. The two arcs form the wing envelope. Keep the leading edge slightly higher than the trailing edge so the wings read as lifted in flight.
- Draw one horizontal guide and mark the body center.
- Mark two wingtip points at equal distances from the center.
- Connect each wingtip to the shoulder with a leading-edge arc.
- Add a trailing-edge arc below it to close the wing envelope.
Block the body, head, and tail
Inside the center mark, draw a tapered oval for the body, narrower at the tail. Add a small circle for the head above and slightly forward of the body. The head should be about one-fifth of the body length in this convention; treat that ratio as a hypothetical starting point and adjust after measuring your guide.
Draw a short wedge for the tail below the body. The tail should sit between the trailing edges of the wings, not below them. Check that the body oval does not touch either wing envelope; a small gap keeps the shoulder joint readable.
- Draw a tapered body oval at the center mark.
- Place a small head circle forward of the body top.
- Add a tail wedge between the wing trailing edges.
- Confirm small gaps at both shoulders.
Build feather rows from shoulder to tip
Feather rows are drawn as overlapping bands. Begin at the shoulder with the secondary row: short, broad bands that follow the trailing edge. Then add the primary row from mid-wing to wingtip: longer bands that fan slightly outward. Finally add a small covert row near the leading edge.
Each row should overlap the row behind it by about one-third of its length. This overlap is a convention, not a universal rule; the rubric accepts any consistent overlap that keeps rows readable. Label each row lightly on your practice sheet: secondary, primary, covert.
- Draw the secondary row along the trailing edge.
- Add the primary row from mid-wing to wingtip.
- Place a short covert row near the leading edge.
- Check that each row overlaps the one behind it.
Refine the head and check the whole study
Add a hooked beak and a small eye to the head circle. Keep the head simple; this study excludes head-only portraits, so the head supports the flight pose rather than dominating it. Darken the primary tips slightly to suggest spread feathers.
Finish by checking the wing envelope, the body gap, and the row order. If a row crosses the wing guide, redraw that band rather than erasing the guide. A clean check is faster than a perfect outline.
- Add a hooked beak and eye to the head circle.
- Darken primary tips lightly.
- Recheck wing envelope and shoulder gaps.
- Redraw any band that crosses the guide.
Worked example
On a 20 cm wide practice area, place the body center at 10 cm and each wingtip at 18 cm. Draw the wing envelope, body oval, head circle, tail wedge, and three feather rows. State the total spread.
Worked answer
The total spread is 18 minus 2, doubled, which equals 16 cm. The envelope uses two arcs per wing, the body oval sits at 10 cm with small shoulder gaps, the head circle is forward of the body top, and the tail wedge sits between the trailing edges. Rows are ordered secondary, primary, covert, each overlapping the one behind.
Four practice exercises
Exercise 1
A practice sheet is 24 cm wide. The body center is at 12 cm and each wingtip is at 21 cm. What is the total wing spread?
Show answer and check
18 cm.
Why: Each wing extends 21 minus 12, which is 9 cm. Two wings give 9 plus 9, or 18 cm.
Check: Subtract the center from one wingtip, double the result, and confirm it matches the distance between wingtips.
Exercise 2
A wing envelope is 12 cm long from shoulder to tip. You plan three equal primary bands. What is each band length if they divide the envelope evenly?
Show answer and check
4 cm each.
Why: 12 divided by 3 equals 4. Equal division is a hypothetical planning choice, not a required feather length.
Check: Multiply 4 by 3 and confirm the total is 12 cm.
Exercise 3
The body oval is 6 cm long and the head circle diameter is one-fifth of that. What is the head diameter?
Show answer and check
1.2 cm.
Why: One-fifth of 6 cm is 6 divided by 5, which equals 1.2 cm.
Check: Multiply 1.2 by 5 and confirm the result is 6 cm.
Exercise 4
A feather band overlaps the row behind it by 2 cm. The band is 6 cm long. What fraction of the band is the overlap?
Show answer and check
One-third.
Why: 2 divided by 6 simplifies to one-third. This matches the hypothetical overlap guide.
Check: Multiply one-third by 6 and confirm the overlap is 2 cm.
Common mistakes
- Drawing feathers before the wing envelope is set. Complete both wing arcs first, then add rows inside the envelope.
- Making the body touch both wing envelopes. Leave a small gap at each shoulder so the joint reads clearly.
- Drawing all feather rows the same length. Use short secondary bands and longer primary bands toward the tip.
- Letting the tail sit below the wing trailing edges. Place the tail wedge between the trailing edges, not beneath them.
Self-check rubric
- Wing envelope is closed and left-right wingtip distances are equal.
- Body oval, head circle, and tail wedge are placed without touching the wing envelopes.
- Three feather rows are readable and ordered secondary, primary, covert.
- Row overlap is consistent, about one-third of band length as a hypothetical guide.
- Valid alternatives are accepted when proportion and row logic remain clear.
Questions and answers
How many feather rows should the wing show?
Three readable rows are enough: secondary, primary, and a short covert row. More rows can work if they stay consistent.
Do I need exact measurements?
No. The numbers here are hypothetical examples. Measure your own paper and keep the left and right wingtip distances equal.
Can I use different line weights?
Yes. The convention allows varied line weights as long as row order and wing envelope remain clear.
Why exclude head-only portraits?
This study focuses on spread wings and feather-row construction in flight, so the head supports the pose rather than standing alone.