Free original lessons
Realistic Tiger Drawing: Fur Texture and Facial Proportion
Learn to draw a realistic tiger head with correct facial proportions and directional fur strokes, using a printable plate and practice exercises.
Free lesson
Four exercises
Worked answers
Object Drawing Lessons
This lesson teaches a realistic tiger head study, focusing on facial proportion and fur texture. You will use a simple proportional grid and directional stroke convention to build a believable tiger face. The approach is checkable: measure key distances, compare ratios, and assess fur direction against a defined rule. All resources are planned and free; they are not yet built. The instructional text here is self-contained, so you can complete the exercises with paper and pencil. A printable tiger plate is proposed to include facial-proportion guides, fur-stroke direction arrows, and a practice area for a tiger head with striped fur shading. Until that plate exists, use the described guides and your own measurements. The lesson excludes tiger-eye close-ups, cartoon tigers, and generic big-cat anatomy; it stays on a realistic tiger head with striped fur.
Practice materials: Printable downloads are not available for this lesson yet. Use the instructions and four exercises below.
Reference illustration
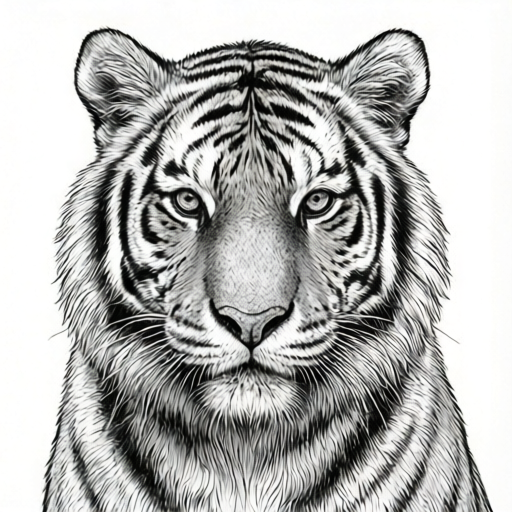
Use the stated measurements and conventions for each exercise.
Facial Proportion: Building the Tiger Head Grid
Start with a light rectangle that will contain the tiger head. Define the head height as the distance from the top of the skull to the bottom of the chin. Divide this height into thirds: top third for forehead and ears, middle third for eyes and nose bridge, bottom third for muzzle and chin. Draw a vertical midline. The eyes sit on a horizontal line at the lower boundary of the top third. The nose pad sits at the lower boundary of the middle third. The mouth line sits about one-sixth of head height below the nose pad. Ear bases align roughly with the eye line, and ear tips rise about one-quarter head height above the skull top. These are proportional guides, not fixed rules; adjust to your reference.
Use a checkable ratio: eye-line to nose-pad distance should be about one-third of head height. Nose-pad to chin should be about one-third. The remaining third is above the eye line. Measure with a ruler or mark tick marks on scrap paper. Keep units consistent, for example millimeters. If your measured eye-to-nose distance is 30 mm and head height is 90 mm, the ratio is 30/90 = 1/3, which matches the guide. A mismatch of more than 10 percent suggests adjusting the grid before adding detail.
- Draw a light rectangle and mark head height.
- Divide height into three equal bands with horizontal lines.
- Add a vertical midline and mark eye line, nose line, and mouth line.
- Place ear bases near the eye line and ear tips about one-quarter head height above the skull top.
- Check the eye-to-nose ratio: it should be close to one-third of head height.
Fur Texture: Directional Stroke Convention
Define a stroke convention: each fur stroke is a short tapered line that starts at its root and ends at its tip. The tip points in the direction of fur growth. Strokes should follow body contours: on the forehead, strokes flow upward and outward from the midline; on the cheeks, they flow downward and back toward the jaw; around the muzzle, they flow forward and slightly down. Keep stroke length varied but consistent in scale: short strokes near the nose, longer strokes on the cheeks and forehead. Space strokes unevenly to avoid a combed look.
Shading uses layered strokes: first a light base layer with widely spaced strokes, then a mid layer with closer spacing, then dark accent strokes along stripe edges. Stripes are not solid blocks; they are clusters of dark strokes that taper at the ends. A valid alternative is to use cross-hatching for shadow areas, provided the dominant stroke direction still follows the convention. The rubric accepts any stroke pattern that matches the defined direction rule and shows varied spacing and taper.
- Mark fur-flow arrows on your practice area: up-out on forehead, down-back on cheeks, forward-down on muzzle.
- Draw a light base layer of tapered strokes following the arrows.
- Add a mid layer with closer spacing in shadow zones.
- Place dark stripe strokes as tapered clusters along stripe paths.
- Check that most strokes taper and point in the marked direction.
Stripes and Shading: Integrating Pattern with Form
Stripes wrap around the head form. On the forehead, vertical stripes curve slightly outward at the top. On the cheeks, stripes angle down and back. Around the eyes, dark strokes frame the eye without covering the pupil. Use the same tapered stroke convention for stripe edges. Shade the underside of the muzzle and the sides of the nose bridge with denser strokes. Keep the eye area clear: draw the eye shape first, then add fur strokes around it.
A simple arithmetic check for shading density: in a 20 mm by 20 mm practice square, count strokes in the light layer and the dark layer. If the light layer has 10 strokes and the dark layer has 20 strokes, the density ratio is 2:1, which is a reasonable contrast. Adjust spacing rather than stroke thickness to change density. Label any numerical values as hypothetical examples; measure your own paper and tools.
- Draw the eye shapes and nose pad before adding dense fur.
- Map stripe paths with light guide lines that follow the head contour.
- Build stripe edges with tapered dark strokes, not solid fills.
- Increase stroke density in shadow zones and decrease on highlights.
- Check contrast by counting strokes in a small square and comparing layers.
Checking Proportion and Texture Together
After the head is built, check three distances: eye line to nose pad, nose pad to chin, and skull top to eye line. Each should be close to one-third of head height. Then check fur direction: sample ten strokes across the forehead, cheeks, and muzzle. At least eight should point within the marked flow arrows. Finally, check stripe integration: stripes should taper and follow the form, not appear as flat blocks. If a check fails, adjust the grid or stroke direction before adding more detail.
Use a simple rubric score: proportion (0-3), fur direction (0-3), stripe integration (0-3), and clarity (0-3). A score of 8 or higher indicates a solid study. Valid alternatives include different stroke spacing or cross-hatching in shadows, as long as the direction convention and taper are respected.
- Measure the three head-height thirds and record ratios.
- Sample ten fur strokes and count how many follow the arrows.
- Check that stripe edges taper and wrap with the form.
- Score each rubric category and note one adjustment.
- Make the adjustment and re-check the weakest category.
Worked example
A student draws a tiger head 90 mm tall. The eye line is 30 mm below the skull top, and the nose pad is 30 mm below the eye line. The chin is 30 mm below the nose pad. The student marks forehead fur arrows pointing up and out, cheek arrows pointing down and back, and muzzle arrows pointing forward and down. They draw ten sample strokes: seven follow the arrows and taper, three are random. What score should they give fur direction on a 0-3 scale, and what is one adjustment?
Worked answer
Fur direction score: 2 out of 3, because seven of ten strokes follow the convention, which is below the eight-of-ten check. One adjustment: re-mark the flow arrows and redraw the three random strokes so they taper along the correct direction. Proportion check: 30/90 = 1/3 for each third, so proportion is consistent.
Why: The proportion ratios are each 30/90 = 1/3, matching the guide. The fur check requires at least eight of ten strokes to follow the arrows; seven passes only partially, so a score of 2 is reasonable. The adjustment targets the weakest check without changing the proportion grid.
Check: Re-count ten strokes after adjustment. If at least eight follow the arrows and taper, raise the score to 3. Re-measure the three head thirds to confirm each is close to 30 mm.
Four practice exercises
Exercise 1
A tiger head is 120 mm tall. The eye line is 40 mm below the skull top, and the nose pad is 40 mm below the eye line. The chin is 40 mm below the nose pad. Calculate each third as a fraction of head height and state whether the proportions match the one-third guide.
Show answer and check
Each third is 40/120 = 1/3. The proportions match the guide.
Why: Divide each measured distance by head height: 40/120 simplifies to 1/3. Since all three bands equal one-third, the grid is consistent.
Check: Add the three distances: 40 + 40 + 40 = 120 mm, which equals head height. Confirm each fraction is 1/3.
Exercise 2
On a practice square, a student draws 12 light-layer strokes and 24 dark-layer strokes. What is the density ratio of dark to light strokes, and is a 2:1 ratio reasonable for shadow contrast?
Show answer and check
The dark-to-light ratio is 24/12 = 2:1. A 2:1 ratio is reasonable for shadow contrast.
Why: Divide dark strokes by light strokes: 24/12 = 2. A 2:1 ratio means the shadow area has twice the stroke density, which supports contrast without solid filling.
Check: Re-count strokes in the same square. If the ratio is close to 2:1, the contrast check passes; adjust spacing if it is far from 2:1.
Exercise 3
A student samples ten fur strokes: six follow the marked flow arrows and taper, four do not. Using the eight-of-ten check, state whether the fur direction passes and give one specific fix.
Show answer and check
The fur direction does not pass because only six of ten strokes follow the convention, below the eight-of-ten check. Fix: re-mark the flow arrows and redraw the four non-following strokes as tapered strokes along the correct direction.
Why: The check requires at least eight of ten strokes to follow the arrows and taper. Six is below eight, so the sample fails. The fix targets the four strokes that do not follow the convention.
Check: After redrawing, sample ten strokes again and count. If at least eight follow the arrows and taper, the check passes.
Exercise 4
A tiger head study scores 2 for proportion, 3 for fur direction, 2 for stripe integration, and 2 for clarity. The rubric total is out of 12, and a score of 8 or higher is solid. Calculate the total and state one adjustment to improve the weakest categories.
Show answer and check
Total = 2 + 3 + 2 + 2 = 9, which is solid. One adjustment: improve proportion and stripe integration by re-measuring the head thirds and rebuilding stripe edges with tapered strokes.
Why: Add the four category scores: 2 + 3 + 2 + 2 = 9. Since 9 is at least 8, the study is solid. The weakest categories are proportion and stripe integration, each at 2, so the adjustment targets those.
Check: Re-score after adjustment. Confirm the total remains at least 8 and that the weakest category improves by at least one point.
Common mistakes
- Making the eye-to-nose distance too long, which pushes the muzzle down and flattens the forehead. Re-measure the eye line and nose line; adjust so the eye-to-nose distance is close to one-third of head height.
- Drawing fur strokes in random directions, which breaks the form and looks like noise. Mark flow arrows first and make each stroke taper from root to tip along the arrow direction.
- Filling stripes as solid dark blocks instead of tapered stroke clusters. Build stripe edges with short tapered strokes and vary spacing; keep the center of the stripe lighter.
- Covering the eye with dense fur strokes and losing the eye shape. Draw the eye shape first and keep a clear margin around it; add fur strokes outside that margin.
Self-check rubric
- Proportion: three head-height thirds are close to equal; eye-to-nose and nose-to-chin ratios are near one-third.
- Fur direction: at least eight of ten sampled strokes taper and follow the marked flow arrows.
- Stripe integration: stripe edges are tapered clusters that wrap with the head form, not solid blocks.
- Clarity: eye shape and nose pad remain readable; shading density varies between light and dark zones.
- Valid alternatives: cross-hatching in shadows is accepted if dominant stroke direction and taper are preserved.
Questions and answers
Do I need the printable tiger plate to complete the lesson?
No. The plate is planned but not yet built. The text describes the proportion guides and stroke convention, so you can use paper, pencil, and a ruler.
What if my tiger head does not match the one-third ratios exactly?
The ratios are guides. A mismatch within about 10 percent is acceptable for a study. Adjust the grid before adding detail if the mismatch is larger.
Can I use cross-hatching for shadows instead of directional strokes?
Yes, as a valid alternative, provided the dominant stroke direction still follows the flow arrows and the strokes taper.
How do I know if my fur texture is working?
Sample ten strokes and check that at least eight point within the marked flow arrows and taper from root to tip. Also check that spacing varies.