Free original lessons
Pencil Snake Drawing: Coil Spacing, Taper, and Head Construction
Learn to draw a coiled pencil snake with even loop spacing, smooth body taper, and a clear head shape using simple construction steps and checks.
Free lesson
Four exercises
Worked answers
Object Drawing Lessons
This lesson teaches a repeatable pencil method for a coiled snake. You will plan overlapping body loops with consistent spacing, taper the body from thick mid-section to narrow neck and tail, and construct a head that reads clearly at the front of the coil. The approach uses light construction lines, then tonal layering with pencil pressure. All measurements are hypothetical examples; measure your own paper and pencil before drawing. The convention for judging size is simple: x-height means the distance from baseline to midline of your written letters, used here only as a relative scale for small features. Letter styles vary, so treat x-height as a flexible guide, not a fixed unit.
Practice materials: Printable downloads are not available for this lesson yet. Use the instructions and four exercises below.
Reference illustration
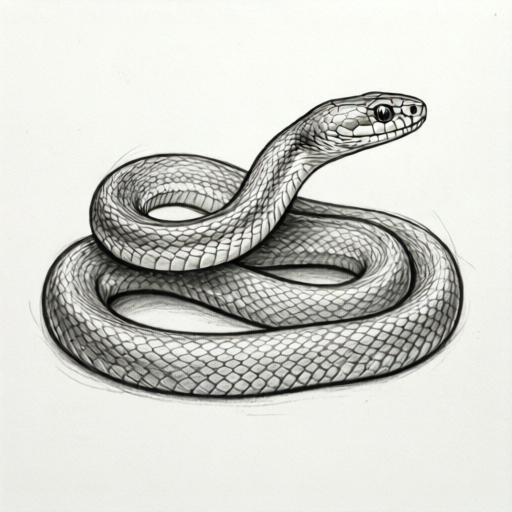
Use the stated measurements and conventions for each exercise.
Plan the coil path before committing
Start with a light pencil and a blank area at least three times the intended coil width. Mark a center point for the coil. Draw a small spiral outward with two or three turns, keeping the gap between neighboring loops roughly equal. Equal spacing is the main visual cue that the snake is coiled rather than tangled.
Decide where the head will sit. A common choice is the outer front loop, so the head overlaps the body slightly and faces the viewer. Mark the neck entry point on the spiral and the tail exit point at the outer end. Keep the tail exit on the opposite side of the head to avoid a crowded silhouette.
- Mark the coil center and draw a light spiral with two or three turns.
- Check loop gaps with a scrap-paper strip; adjust any gap that is more than about one pencil-width different from its neighbors.
- Mark the head position on the outer front loop and the tail exit on the outer back loop.
- Erase nothing yet; keep all lines light enough to lift with a kneaded eraser.
Build body taper from mid-section to ends
A snake body is thickest near the mid-section and narrows toward the neck and tail. On your spiral, assign a width at three points: mid-body, neck, and tail tip. For example only, if mid-body is four pencil widths, the neck might be two and the tail tip one. These numbers are hypothetical; choose values that fit your paper.
Draw the body outline as two parallel curves offset from the spiral centerline. Keep the offset consistent along each segment, then reduce it gradually at the neck and tail. Overlap the body where loops cross by drawing the nearer loop's outline continuously and breaking the farther loop's line at the crossing.
- Mark width at mid-body, neck, and tail tip with light ticks.
- Draw one side of the body outline following the spiral, then the other side at the chosen offset.
- At each loop crossing, decide which loop is nearer and draw that outline through; stop the farther outline at the crossing.
- Compare neck and tail widths to your ticks and adjust before adding tone.
Construct the head and add tonal layering
The head should read as a rounded wedge, wider at the back and narrower at the snout. Draw a light oval for the skull, then a shorter oval for the snout overlapping the front. Add a jaw line that curves gently back toward the neck. Place the eye on the upper side of the skull oval, about one x-height from the snout edge. Because letter styles vary, use x-height only as a relative guide and adjust to your drawing size.
Add tone in layers. First a light even layer over the body, then a second layer on the underside of each loop to suggest roundness. Keep the head slightly lighter than the darkest body shadow so the face stays readable. Use pencil pressure, not smudging, to darken. Leave a thin highlight along the top of each loop.
- Draw a skull oval and a snout oval overlapping at the front.
- Add a jaw line from the snout back toward the neck entry point.
- Place the eye one x-height from the snout edge on the upper skull.
- Apply a light base tone, then a second layer on loop undersides; keep the head lighter than the darkest body shadow.
Worked example
A coil plan has three loops with gaps of 8 mm, 9 mm, and 13 mm. Mid-body width is 12 mm, neck width 6 mm, and tail tip 3 mm. Identify the spacing problem and state one correction.
Worked answer
The third gap is 13 mm, which is 4 mm wider than the 9 mm gap and 5 mm wider than the 8 mm gap. Redraw the outer loop so its gap is about 9 mm, matching the middle gap within one pencil width.
Four practice exercises
Exercise 1
A coil plan has four loops with gaps of 10 mm, 11 mm, 9 mm, and 16 mm. Mid-body width is 14 mm, neck 7 mm, tail tip 4 mm. State the spacing problem and one correction.
Show answer and check
The fourth gap, 16 mm, is 5 mm wider than the 11 mm gap and 7 mm wider than the 9 mm gap. Redraw the outer loop so its gap is about 10 mm, within one pencil width of its neighbors.
Why: Even spacing is judged by comparing each gap with its neighbors. The 16 mm gap is the outlier, so the outer loop needs adjustment.
Check: Compare each gap with its neighbors: the 16 mm gap is the outlier. After redrawing, confirm the outer gap is about 10 mm, within 1 mm of the 9–11 mm neighbors.
Exercise 2
A body outline is drawn with mid-body width 16 mm, neck width 15 mm, and tail tip 5 mm. Identify the taper error and describe the corrected widths.
Show answer and check
The neck is too wide relative to mid-body; it should be noticeably narrower. For example only, keep mid-body 16 mm, reduce neck to about 8 mm, and keep tail tip 5 mm.
Why: A snake tapers from mid-section toward neck and tail. A 15 mm neck nearly equals the 16 mm mid-body, so the taper is missing.
Check: Confirm mid-body 16 mm is greater than neck about 8 mm, which is greater than tail tip 5 mm, with the neck roughly half the mid-body width.
Exercise 3
A head is drawn as a single circle 20 mm across with the eye at the center. Describe two construction changes that would make the head read as a snake head.
Show answer and check
Replace the circle with two overlapping ovals: a skull oval and a narrower snout oval at the front. Move the eye to the upper side of the skull oval, about one x-height from the snout edge, and add a jaw line returning to the neck.
Why: A single circle gives no snout direction. Overlapping ovals create a wedge shape, and the eye position plus jaw line clarify orientation.
Check: Confirm the snout oval is narrower than the skull oval and that the eye sits on the upper skull, not at the center.
Exercise 4
A tonal plan uses one heavy layer over the whole snake, making the head as dark as the body shadow. State the tonal problem and give a two-layer correction.
Show answer and check
The single heavy layer flattens the coil and hides the head. Apply a light base layer over the whole body, then a second layer only on loop undersides, keeping the head lighter than the darkest body shadow.
Why: Layered tone preserves roundness and keeps the face readable. Equal darkness on head and body removes the visual hierarchy.
Check: Compare the head tone with the darkest loop underside; the head should be visibly lighter, and two distinct layers should be present.
Common mistakes
- Loop gaps vary widely, making the coil look tangled. Measure gaps with a scrap-paper strip and redraw any gap that differs by more than one pencil width from its neighbors.
- Body width stays constant from neck to tail. Mark width ticks at mid-body, neck, and tail tip, then taper the outline gradually between them.
- Head is drawn as a circle with no snout direction. Use two overlapping ovals, skull and snout, and add a jaw line that points back to the neck.
- Tone is applied heavily in one pass, flattening the coil. Build tone in two light layers and darken only loop undersides with pencil pressure.
Self-check rubric
- Coil loops show roughly even spacing, with no gap differing by more than about one pencil width from its neighbors.
- Body taper is visible: mid-body is widest, neck is narrower, and tail tip is narrowest.
- Loop crossings are handled consistently, with the nearer loop drawn through and the farther loop stopped.
- Head reads as a rounded wedge with a distinct snout direction and a jaw line returning to the neck.
- Eye placement is plausible relative to the snout, using x-height as a flexible guide.
- Tone is layered, with darker loop undersides and a lighter head; highlights are left along loop tops.
- Valid alternatives are accepted: different loop counts, head positions, and letter-style-based x-height choices are allowed if the checks above hold.
Questions and answers
How do I keep loop spacing even without a ruler?
Use a scrap-paper strip marked with one pencil width. Slide it between loops and adjust any gap that is noticeably wider or narrower than the strip.
What does x-height mean here?
X-height is the distance from baseline to midline of your written letters. Use it only as a relative guide for small features like eye placement; letter styles vary, so adjust to your drawing size.
Should the head overlap the body or sit beside it?
Overlapping the outer front loop usually reads more clearly because the head appears in front of the coil. Keep the tail exit on the opposite side to avoid crowding.
How dark should the head be compared with the body?
Keep the head slightly lighter than the darkest body shadow so the eye and jaw line remain readable. Darken loop undersides first.