Free original lessons
Softball Glove Drawing: Pocket Outline and Lace Path
Learn to draw a softball glove with a clear pocket outline and a numbered lace path through web and fingers, using simple shapes and checkable steps.
Free lesson
Four exercises
Worked answers
Object Drawing Lessons
This lesson teaches a reliable way to draw a softball glove by building the pocket outline first, then adding a lace path that travels through the web and fingers. The method uses basic shapes, a consistent unit system, and a simple convention for line weight so you can check your work without needing a reference photo. You will practice proportion, pocket shape, and lace routing, then test your drawing against a short rubric. All measurements are hypothetical examples; measure your own paper and tools if you adapt the scale.
Practice materials: Printable downloads are not available for this lesson yet. Use the instructions and four exercises below.
Reference illustration
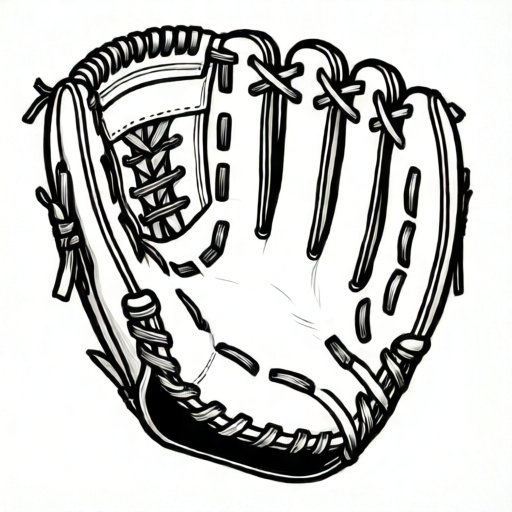
Use the stated measurements and conventions for each exercise.
Build the glove outline from simple shapes
Start with a rounded rectangle for the palm and a smaller rounded rectangle for the thumb. Place the thumb on the left side for a right-handed glove, or mirror it for a left-handed glove. Keep the palm about twice as wide as the thumb. Use light pencil lines so you can adjust proportions before committing.
Add four finger capsules along the top edge. Make the index finger slightly shorter than the middle finger, and the ring and little fingers slightly shorter again. The finger tips should form a gentle curve, not a straight line. This curve helps the glove look natural and prepares the pocket area.
Define the pocket as a shallow U-shape between the thumb and index finger. The pocket outline should sit below the finger bases and above the heel of the palm. Draw it with a slightly thicker line than the construction shapes so it reads as a key feature.
- Draw a rounded rectangle 8 units wide and 10 units tall for the palm.
- Draw a thumb capsule 3 units wide and 6 units tall, attached to the left side of the palm.
- Add four finger capsules on top, each 2 units wide, with lengths 5, 6, 5, and 4 units from index to little finger.
- Sketch a U-shaped pocket outline 4 units wide and 3 units deep between the thumb and index finger.
- Erase construction lines lightly, keeping the pocket outline visible.
Plan the lace path through web and fingers
The lace path is a single continuous route that crosses the web between thumb and index finger, then travels across the finger bases. Use a dashed line for planning, then convert it to a solid line with small crossing marks where the lace passes over itself. Number the path from 1 at the thumb-side web to 6 at the little-finger side so you can check the order.
Keep the lace path inside the glove outline. Each segment should cross the web or finger base at a slight angle, not straight up and down. This angled crossing makes the lace look threaded rather than drawn as a grid. Space the crossings evenly, about 1 unit apart in the hypothetical scale.
Use a simple convention for line weight: construction lines are light, the pocket outline is medium, and the lace path is the darkest line. This convention is not a universal standard; it is a checkable rule for this lesson. Valid alternatives include using color for the lace path or adding small arrows to show direction, as long as the path remains continuous and numbered.
- Mark point 1 at the thumb-side web, about 1 unit below the pocket top.
- Draw a dashed segment to point 2 at the index-finger base, crossing the web at a slight angle.
- Continue to point 3 between index and middle fingers, then point 4 between middle and ring fingers.
- Add point 5 between ring and little fingers, then point 6 at the little-finger outer edge.
- Convert the dashed path to a solid dark line, adding small crossing marks where segments overlap.
Refine the pocket and shade for depth
Refine the pocket outline by checking that it is wider at the top than at the bottom and that it does not touch the thumb or index finger. A pocket that is too narrow looks like a slit; too wide and it merges with the palm. Use the 4-unit width and 3-unit depth as a starting example, then adjust to your glove outline.
Add shading inside the pocket with short parallel lines that follow the pocket curve. Keep shading lighter near the opening and darker near the bottom to suggest depth. Do not shade over the lace path; leave a small gap so the lace remains readable.
Check the whole drawing by tracing the lace path with your finger from 1 to 6. If you can follow it without lifting your finger, the path is continuous. Then compare the pocket width to the thumb width; the pocket should be slightly wider than the thumb in this lesson’s convention.
- Compare pocket width to thumb width; adjust until the pocket is about 1 unit wider.
- Shade the pocket bottom with 5 to 7 short parallel lines, leaving the lace path clear.
- Trace the lace path from 1 to 6 to confirm continuity.
- Label the pocket outline and lace path lightly for your own check, then erase labels if desired.
Worked example
Draw a glove outline with a pocket 4 units wide and 3 units deep, then plan a lace path with 6 numbered points from the thumb-side web to the little-finger edge. Use the lesson convention for line weight.
Worked answer
The glove outline has a palm 8 by 10 units, a thumb 3 by 6 units on the left, and four finger capsules of lengths 5, 6, 5, and 4 units. The pocket is a U-shape 4 units wide and 3 units deep between thumb and index finger. The lace path runs from point 1 at the thumb-side web to point 2 at the index base, then to points 3, 4, and 5 between fingers, ending at point 6 on the little-finger edge. Construction lines are light, the pocket is medium, and the lace path is dark. The path stays inside the outline and is continuous from 1 to 6.
Four practice exercises
Exercise 1
Using the lesson proportions, draw a glove outline with palm 8 by 10 units, thumb 3 by 6 units on the left, and four fingers of lengths 5, 6, 5, and 4 units. Add a pocket 4 units wide and 3 units deep. Describe where the pocket sits relative to the thumb and index finger.
Show answer and check
The pocket sits between the thumb and index finger, below the finger bases and above the heel of the palm. It is 4 units wide and 3 units deep, wider at the top than at the bottom, and does not touch the thumb or index finger.
Why: The palm and thumb establish the overall width, and the finger lengths create a curved top edge. The pocket is placed in the gap between thumb and index finger, using the given width and depth to keep it clear of both.
Check: Measure the pocket width and depth against the thumb width. The pocket should be about 1 unit wider than the thumb and should not overlap the thumb or index finger outlines.
Exercise 2
Plan a lace path with six numbered points from the thumb-side web to the little-finger edge. Describe the order of the points and one check that confirms the path is continuous.
Show answer and check
Point 1 is at the thumb-side web, point 2 at the index-finger base, point 3 between index and middle fingers, point 4 between middle and ring fingers, point 5 between ring and little fingers, and point 6 at the little-finger outer edge. The path is continuous because you can trace from 1 to 6 without lifting your finger or crossing outside the glove outline.
Why: Numbering from the thumb side to the little-finger side gives a single route across the web and finger bases. Each point sits at a natural crossing location, so the path reads as threaded lace.
Check: Trace the path with your finger from 1 to 6. Confirm that every segment stays inside the glove outline and that no segment jumps over a number out of order.
Exercise 3
A drawing has a pocket that is 2 units wide and 5 units deep, and the lace path crosses itself twice. Identify two mistakes and state how to fix each one using the lesson conventions.
Show answer and check
Mistake one: the pocket is too narrow and too deep, looking like a slit. Fix by making it about 4 units wide and 3 units deep, wider at the top. Mistake two: the lace path crosses itself randomly. Fix by numbering the path from 1 to 6 and keeping each segment angled but orderly, staying inside the outline.
Why: The lesson pocket convention is a shallow U-shape wider than the thumb. A narrow, deep pocket does not match that shape. Random crossings break the continuous numbered route, so renumbering and re-routing restore order.
Check: Compare the pocket width to the thumb width; it should be slightly wider. Then trace the lace path from 1 to 6 and confirm there are no unintended crossings.
Exercise 4
Draw a glove with the thumb on the right side instead of the left. State how the lace path numbering changes and give one way to check that the mirrored drawing still follows the lesson convention.
Show answer and check
Mirror the thumb to the right side and reverse the lace path numbering: point 1 starts at the right-side web near the thumb, and point 6 ends at the left outer edge near the little finger. Check that the path is still continuous from 1 to 6 and stays inside the outline, and that the pocket remains between thumb and index finger.
Why: Mirroring swaps left and right, so the thumb-side web is now on the right. Reversing the numbering keeps the path starting at the thumb side and ending at the little-finger side, preserving the lesson’s order.
Check: Trace the path from 1 to 6 on the mirrored drawing. Confirm the pocket is still a shallow U-shape between thumb and index finger and that the line weight convention is applied.
Common mistakes
- Drawing the pocket as a straight vertical slit. Use a shallow U-shape that is wider at the top and curves inward at the bottom.
- Making the lace path cross itself randomly. Number the path from 1 to 6 and keep each segment angled but orderly.
- Letting the lace path run outside the glove outline. Keep every segment inside the palm, web, or finger-base area.
- Using the same line weight for construction, pocket, and lace. Apply the lesson convention: light construction, medium pocket, dark lace.
Self-check rubric
- Glove outline includes palm, thumb, and four finger capsules with plausible proportions.
- Pocket outline is a shallow U-shape, wider at the top than the bottom, and does not touch thumb or index finger.
- Lace path is continuous, numbered 1 to 6, and stays inside the glove outline.
- Lace segments cross the web and finger bases at slight angles and are evenly spaced.
- Line weight convention is applied: light construction, medium pocket, dark lace.
- Shading inside the pocket suggests depth without covering the lace path.
- Valid alternatives are accepted if the path remains continuous and the pocket shape is clear.
Questions and answers
Do I need a reference photo to draw the glove?
No. The lesson uses simple shapes and a numbered lace path that you can build from the instructions alone.
Can I mirror the glove for a left-handed player?
Yes. Mirror the thumb to the right side and reverse the lace path numbering from 1 on the right web to 6 on the left edge.
Are the unit measurements real glove sizes?
No. They are hypothetical examples for proportion practice. Measure your own paper and adjust the scale consistently.
What if my lace path looks different from the example?
Valid alternatives are allowed if the path is continuous, numbered, inside the outline, and crosses the web and finger bases at slight angles.