Free original lessons
Draw a Stormy Sky: Layered Clouds and Rain Streaks
Learn to build a stormy sky using three cloud-layer bands, directional rain streaks, and a simple tonal key. Includes a worked example, four practice tasks, and a rubric.
Free lesson
Four exercises
Worked answers
Object Drawing Lessons
A stormy sky reads clearly when it has depth: darker, heavier cloud bands sit low, lighter bands recede above, and rain streaks follow one consistent direction. This lesson uses a defined convention for cloud layering and rain marks so you can compose a convincing sky without drawing a full landscape or weather symbols. You will work on a blank sky panel, use a tonal key to keep values ordered, and check your result with simple, observable criteria. All measurements are hypothetical examples; measure your own paper and tools before drawing.
Practice materials: Printable downloads are not available for this lesson yet. Use the instructions and four exercises below.
Reference illustration
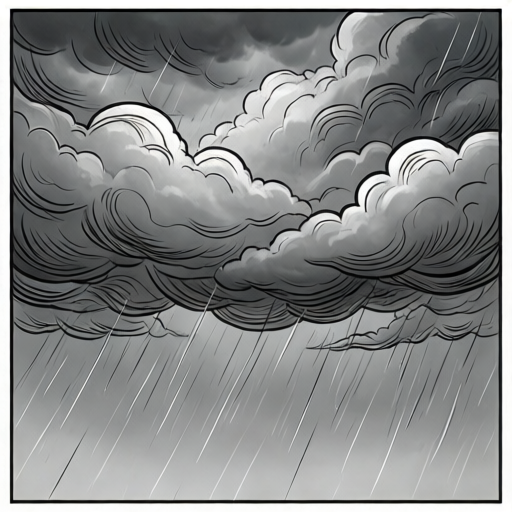
Use the stated measurements and conventions for each exercise.
Set up the sky panel and tonal key
Choose a rectangular sky panel. As a hypothetical example, a panel 18 cm wide and 12 cm high gives room for three horizontal cloud bands and a rain area. Mark the panel edges lightly. Decide a light source direction, such as upper left, and keep it consistent.
Make a three-step tonal key on a scrap strip: light, mid, and dark. Use your actual pencil or medium to produce these values; do not assume a standard hardness. Label the key L, M, D. The key is your reference for cloud bands and rain marks.
- Draw a light border around the sky panel.
- Create a scrap tonal key with three labeled patches: L, M, D.
- Mark a faint horizontal guide at about one-third and two-thirds of the panel height (hypothetical example: 4 cm and 8 cm on a 12 cm panel).
- Choose one rain direction, such as 20 degrees from vertical, and note it at the panel edge.
Build three cloud-layer bands
Use the convention: the lowest band is the darkest and largest, the middle band is mid-toned and slightly smaller, and the top band is lightest and smallest. This ordering creates depth. Cloud shapes are lumpy ovals and rounded wedges, not perfect circles.
Keep band edges irregular but continuous. Overlap the middle band slightly behind the lower band, and the top band behind the middle. Leave gaps of sky between bands to suggest distance. Shade each band with its key value, then add a slightly darker underside edge on the lower band only.
- Draw the lower band across the bottom third using rounded wedges; keep its top edge bumpy.
- Draw the middle band above it, overlapping slightly, with smaller bumps.
- Draw the top band near the upper third, smallest and lightest.
- Shade lower band D, middle band M, top band L; add a darker underside line to the lower band.
Add directional rain streaks
Rain streaks are short, straight marks that follow one direction. Use the convention: each streak is a thin line about 1 to 2 cm long (hypothetical example) with a small gap between streaks. Vary length slightly but not direction. Place denser streaks under the darkest band and sparser streaks near the top band.
Do not draw lightning bolts or weather symbols. Keep streaks separate from cloud outlines so the clouds remain readable. If a streak crosses a cloud, stop it at the cloud edge or draw it lightly over the cloud to show rain in front.
- Mark the chosen rain direction with a faint arrow outside the panel.
- Draw a first row of streaks under the lower band, spacing them about 1 cm apart (hypothetical example).
- Add a second row with slightly shorter streaks and wider spacing.
- Check that every streak is parallel to the direction arrow; erase any that are not.
Balance values and finish
Step back and compare the three bands to your tonal key. The lower band should be clearly darker than the middle, and the middle darker than the top. If two bands look equal, darken the lower one or lighten the upper one. Keep the rain streaks lighter than the lower band so they read as marks, not as a solid mass.
Finish by cleaning guide marks and strengthening the darkest underside edge of the lower band. Leave the top band edges soft. The sky should show layering and one rain direction without extra symbols.
- Compare each band to the L, M, D key.
- Adjust one value if two bands are too close.
- Erase guide marks and stray streaks.
- Confirm rain streaks share one direction and do not form a solid block.
Worked example
On an 18 cm by 12 cm sky panel, place three cloud bands and rain streaks. Use a tonal key L, M, D. The lower band is darkest and largest, the middle band is mid-toned, and the top band is lightest. Rain streaks follow one direction, about 20 degrees from vertical, and are denser under the lower band.
Worked answer
Draw faint guides at 4 cm and 8 cm from the bottom. Lower band: rounded wedges across the bottom third, shaded D, with a darker underside edge. Middle band: smaller wedges overlapping slightly above 4 cm, shaded M. Top band: smallest wedges near 8 cm, shaded L. Mark a direction arrow at 20 degrees from vertical outside the panel. Add streaks 1 to 2 cm long under the lower band spaced about 1 cm apart, then shorter and wider-spaced streaks under the middle band. Check that lower band is darker than middle, middle darker than top, and all streaks parallel to the arrow.
Four practice exercises
Exercise 1
A sky panel is 16 cm wide and 10 cm high. You place three horizontal guides at 3 cm and 6 cm from the bottom. Describe where the lower, middle, and top cloud bands go and which tonal key value each uses.
Show answer and check
Lower band below 3 cm, shaded D; middle band between 3 cm and 6 cm, shaded M; top band above 6 cm, shaded L.
Why: The convention orders bands from darkest and lowest to lightest and highest. The guides divide the panel into three horizontal zones.
Check: Measure the guide heights on your panel and confirm each band sits in its zone and matches the correct key label.
Exercise 2
You choose a rain direction 15 degrees from vertical. You draw ten streaks: six at 15 degrees, two at 30 degrees, and two vertical. How many streaks follow the chosen direction, and what should you do with the others?
Show answer and check
Six streaks follow the chosen direction. Erase or redraw the four that do not.
Why: The convention requires every streak to be parallel to the single chosen direction. Only the six at 15 degrees match.
Check: Compare each streak to the direction arrow; count matches and correct mismatches.
Exercise 3
Under the lower band you place streaks 1 cm apart across 12 cm. Under the middle band you place streaks 2 cm apart across 12 cm. How many streaks are in each row, and which row is denser?
Show answer and check
Lower row: 12 streaks if starting at one edge and spacing 1 cm across 12 cm (hypothetical count). Middle row: 6 streaks at 2 cm spacing. The lower row is denser.
Why: Density increases as spacing decreases. The lower band should have denser rain according to the convention.
Check: Count the gaps and streaks in each row and confirm the lower row has smaller gaps.
Exercise 4
Your lower band and middle band look equally dark. You want the lower band to be clearly darker. Name one adjustment and state how you would check it.
Show answer and check
Darken the lower band by one step on your tonal key, or lighten the middle band. Check by comparing both bands side by side to the L, M, D key.
Why: The convention requires a clear value order. Adjusting one band restores the order without changing the layout.
Check: Place the tonal key next to each band and confirm lower matches D and middle matches M, with a visible difference.
Common mistakes
- Making all three cloud bands the same tone. Assign D to the lower band, M to the middle, and L to the top, then check against the tonal key.
- Drawing rain streaks in several directions. Choose one direction arrow at the panel edge and make every streak parallel to it.
- Using perfect circles for clouds. Build clouds from rounded wedges and lumpy ovals with irregular top edges.
- Letting rain streaks merge into a solid dark area. Keep gaps between streaks and make streaks lighter than the lower cloud band.
Self-check rubric
- Three distinct cloud bands are present and ordered dark to light from bottom to top.
- Cloud shapes use rounded wedges or lumpy ovals, not perfect circles.
- Rain streaks share one consistent direction marked at the panel edge.
- Streak density is greater under the lower band and sparser near the top.
- Values match the student's own L, M, D tonal key.
- No lightning bolts or weather symbols are included.
- Valid alternatives: any single rain direction, any cloud bump pattern, and any panel size are acceptable if the ordering and direction rules are met.
Questions and answers
Do I need a full landscape to draw a stormy sky?
No. This lesson uses a blank sky panel. The focus is cloud layering and rain streaks only.
Can I use a different rain direction?
Yes. Any single direction is valid if every streak follows it and the direction is noted at the panel edge.
How dark should the lowest cloud band be?
It should match the dark patch on your own tonal key. Measure your medium rather than assuming a fixed darkness.
Are the centimeter sizes required?
No. They are hypothetical examples. Measure your actual panel and scale the bands and streaks to fit.