Free original lessons
Draw an Acorn: Cap Texture and Nut-Body Shading
Learn to draw an acorn with a textured cap and shaded nut body using contour steps, cross-hatch patterns, and a simple tonal key.
Free lesson
Four exercises
Worked answers
Object Drawing Lessons
This lesson focuses on the acorn alone: its cap texture and nut-body construction. You will build the shape from simple contours, add a cross-hatch cap pattern, and shade the nut body with a clear tonal key. For drawing, treat the cap as a dome and the nut as an egg-like form. All numerical values are hypothetical examples for practice, not manufacturing standards. Measure your own paper and pencil if you need exact sizes.
Practice materials: Printable downloads are not available for this lesson yet. Use the instructions and four exercises below.
Reference illustration
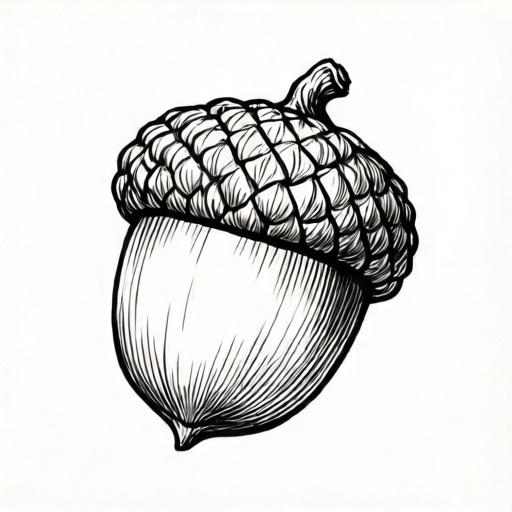
Use the stated measurements and conventions for each exercise.
Build the Nut-Body Contour
Start with a light vertical axis. Mark a top point where the cap will sit and a bottom point for the nut tip. The nut body is wider near the top and narrows toward the bottom, like an egg standing on its narrow end. Keep the outline smooth and slightly asymmetrical; real acorns are rarely perfectly symmetrical.
Draw two gentle side curves from the top mark to the bottom tip. Check that the widest part sits about one-third of the way down the nut body from the cap rim, which keeps it above the nut midpoint. If your curve bulges too low, the acorn will look like a pear. Adjust with light erasing before adding texture.
- Draw a light vertical axis about 8 cm long on your paper (hypothetical example).
- Mark the cap line near the top and the nut tip at the bottom.
- Sketch two side curves that bulge slightly above the midpoint.
- Refine the outline so the bottom tapers to a small rounded point.
Add the Cap Dome and Rim
The cap sits on top like a shallow bowl or dome. Draw a curved line above the nut body, then a second curved line below it to form the rim. The rim should overlap the nut body slightly, because the cap covers the top of the nut. Keep the dome wider than the nut body at the rim.
Check the cap height: it should be roughly one-quarter to one-third of the total acorn height. If the cap looks like a flat hat, raise the dome curve. If it looks like a full circle, flatten the top slightly.
- Draw a dome curve above the nut body.
- Add a lower rim curve that crosses the nut outline.
- Erase the nut outline inside the cap area so the cap reads as covering it.
- Check that the cap width is slightly greater than the nut width at the rim.
Create Cap Texture with Cross-Hatch
Cap texture comes from small overlapping scales, not from random scribbles. Use a cross-hatch pattern: draw short diagonal lines in one direction, then cross them with short lines in the opposite direction. Keep the lines close together near the rim and slightly more open near the dome top. This suggests the cap's rough, scaly surface.
Work in small patches rather than covering the whole cap at once. Leave a thin untextured border along the rim so the cap edge stays readable. If your lines become too dense, lighten them with an eraser rather than adding more lines.
- Draw short diagonal lines across the cap in one direction.
- Cross them with short lines in the opposite direction.
- Keep patches small and follow the dome curve.
- Leave a thin clear border at the rim.
Shade the Nut Body with a Tonal Key
Use three tones: light, medium, and dark. Decide a light direction, for example from the upper left (hypothetical). The side facing the light stays light. The opposite side gets medium shading. The area under the cap rim and near the bottom tip gets dark shading. Blend with light pencil strokes that follow the nut's curve.
A simple tonal key on scrap paper helps you compare values. Draw three small squares: light, medium, dark. Match your nut shading to those squares. Avoid shading the entire nut evenly; contrast between light and dark makes the form read as round.
- Choose a light direction and mark it lightly on scrap paper.
- Shade the side away from the light with medium tone.
- Darken under the cap rim and near the bottom tip.
- Blend strokes along the nut's curve and compare to your tonal key.
Worked example
Draw an acorn about 10 cm tall on plain paper. Use a light direction from the upper right. Add cross-hatch cap texture and three-tone nut shading. Check that the cap height is about 3 cm and the widest nut point is about 3.5 cm below the cap rim.
Worked answer
A completed acorn with a dome cap about 3 cm tall, a nut body widest about 3.5 cm below the rim, cross-hatch texture in small patches, and three tones: light on the upper right, medium on the lower left, dark under the rim and near the tip.
Four practice exercises
Exercise 1
Draw an acorn 8 cm tall with a cap 2 cm tall. Place the widest nut point 2 cm below the cap rim. Use cross-hatch texture and two tones only: light and dark.
Show answer and check
An acorn with a 2 cm dome cap, nut body widest at 2 cm below the rim, cross-hatch patches on the cap, and two clear tones on the nut body.
Why: The cap is one-quarter of total height, which fits the suggested range. The nut body is 6 cm tall, so its midpoint is 3 cm below the rim; placing the widest point at 2 cm keeps it above the midpoint. Two tones simplify the shading decision.
Check: Measure cap height and widest-point distance with a ruler. Confirm the widest point is less than 3 cm below the rim, two distinct tone areas are present, and cross-hatch patches are visible.
Exercise 2
Draw an acorn 12 cm tall. Make the cap 4 cm tall and the nut body widest 5 cm below the rim. Use a light direction from the left and three tones. Add a thin clear border at the cap rim.
Show answer and check
A 12 cm acorn with a 4 cm cap, widest nut point at 5 cm below the rim, left-side light, three tones, and an untextured border at the rim.
Why: Cap height is one-third of total height, within the suggested range. The widest point is above the nut midpoint. The border keeps the rim readable.
Check: Measure cap and widest-point distances. Check that the left side is lightest and the border is visible.
Exercise 3
Draw two acorns side by side, each 9 cm tall. Give the first a cap 2.5 cm tall and the second a cap 3.5 cm tall. Use cross-hatch on both caps but vary the patch density. Shade both nut bodies with three tones.
Show answer and check
Two acorns with different cap heights, varied cross-hatch density, and three-tone nut shading on each.
Why: Comparing two cap heights shows how the dome proportion changes the look. Varying patch density practices texture control without changing the subject.
Check: Measure both cap heights. Confirm that cross-hatch density differs between caps and that each nut has three tones.
Exercise 4
Draw an acorn 10 cm tall with the cap rim crossing the nut outline. Erase the nut line inside the cap area. Add cross-hatch texture and shade the nut body with a dark zone under the rim and near the tip. Use a light direction from the upper left.
Show answer and check
An acorn with a clear cap overlap, erased interior nut line, cross-hatch texture, and dark zones under the rim and near the tip.
Why: Erasing the nut line inside the cap makes the cap read as covering the nut. Dark zones at the rim and tip create depth.
Check: Look for no nut outline inside the cap area. Confirm dark shading under the rim and near the tip, with the upper left lightest.
Common mistakes
- Making the nut body perfectly symmetrical and round. Add a slight asymmetry to the side curves and keep the widest point above the midpoint.
- Drawing cap texture as random scribbles. Use short cross-hatch lines in small patches that follow the dome curve.
- Shading the whole nut evenly. Use three distinct tones and keep one side light, one medium, and the rim area dark.
- Letting the cap look like a flat hat. Raise the dome curve and check that cap height is about one-quarter to one-third of total height.
Self-check rubric
- Nut body is egg-like with the widest point above the midpoint.
- Cap dome and rim overlap the nut body clearly.
- Cap texture uses short cross-hatch lines in small patches.
- Three distinct tones are visible on the nut body.
- Light direction is consistent across the shading.
- Outline is clean and readable after erasing construction lines.
Questions and answers
Do I need oak leaves or a squirrel to make the acorn look complete?
No. This lesson excludes leaves, squirrels, and fall scenes. The acorn alone is the subject.
How dense should the cap cross-hatch be?
Close enough to read as texture but open enough to see individual lines. Keep patches small and leave a thin border at the rim.
What if my acorn looks like a pear?
Move the widest bulge higher, to about one-third of the way down the nut body from the cap rim (above the nut midpoint), and narrow the lower half.
Can I use a different light direction?
Yes. Choose any direction, mark it on scrap paper, and keep the light, medium, and dark zones consistent.