Free original lessons
Face Positions Drawing: Front, Three-Quarter, and Profile Alignment
Learn to place eyes, nose, and mouth consistently across front, three-quarter, and profile views using simple alignment guides and checkable proportions.
Free lesson
Four exercises
Worked answers
Object Drawing Lessons
Drawing a face in different positions becomes manageable when you separate feature placement from expression and detail. This lesson teaches a repeatable method: establish an oval, mark the eye line, nose line, and mouth line, then adjust horizontal spacing for front, three-quarter, and profile views. You will use a defined convention for x-height (baseline to midline) and a rubric that accepts valid stylistic variation. All measurements are simple ratios you can check with a ruler or by eye. The goal is consistent alignment across the three positions, not a single universal face shape.
Practice materials: Printable downloads are not available for this lesson yet. Use the instructions and four exercises below.
Reference illustration
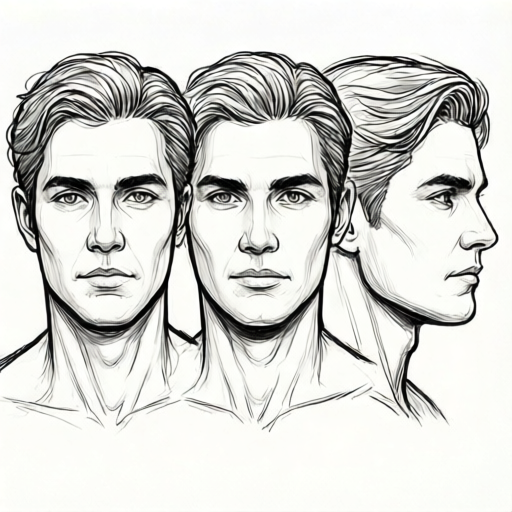
Use the stated measurements and conventions for each exercise.
Set the alignment convention
Use a face oval divided by three horizontal guide lines: the eye line, the nose line, and the mouth line. Define x-height as the vertical distance from the baseline (bottom of the oval) to the midline (halfway up the oval). This is a working convention, not a standard. Letter styles and feature shapes vary, so treat the lines as placement guides, not rigid rules.
For each view, draw the oval first. Mark the midline and baseline. Place the eye line above the midline by a chosen offset, for example halfway between the midline and the top of the oval; label this offset as a hypothetical example. The nose line sits a chosen distance below the eye line, and the mouth line a chosen distance below the nose line. These offsets are starting points you can adjust after measuring your own drawing. When an exercise or example uses different offsets, those offsets are chosen hypothetical examples and are stated in the task.
- Draw an oval and mark the baseline and midline.
- Measure x-height from baseline to midline.
- Place the eye line using your chosen ratio and label it as a hypothetical example.
- Add the nose line and mouth line below the eye line.
- Check that all three lines are horizontal and evenly spaced before adding features.
Front view placement
In front view, the face is symmetrical around a vertical center line. Place the eyes on the eye line, one on each side of the center, with a gap of about one eye width between them. The nose sits on the center line, its base near the nose line. The mouth is centered on the mouth line. Ear tops align near the eye line and ear bottoms near the nose line.
Check symmetry by folding the paper or using a mirror. Valid alternatives include wider or narrower eye spacing if the overall proportion remains balanced. The rubric rewards consistent alignment, not identical feature shapes.
- Draw a vertical center line through the oval.
- Mark eye positions on the eye line, leaving a central gap.
- Place the nose base on the center line at the nose line.
- Center the mouth on the mouth line.
- Align ear tops and bottoms to the eye and nose lines.
Three-quarter view placement
In three-quarter view, the face turns so one side is foreshortened. Keep the eye line, nose line, and mouth line horizontal. The far eye sits closer to the face edge and appears narrower; the near eye is wider. The nose shifts toward the far side, and the mouth follows the same shift. The far ear may be partly hidden.
Use the center line as a curved guide that follows the turn. Measure the distance from the near face edge to the nose and compare it with the far side; the near side should be wider. Label any numerical ratio you choose as a hypothetical example and verify it with a ruler.
- Draw the oval and tilt the vertical center guide to suggest the turn.
- Keep the three horizontal lines level.
- Place the near eye wider and the far eye narrower on the eye line.
- Shift the nose base toward the far side at the nose line.
- Shift the mouth toward the far side at the mouth line.
- Check that the near side of the face is wider than the far side.
Profile view placement
In profile, the face outline includes the forehead, nose bridge, nose tip, lips, and chin. The eye sits near the front edge of the oval on the eye line. The ear sits behind the eye, roughly between the eye line and nose line. The mouth line marks the lip separation near the front contour.
Keep the three horizontal lines level across the profile oval. The nose line marks the base of the nose where it meets the face. Check that the eye is not placed too far back and that the ear does not overlap the eye. Valid alternatives include different nose profiles and lip shapes as long as the alignment lines remain consistent.
- Draw the profile oval with a front contour for forehead, nose, lips, and chin.
- Mark the eye line, nose line, and mouth line horizontally.
- Place the eye near the front edge on the eye line.
- Place the ear between the eye line and nose line, behind the eye.
- Mark the lip separation at the mouth line.
- Check that the nose base meets the nose line and the chin sits below the mouth line.
Worked example
A student draws three ovals with x-height 6 cm. They place the eye line 3 cm above the midline, the nose line 2 cm below the eye line, and the mouth line 1.5 cm below the nose line. In front view the eyes are 2 cm apart; in three-quarter view the near eye is 2.5 cm wide and the far eye is 1.5 cm wide; in profile the eye is 1 cm from the front contour. Check the alignment.
Worked answer
The vertical spacing is consistent: eye line 3 cm above midline, nose line 2 cm below eye line, mouth line 1.5 cm below nose line. In front view the 2 cm gap is centered. In three-quarter view the near eye is wider than the far eye, which is correct. In profile the eye is near the front contour on the eye line. All three views keep horizontal guide lines level, so the placement is consistent.
Four practice exercises
Exercise 1
An oval has x-height 8 cm. The eye line is 4 cm above the midline. Using chosen hypothetical offsets, the nose line is 2.5 cm below the eye line and the mouth line is 2 cm below the nose line. Where is the mouth line? Give the distance from the midline.
Show answer and check
The mouth line is 0.5 cm below the midline.
Why: Eye line is 4 cm above midline. Nose line is 2.5 cm below eye line, so it is 1.5 cm above midline. Mouth line is 2 cm below nose line, so 1.5 minus 2 equals 0.5 cm below midline.
Check: Measure downward from the midline: 1.5 cm up to nose line, then 2 cm down to mouth line gives 0.5 cm below midline.
Exercise 2
In a three-quarter drawing, the near eye is 3 cm wide and the far eye is 1.8 cm wide. The distance from the near face edge to the nose is 4 cm. What should the far-side distance be if the near side is wider by 1.5 cm?
Show answer and check
The far-side distance should be 2.5 cm.
Why: Near-side distance is 4 cm. Near side is wider by 1.5 cm, so far side is 4 minus 1.5 equals 2.5 cm.
Check: Add 1.5 cm to the far-side distance: 2.5 plus 1.5 equals 4 cm, matching the near side.
Exercise 3
A profile oval has x-height 10 cm. The eye line is 5 cm above the midline. Using a chosen hypothetical offset, the nose line is 3 cm below the eye line. The ear top is on the eye line and the ear bottom is on the nose line. What is the ear height?
Show answer and check
The ear height is 3 cm.
Why: Ear top is on the eye line and ear bottom is on the nose line. The nose line is 3 cm below the eye line, so the vertical distance is 3 cm.
Check: Measure from the eye line down to the nose line; the distance should equal 3 cm.
Exercise 4
In front view, the eyes are 2.4 cm apart and each eye is 2.4 cm wide. The face width at the eye line is 12 cm. How much space remains on each side of the eyes if the eyes and gap are centered?
Show answer and check
Each side has 2.4 cm of space.
Why: Total eye span is 2.4 plus 2.4 plus 2.4 equals 7.2 cm. Face width 12 minus 7.2 equals 4.8 cm. Divided equally, each side is 2.4 cm.
Check: Add the two side spaces and the eye span: 2.4 plus 7.2 plus 2.4 equals 12 cm, matching the face width.
Common mistakes
- Tilting the eye, nose, and mouth lines in three-quarter view. Keep all three guide lines horizontal; only the vertical center guide curves or tilts.
- Placing the far eye the same width as the near eye in three-quarter view. Narrow the far eye and widen the near eye, then check the near side is wider.
- Putting the profile eye too far back in the oval. Move the eye toward the front contour while keeping it on the eye line.
- Spacing the nose and mouth lines unevenly between views. Measure x-height and apply the same ratios to all three ovals before adding features.
Self-check rubric
- All three views use horizontal eye, nose, and mouth lines.
- X-height is measured from baseline to midline and applied consistently.
- Front view is symmetrical around the vertical center line.
- Three-quarter view shows a wider near side and narrower far eye.
- Profile view places the eye near the front contour and the ear behind the eye.
- Valid stylistic alternatives are accepted if alignment and proportion remain consistent.
Questions and answers
Do I need to use exact ratios?
No. The ratios are hypothetical examples. Measure your own drawing and keep the same ratios across all three views for consistency.
Can feature shapes differ between views?
Yes. The rubric checks alignment and proportion, not identical shapes. Valid alternatives are accepted if the guide lines remain consistent.
What is x-height here?
X-height is the vertical distance from the baseline at the bottom of the oval to the midline halfway up the oval. It is a working convention for this lesson.
How do I check symmetry in front view?
Fold the paper along the center line or use a mirror. The eye positions and mouth center should match.