Free original lessons
Draw Tree Roots: Spreading Lines and Soil Line
Learn to draw a tree root system with a trunk base, spreading root lines, and a clear soil line using simple conventions and checkable steps.
Free lesson
Four exercises
Worked answers
Object Drawing Lessons
This lesson teaches a simple, repeatable way to draw tree roots: a trunk base above a soil line, with root lines spreading outward and downward. You will use a defined drawing convention so that different valid styles can still be checked fairly. The focus is on structure and clarity, not bark texture or canopy. All measurements are hypothetical examples; measure your own paper and tools before drawing.
Practice materials: Printable downloads are not available for this lesson yet. Use the instructions and four exercises below.
Reference illustration
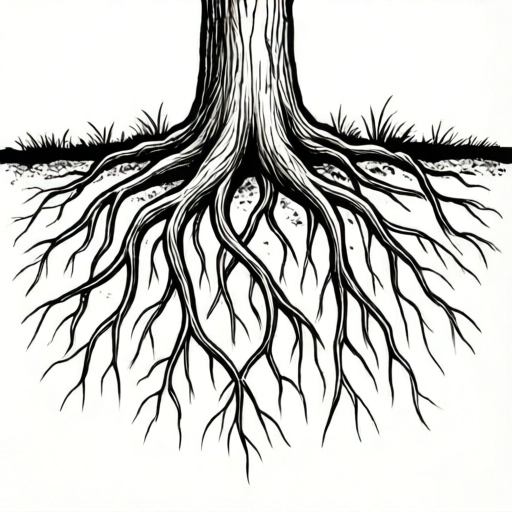
Use the stated measurements and conventions for each exercise.
Set the ground and trunk base
Start by drawing a horizontal soil line across the lower third of your paper. This line separates air from soil. Above it, draw a short trunk base: two slightly curved vertical sides that meet the soil line. The trunk base should be narrower at the top than at the soil line, like a small stump. Keep the trunk base centered or slightly off-center; either is valid if the roots can spread clearly.
Use a light pencil line for the soil line so you can adjust it. Mark a center point on the soil line where the trunk meets the ground. This point is the origin for the root spread. Decide a spread width: for example, if your paper is 20 cm wide, a hypothetical spread of 12 cm total (6 cm each side of center) leaves room for labels. These numbers are examples only; choose values that fit your actual paper.
- Draw a horizontal soil line with a ruler or straightedge.
- Draw two short trunk sides above the soil line, meeting it at the trunk base.
- Mark the center point where the trunk meets the soil line.
- Choose a total spread width that fits your paper and note it lightly.
Draw spreading root lines
From the center point, draw three to five main root lines that spread outward and downward below the soil line. Each main root should start at the trunk base and curve gently away. Use a convention: main roots are thicker near the trunk and taper as they extend. Secondary roots branch from main roots at a narrower angle. Keep lines smooth and avoid crossing main roots unless you intend a natural overlap.
A useful convention for checking spread: measure the horizontal distance from the center point to the farthest tip of each main root. In a hypothetical example, main root tips might reach 5 cm, 6 cm, and 4 cm from center. The spread is valid if at least two main roots extend beyond half the chosen spread width and no root tip touches the paper edge. Letter styles and line styles may vary; the convention is about structure, not a single universal look.
- Draw three to five main roots from the trunk base, spreading outward and downward.
- Taper each main root from thicker near the trunk to thinner at the tip.
- Add two or three secondary roots branching from main roots.
- Check that at least two main roots extend beyond half the chosen spread width.
Label parts and check the drawing
Label the soil line, trunk base, main roots, and secondary roots with short straight leader lines. Keep labels outside the root area so they do not cover lines. Use the same letter style throughout; handwriting may vary, but labels must be readable. A simple convention is to write labels horizontally and keep leader lines from crossing root lines.
Check the drawing against the rubric: soil line is clear and horizontal, trunk base meets the soil line, main roots spread outward and downward, secondary roots branch from main roots, and labels are readable. Measure the actual spread with a ruler and compare it to your chosen width. If a root tip is too close to the edge, shorten it or shift the center point. These checks use simple arithmetic and consistent units, such as centimeters.
- Label soil line, trunk base, main roots, and secondary roots.
- Keep leader lines short and avoid crossing root lines.
- Measure the farthest root tip distance from center.
- Compare measurements to your chosen spread width and adjust if needed.
Worked example
On a 20 cm wide paper, draw a soil line 7 cm from the bottom. Draw a trunk base centered on the soil line. Choose a total spread width of 12 cm. Draw three main roots and two secondary roots. Label the parts. Check that at least two main roots extend beyond 6 cm from center.
Worked answer
The drawing shows a horizontal soil line 7 cm from the bottom. The trunk base meets the soil line at the center point. Three main roots spread outward and downward: one reaches 5 cm left, one reaches 6 cm right, and one reaches 4 cm left. Two secondary roots branch from the main roots. Labels are placed outside the root area. Check: half of the 12 cm spread width is 6 cm. The tip distances are 5 cm, 6 cm, and 4 cm; none is strictly greater than 6 cm, so zero roots qualify and the check fails. Adjustment: reduce the spread width to 8 cm, so half is 4 cm; then the 5 cm and 6 cm roots both exceed 4 cm and the check passes. Alternatively, extend the 5 cm and 6 cm roots to 7 cm each while keeping the 12 cm spread, so two roots exceed 6 cm. After either adjustment, at least two main roots extend beyond half the chosen spread width.
Four practice exercises
Exercise 1
On a 15 cm wide paper, place a soil line 5 cm from the bottom. Draw a trunk base at the center. Choose a total spread width of 10 cm. Draw four main roots. Check that at least two main roots extend beyond 5 cm from center. Describe your root tip distances.
Show answer and check
A valid drawing has a horizontal soil line 5 cm from the bottom, a centered trunk base, and four main roots spreading outward and downward. Example tip distances from center: 4 cm left, 6 cm right, 3 cm left, 7 cm right. Two roots reach 6 cm and 7 cm, which are beyond 5 cm, so the check passes.
Why: The spread width is 10 cm, so half is 5 cm. At least two main roots must extend beyond 5 cm from center. The example distances satisfy this with simple arithmetic.
Check: Measure each main root tip distance from the center point with a ruler. Count how many are greater than 5 cm. The drawing passes if the count is at least two.
Exercise 2
Draw a soil line and trunk base on paper 18 cm wide. Use a total spread width of 14 cm. Draw three main roots with tip distances 6 cm left, 7 cm right, and 4 cm left. Draw two secondary roots. Does the drawing meet the spread check? Explain.
Show answer and check
Half of 14 cm is 7 cm. The tip distances are 6 cm, 7 cm, and 4 cm. The 7 cm root is equal to 7 cm, not beyond it; the 6 cm and 4 cm roots are also not beyond 7 cm. So zero roots are beyond half the spread width. The drawing does not meet the check. To fix it, extend one root to 8 cm or reduce the spread width to 10 cm (half = 5 cm) so both the 6 cm and 7 cm roots qualify.
Why: The check requires at least two main roots beyond half the spread width. With half equal to 7 cm, the distances 6, 7, and 4 do not produce two values greater than 7.
Check: Compute half the spread width: 14 divided by 2 equals 7 cm. Compare each tip distance to 7 cm using greater than. Count qualifying roots. The count must be at least two.
Exercise 3
On paper 22 cm wide, draw a soil line 8 cm from the bottom. Draw a trunk base slightly left of center. Choose a total spread width of 16 cm. Draw five main roots. At least two main roots must extend beyond 8 cm from center. Propose tip distances that pass the check and label all parts.
Show answer and check
A valid proposal: tip distances 9 cm left, 7 cm right, 8 cm left, 10 cm right, and 5 cm left. Half of 16 cm is 8 cm. The roots at 9 cm and 10 cm are beyond 8 cm, so the check passes. Labels are placed outside the root area for soil line, trunk base, main roots, and secondary roots.
Why: The spread width is 16 cm, so half is 8 cm. At least two tip distances must be greater than 8 cm. The proposed distances include 9 cm and 10 cm, which satisfy the requirement.
Check: Measure each tip distance from the center point. Count distances greater than 8 cm. The drawing passes if the count is at least two. Also check that labels are readable and do not cover root lines.
Exercise 4
Draw a root system on paper 12 cm wide. Place the soil line 4 cm from the bottom. Choose a total spread width of 8 cm. Draw three main roots and one secondary root. Check that at least two main roots extend beyond 4 cm from center. If your drawing fails, state one adjustment and redraw the check.
Show answer and check
A valid drawing has a horizontal soil line 4 cm from the bottom, a trunk base at center, and three main roots. Example tip distances: 3 cm left, 5 cm right, and 4 cm left. Half of 8 cm is 4 cm. The 5 cm root is beyond 4 cm, but the 4 cm root is equal, not beyond. Only one root qualifies, so the drawing fails. Adjustment: extend the 4 cm root to 5 cm. Then two roots (5 cm and 5 cm) are beyond 4 cm, and the check passes.
Why: The check requires at least two main roots beyond half the spread width. With half equal to 4 cm, the distances 3, 5, and 4 produce only one value greater than 4. Extending one root fixes the count.
Check: Compute half the spread width: 8 divided by 2 equals 4 cm. Compare each tip distance to 4 cm using greater than. Count qualifying roots. After adjustment, recount to confirm at least two roots qualify.
Common mistakes
- Drawing roots only sideways with no downward spread. Curve at least two main roots downward as well as outward so the root system looks anchored.
- Making all roots the same thickness. Taper main roots from thicker near the trunk to thinner at the tips; secondary roots should be thinner than main roots.
- Placing the soil line too high or too low, leaving no room for roots. Measure your paper and place the soil line so there is at least 6 cm of space below it for root spread, or adjust to your actual paper size.
- Labels covering root lines or crossing each other. Move labels outside the root area and use short leader lines that do not cross root lines.
Self-check rubric
- Soil line is present, horizontal, and clearly separates air from soil.
- Trunk base meets the soil line and is narrower at the top than at the soil line.
- Three to five main roots spread outward and downward from the trunk base.
- Main roots taper from thicker near the trunk to thinner at the tips.
- At least two secondary roots branch from main roots.
- At least two main roots extend beyond half the chosen spread width.
- Labels for soil line, trunk base, main roots, and secondary roots are readable and do not cover root lines.
- Valid alternative styles are accepted if the structural checks above are met.
Questions and answers
How many main roots should I draw?
Three to five main roots is a clear range. Fewer may look sparse; more may crowd the drawing. Choose a number that lets each root be seen and labeled.
Do I need to draw the whole tree?
No. This task focuses on the trunk base, soil line, and root spread. The canopy and bark texture are outside the boundary.
Can I use curved or straight root lines?
Both are valid if the roots spread outward and downward and taper toward the tips. The convention checks structure, not a single style.
How do I know my spread is wide enough?
Measure from the center point to the farthest root tip. At least two main roots should extend beyond half your chosen spread width. Use the same units for all measurements.