Free original lessons
Basset Hound Head Drawing: Drooping Ears and Wrinkled Face
Learn breed-specific basset hound head construction: oval skull, long drooping ears, wrinkled brow and muzzle folds, and eye placement, with a four-step plate and practice box.
Free lesson
Four exercises
Worked answers
Object Drawing Lessons
This lesson focuses only on the basset hound head, not general dog anatomy or full-body stance. You will build the head from an oval skull guide, add the breed's signature long drooping ears, place the wrinkled brow and muzzle folds, and set the eyes so the expression reads as a basset hound. Work on plain paper with a pencil and eraser. Use the four-step plate as a guide and the blank practice box for an independent redraw. All measurements are hypothetical examples; measure your own paper and tools before drawing.
Practice materials: Printable downloads are not available for this lesson yet. Use the instructions and four exercises below.
Reference illustration
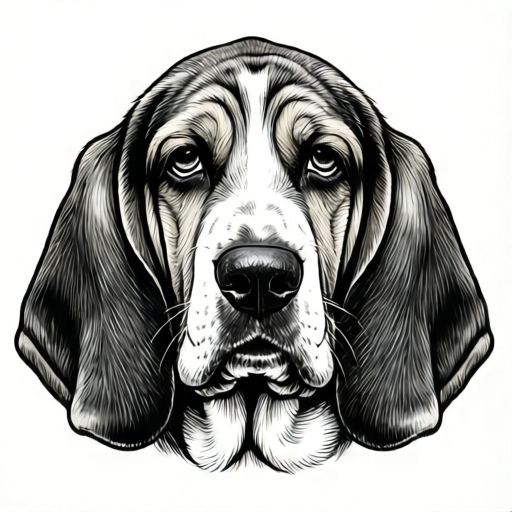
Use the stated measurements and conventions for each exercise.
Step 1: Build the Oval Skull Guide
Start with a light oval for the skull. The basset hound skull is broad and slightly domed, wider than a typical hound's, so make the oval wider than it is tall. A hypothetical example on a 20 cm by 25 cm sheet is an oval about 9 cm wide and 7 cm tall, centered slightly above the middle of the page. These numbers are examples only; adjust to your paper size.
Draw the oval with a light pencil so you can erase it later. Mark a vertical center line and a horizontal midline. The midline is your reference for eye placement and ear attachment. Keep the lines faint; they are guides, not final contours.
- Measure your paper and choose a center point.
- Draw a light oval wider than tall for the skull.
- Add a faint vertical center line and a horizontal midline.
- Check that the oval is symmetrical by comparing left and right widths.
Step 2: Add Long Drooping Ears
Basset hound ears are long, low-set, and droop well below the jaw line. Attach each ear at about the level of the horizontal midline, near the sides of the oval. Draw the ear as a long, soft teardrop that hangs downward and slightly outward. A hypothetical example is an ear length about 1.5 times the skull height, but measure your own drawing and keep the two ears similar in length.
The ear should overlap the side of the skull and fall in front of the neck area. Keep the top of the ear narrow where it meets the head, then widen it before tapering to a rounded tip. Draw both ears before adding details so you can compare their length and angle.
- Mark ear attachment points on the horizontal midline at both sides of the oval.
- Draw a long teardrop shape hanging down and slightly outward from each point.
- Compare ear lengths and adjust so they are close but not identical.
- Erase the guide lines inside the ear area only after the ear shape is clear.
Step 3: Place Wrinkled Brow and Muzzle Folds
The wrinkled face is the breed's key feature. Draw a short, broad muzzle below the midline, then add loose folds across the brow and down the muzzle. Use curved lines that follow the form of the head, not straight scratches. A hypothetical example is three brow folds spaced about 1 cm apart on a 9 cm wide skull; adjust spacing to your drawing size.
Place the nose at the front of the muzzle and add a few short fold lines beside it. Keep folds asymmetrical and varied in length; real wrinkles are not evenly spaced. Avoid covering the eye area with too many lines, or the expression will become muddy.
- Draw a short, broad muzzle below the horizontal midline.
- Add two or three curved brow folds above the eyes.
- Add one or two muzzle folds beside the nose.
- Vary fold length and spacing so the wrinkles look natural.
Step 4: Set the Eyes and Refine
Place the eyes on or just above the horizontal midline, spaced about one eye-width apart. Basset hound eyes are often described as soft and slightly droopy, so draw a gentle upper lid curve and a small lower lid. A hypothetical example is an eye width of about 1.5 cm on a 9 cm wide skull; measure your own drawing to keep proportions consistent.
Refine the head by darkening the final contours: the oval skull edge, the ear outlines, the muzzle, and the nose. Erase the guide lines. Check that the ears hang below the jaw, the brow folds sit above the eyes, and the eyes are level with each other.
- Mark eye positions on the horizontal midline, one eye-width apart.
- Draw a soft upper lid and a small lower lid for each eye.
- Darken final contours and erase guide lines.
- Check ear length, eye level, and fold placement before finishing.
Worked example
On a 20 cm by 25 cm sheet, draw a basset hound head using a 9 cm wide by 7 cm tall oval skull, ears attached at the midline and hanging 10 cm below the jaw, three brow folds, and eyes 1.5 cm wide spaced 1.5 cm apart.
Worked answer
A completed head drawing with a broad oval skull, two long drooping ears below the jaw, three curved brow folds above level eyes, a short broad muzzle, and a nose at the front. Guide lines erased and final contours darkened.
Four practice exercises
Exercise 1
Draw a basset hound head on a 15 cm by 20 cm sheet. Use an oval skull 7 cm wide and 5 cm tall. Attach ears at the midline and make each ear 8 cm long. Add two brow folds and place eyes 1 cm wide, 1 cm apart.
Show answer and check
A head with a broad oval skull, two long ears hanging below the jaw, two curved brow folds, and level eyes spaced 1 cm apart.
Why: The oval is wider than tall, ears attach at the midline and extend below the jaw, folds are curved, and eyes are level and evenly spaced.
Check: Measure the oval width and height, ear length, and eye spacing with a ruler; confirm ears hang below the jaw and eyes are level.
Exercise 2
Draw a basset hound head with a 10 cm wide by 8 cm tall oval skull. Make the left ear 12 cm long and the right ear 11 cm long. Add three brow folds and one muzzle fold. Place eyes 1.5 cm wide, 1.5 cm apart.
Show answer and check
A head with a wide oval skull, two long ears of slightly different lengths, three brow folds, one muzzle fold, and level eyes.
Why: Slightly different ear lengths are acceptable if both hang below the jaw; folds are curved and varied; eyes are level and spaced correctly.
Check: Compare ear lengths and confirm both hang below the jaw; check fold curvature and eye level with a ruler.
Exercise 3
Draw a basset hound head on a 20 cm by 25 cm sheet with a 9 cm wide by 7 cm tall oval skull. Attach ears at the midline and make them 10 cm long. Add four brow folds and two muzzle folds. Place eyes 1.5 cm wide, 1.5 cm apart. Erase all guide lines.
Show answer and check
A refined head with a broad oval skull, long drooping ears, four brow folds, two muzzle folds, level eyes, and no visible guide lines.
Why: The drawing meets the proportions, ear placement, fold count, and eye spacing; guide lines are erased for a clean finish.
Check: Measure oval, ear length, and eye spacing; count folds; confirm guide lines are erased and ears hang below the jaw.
Exercise 4
Draw a basset hound head with a 8 cm wide by 6 cm tall oval skull. Make ears 9 cm long attached at the midline. Add two brow folds and place eyes 1.2 cm wide, 1.2 cm apart. Then redraw the same head in a blank practice box without guide lines.
Show answer and check
Two head drawings: one with guide lines and one independent redraw, both showing a broad oval skull, long drooping ears, curved brow folds, and level eyes.
Why: The independent redraw tests whether the learner can reproduce the breed-specific proportions and features without guides.
Check: Compare both drawings for oval width, ear length below the jaw, fold curvature, and eye level; measure key distances with a ruler.
Common mistakes
- Drawing ears too short or attached too high. Attach ears at the horizontal midline and extend them well below the jaw; compare both ears for length.
- Making the skull oval too narrow. Widen the oval so it is clearly wider than tall, matching the basset hound's broad skull.
- Adding too many straight wrinkle lines. Use curved folds that follow the head form and vary their length and spacing.
- Placing eyes too high or too far apart. Set eyes on or just above the midline, about one eye-width apart, and check they are level.
Self-check rubric
- Skull oval is wider than tall and symmetrical.
- Ears attach near the horizontal midline and hang below the jaw.
- Brow and muzzle folds are curved, varied, and placed above the eyes.
- Eyes are level, spaced about one eye-width apart, and have soft lids.
- Final contours are clear and guide lines are erased.
- Valid alternatives: ear length and fold count may vary if the drooping and wrinkled character remains clear.
Questions and answers
Do I need to draw the whole body?
No. This lesson covers only the head and ears, as stated in the boundary.
How long should the ears be?
Long enough to hang well below the jaw. A hypothetical example is 1.5 times the skull height, but measure your own drawing.
Can I use a ruler?
Yes, for guide lines and checking proportions. Keep final contours freehand.
What if my wrinkles look messy?
Use fewer, curved folds and vary spacing. Erase guide lines before adding final folds.