Free original lessons
Draw a Bird Nest: Twig Weave, Egg Placement, and Depth Shading
Learn to draw a bird nest with layered twig strokes, correctly placed eggs, and interior depth shading using a simple, checkable method.
Free lesson
Four exercises
Worked answers
Object Drawing Lessons
This lesson teaches a reliable way to draw a bird nest that reads as a woven bowl rather than a flat tangle. You will build the nest in three passes: a structural bowl, a twig-weave layer, and interior depth shading. Egg placement is handled with a simple ellipse guide so the eggs sit inside the rim rather than on top of it. The method uses a defined convention for x-height and stroke direction, and the rubric accepts valid stylistic alternatives. All measurements are hypothetical examples; measure your own paper and tools before drawing.
Practice materials: Printable downloads are not available for this lesson yet. Use the instructions and four exercises below.
Reference illustration
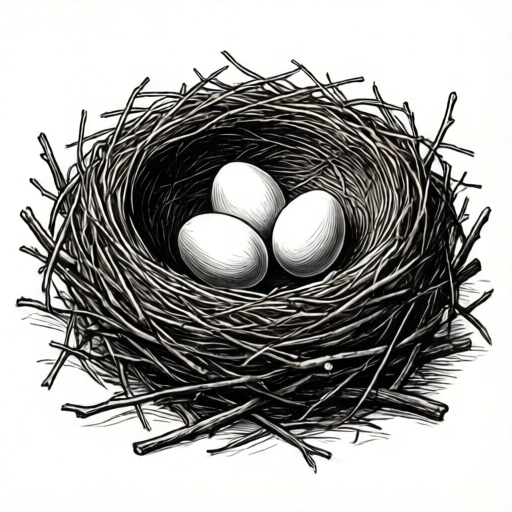
Use the stated measurements and conventions for each exercise.
Build the bowl structure first
Start with a shallow bowl shape, not a circle. Draw a wide, slightly flattened oval for the rim and a curved lower edge that sits below it. The rim oval should be wider than it is tall; a ratio near 3:2 is a useful hypothetical starting point. Keep the rim line light because twigs will cross it later.
Inside the rim, draw a second, smaller oval offset slightly downward. This inner oval marks the visible interior wall and helps you place eggs. The gap between the outer rim and the inner oval is the rim thickness. A rim thickness of about one-tenth of the nest width is a reasonable hypothetical example, but adjust to your drawing size.
Add two or three curved guide lines from the rim down to the lower edge to suggest the bowl's curvature. These guides are not final lines; they help you keep twig strokes following the nest's form rather than lying flat.
- Draw a light rim oval wider than tall.
- Draw a smaller inner oval offset downward inside the rim.
- Add two or three curved side guides from rim to base.
- Check that the bowl looks deeper than a flat disc before adding twigs.
Layer the twig weave
Twigs are drawn as short, slightly curved strokes that cross each other at shallow angles. Work in three layers: long structural twigs first, medium crossing twigs second, and short filler twigs last. Each layer should have fewer strokes than the one below it so the weave does not become a solid mass.
Use a consistent stroke convention: each twig stroke begins thin, thickens slightly at the midpoint, and tapers at the end. Vary stroke length but keep most twigs within a similar length range so the nest reads as one scale. Leave small gaps between crossings; gaps are what make the weave visible.
Let twigs follow the bowl guides. On the sides, angle strokes downward toward the base. Across the rim, keep strokes mostly horizontal so the rim reads as a woven edge. Do not outline every twig; overlapping strokes create the weave.
- Draw six to ten long structural twigs following the bowl guides.
- Add medium twigs crossing the first layer at shallow angles.
- Add short filler twigs in gaps, keeping some gaps open.
- Check that at least three crossing points are visible on each side.
Place eggs with an ellipse guide
Eggs sit inside the inner oval, not on the rim. Draw a light ellipse guide inside the inner oval to represent the clutch area. Place two or three egg shapes within this guide, tilted slightly toward the center. Each egg is an oval with one end slightly narrower; keep the narrow end pointing toward the nest center for a natural look.
Eggs should overlap slightly but not hide each other completely. Leave a small gap between the eggs and the inner rim so the nest wall remains visible. If an egg crosses the inner oval, redraw it smaller or move it inward.
Do not shade eggs heavily in this lesson; a light outline and a single soft shadow beneath each egg is enough to show placement. The focus is the nest, not the eggs.
- Draw a light ellipse guide inside the inner oval.
- Place two or three egg ovals within the guide, narrow ends toward center.
- Keep a small gap between eggs and the inner rim.
- Add a soft shadow under each egg to show it sits inside the nest.
Shade interior depth
Depth comes from darkening the interior wall below the rim and lightening the rim itself. Shade the inner oval's lower half with short, curved strokes that follow the bowl's curve. Keep the upper inner wall lighter so the rim reads as catching light.
Add a darker band just under the rim on the inside, then soften it downward. The darkest area should be where the inner wall meets the eggs' shadows. Avoid shading the twigs on the outer rim heavily; their contrast with the dark interior is what creates depth.
Finish by checking three values: light rim, medium outer bowl, dark inner wall. If the inner wall is not darker than the outer bowl, the nest will look flat. Adjust with more short strokes rather than one heavy fill.
- Shade the lower half of the inner oval with curved strokes.
- Darken a narrow band just under the inner rim.
- Keep the outer rim lighter than the interior.
- Check that the inner wall is the darkest area of the nest.
Worked example
Draw a nest about 12 cm wide on paper, with a rim oval wider than tall, three eggs inside the inner oval, and an interior wall darker than the outer bowl. Use the three-layer twig method and the taper convention.
Worked answer
First draw a light rim oval about 12 cm wide and 8 cm tall. Draw an inner oval about 10 cm wide and 6 cm tall, offset 1 cm downward. Add three curved side guides. Draw ten long twigs following the guides, then eight medium crossing twigs, then six short filler twigs, leaving gaps at crossings. Draw an ellipse guide inside the inner oval and place three egg ovals within it, narrow ends toward center, with a 0.5 cm gap from the inner rim. Shade the lower half of the inner oval with curved strokes, darken a narrow band under the inner rim, and keep the outer rim light. Check that the inner wall is the darkest area and that at least three crossings are visible on each side.
Four practice exercises
Exercise 1
A nest drawing has a rim oval 10 cm wide and 6 cm tall. The inner oval is 8 cm wide and 4 cm tall, offset 0.5 cm downward. What is the rim thickness on each side in this hypothetical example?
Show answer and check
1 cm on each side.
Why: The rim width difference is 10 minus 8 equals 2 cm total. Divided equally on two sides, each side is 1 cm. The vertical offset does not change the side thickness.
Check: Subtract inner width from rim width, divide by two, and confirm the result is positive and consistent with the drawing.
Exercise 2
You draw 9 long twigs, 6 medium twigs, and 4 short filler twigs. If each medium twig crosses two long twigs and each short twig crosses one medium twig, how many crossings are described in this hypothetical example?
Show answer and check
16 crossings.
Why: Medium twigs create 6 times 2 equals 12 crossings. Short twigs create 4 times 1 equals 4 crossings. Total is 12 plus 4 equals 16 crossings.
Check: Multiply counts by crossings per twig, add the two products, and verify the arithmetic: 6 times 2 is 12; 4 times 1 is 4; 12 plus 4 is 16.
Exercise 3
An inner oval is 9 cm wide and 5 cm tall. You place three egg ovals each 2 cm wide and 3 cm tall in a row with 0.5 cm gaps between them. Do the eggs fit within the inner oval width in this hypothetical example?
Show answer and check
Yes, they fit with 2 cm total spare width.
Why: Three eggs at 2 cm each equal 6 cm. Two gaps at 0.5 cm each equal 1 cm. Total used width is 7 cm. The inner oval is 9 cm wide, so 2 cm remains.
Check: Add egg widths and gap widths, subtract from inner oval width, and confirm the result is zero or positive.
Exercise 4
A drawing uses three values: rim light, outer bowl medium, inner wall dark. A classmate shades the outer bowl darker than the inner wall. According to the lesson's value order, what is the mistake and how should it be fixed?
Show answer and check
The mistake is reversing the value order. Fix by lightening the outer bowl and darkening the inner wall so the rim is lightest, the outer bowl is medium, and the inner wall is darkest.
Why: Depth in this method depends on the inner wall being darker than the outer bowl. Reversing the order makes the nest look flat or inside-out. The fix restores the three-value order.
Check: Compare the three areas side by side and confirm the rim is lightest, the outer bowl is medium, and the inner wall is darkest.
Common mistakes
- Drawing the nest as a flat circle with twigs on top. Start with a bowl shape and curved side guides so twigs follow the form.
- Making the twig weave a solid mass with no gaps. Use three layers with fewer strokes in each upper layer and leave small gaps at crossings.
- Placing eggs on the rim or outside the inner oval. Draw an ellipse guide inside the inner oval and keep eggs within it with a small gap from the rim.
- Shading the outer bowl darker than the interior. Keep the rim light, the outer bowl medium, and the inner wall darkest to create depth.
Self-check rubric
- Nest reads as a bowl with visible depth, not a flat disc.
- Twig weave shows at least three layers with visible crossings and some open gaps.
- Twig strokes follow the defined taper convention: thin start, slight midpoint thickening, tapered end.
- Eggs sit inside the inner oval with a small gap from the rim and narrow ends toward center.
- Interior wall is darker than the outer bowl, and the rim is the lightest area.
- Valid stylistic alternatives are accepted if the bowl structure, weave visibility, egg placement, and value order remain clear.
Questions and answers
How many twigs should I draw?
There is no fixed number. Aim for enough strokes to show a weave while keeping gaps visible. A hypothetical starting point is ten long twigs, eight medium, and six short filler twigs, adjusted to your nest size.
Can I draw more than three eggs?
Yes, if the inner oval is large enough. Keep each egg within the guide and leave a gap from the rim. The rubric checks placement, not a specific count.
What if my twigs look too uniform?
Vary stroke length and curvature slightly while keeping the same taper convention. Uniformity is less important than visible crossings and gaps.
Do I need to draw the bird?
No. This lesson excludes bird drawing and habitat composition. Focus on the nest, eggs, and interior depth.