Free original lessons
Chibi Cat Base Drawing: Oversized Head, Small Body, Clear Proportions
Learn to draw a chibi cat base with a big head, tiny body, and clear limb placement using a simple ratio guide and checkable steps.
Free lesson
Four exercises
Worked answers
Object Drawing Lessons
A chibi cat base is a reusable construction drawing: an oversized head, a small body, and limbs placed so the figure reads clearly at a glance. This lesson teaches a repeatable method using a head-to-body ratio guide, simple landmark lines, and a convention for line placement. You will build one base, test it with a pose variant, and then draw an independent chibi cat in a blank practice box. The focus is construction, not realistic cat anatomy. All measurements are relative to the head unit, so the method works at any drawing size. Use a pencil and paper; no special tools are required. The convention below defines where lines sit so that checks are consistent, while still allowing valid stylistic alternatives.
Practice materials: Printable downloads are not available for this lesson yet. Use the instructions and four exercises below.
Reference illustration
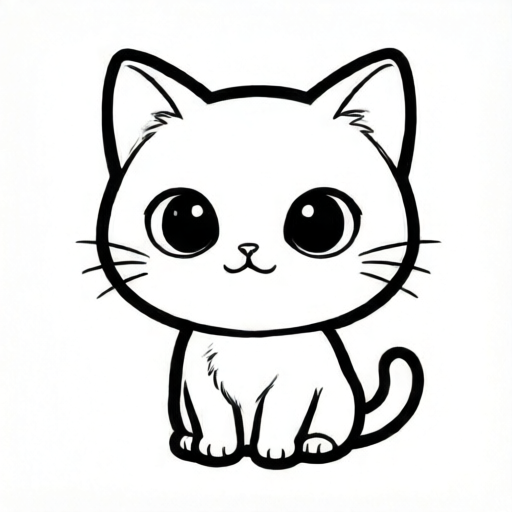
Use the stated measurements and conventions for each exercise.
Set the head unit and body ratio
Begin by drawing a circle or soft oval for the head. Treat its height as one head unit (1 HU). For a chibi cat base, the body is deliberately small: a common starting ratio is a head height of 1 HU and a body height of about 0.6 HU, measured from the chin line to the base of the body. These numbers are hypothetical examples, not standards; adjust them to suit your style while keeping the head clearly larger than the body.
Mark the chin line at the bottom of the head. From there, measure downward 0.6 HU and mark the body base line. The space between these lines is the body zone. Keep the body narrower than the head: a body width of roughly 0.5 to 0.6 HU at the widest point is a practical starting point. Draw the body as a rounded trapezoid or egg shape that sits centered under the head.
- Draw the head as a circle or oval and label its height as 1 HU.
- Mark the chin line at the bottom of the head.
- Measure 0.6 HU downward from the chin line and mark the body base line.
- Draw the body between the chin line and body base line, keeping it narrower than the head.
Place facial landmarks and ears
Use a midline and an eye line to keep the face symmetrical. Draw a vertical midline through the head. Place the eye line slightly below the middle of the head, for example at 0.55 HU from the top of the head; this is a hypothetical value you can shift. Eyes sit on this line, spaced so that the gap between them is about one eye width. A small nose sits on the midline below the eye line, and the mouth is a short curve beneath the nose.
Ears are triangular or rounded-triangular shapes attached to the top of the head. Place their bases so they overlap the head outline slightly, and keep them roughly symmetrical about the midline. Ear height can be about 0.25 to 0.35 HU as a starting example. The convention for line placement is: construction lines are light and removable; final outline lines are darker and continuous. Valid alternatives include rounder ears, slightly asymmetric ear angles, or a tilted head, provided the landmarks remain readable.
- Draw a vertical midline through the head.
- Mark an eye line below the head's middle and place two eyes with a one-eye-width gap.
- Add a small nose on the midline and a short mouth curve below it.
- Attach two ears at the top of the head, overlapping the outline slightly and keeping them roughly symmetrical.
Attach limbs and tail with clear placement
Chibi limbs are short and simple. For a standing base, place the shoulder joints just below the chin line, about 0.1 HU into the body zone. Draw the arms as short rounded tubes ending in simple paw shapes. Place the hip joints near the body base line, about 0.1 HU above it, and draw the legs as short rounded tubes with small feet. Keep the limbs outside the body outline so the silhouette reads clearly.
The tail attaches at the lower back of the body, near the body base line. Draw it as a curved tube that extends outward and slightly upward. A tail length of about 0.4 to 0.5 HU is a practical example. Check that no limb crosses the face and that the feet sit on a shared ground line. The ground line is a horizontal guide; both feet should touch it in a standing pose.
- Mark shoulder joints just below the chin line and draw short arms with paw shapes.
- Mark hip joints just above the body base line and draw short legs with feet.
- Attach the tail at the lower back near the body base line and curve it outward.
- Draw a ground line and check that both feet touch it in a standing pose.
Test the base with a pose variant
A base is useful only if it can be adapted. Test your construction by shifting one arm upward and tilting the head slightly. Keep the head unit and body ratio unchanged. Move the shoulder joint with the arm, and keep the elbow and paw aligned so the arm does not look detached. If the head tilts, rotate the facial landmarks together with the head rather than redrawing them independently.
Use the same convention: light construction lines first, darker final lines second. A valid alternative is a sitting pose, where the body base line becomes the seat line and the legs fold forward. In that case, the ground line still applies to the feet or seat, and the tail may rest on the ground. Check that the head remains the largest single shape and that the body does not exceed the head height.
- Shift one arm upward and move its shoulder joint with it.
- Tilt the head slightly and rotate the facial landmarks with the head.
- Keep the head unit and body ratio unchanged.
- Check that the head is still the largest single shape and the body does not exceed head height.
Worked example
Construct a standing chibi cat base using a head height of 1 HU and a body height of 0.6 HU. Place the eye line at 0.55 HU from the top of the head, attach ears at the top, place shoulder joints 0.1 HU below the chin line, hip joints 0.1 HU above the body base line, and attach a tail at the lower back. Describe the check.
Worked answer
Draw the head as a 1 HU oval. Mark the chin line at its bottom. Measure 0.6 HU downward and mark the body base line. Draw a body narrower than the head between these lines. Add a midline, place the eye line at 0.55 HU from the top, and put two eyes with a one-eye-width gap. Add a nose and mouth on the midline. Attach two ears at the top, overlapping the outline slightly. Mark shoulder joints 0.1 HU below the chin line and draw short arms outside the body. Mark hip joints 0.1 HU above the body base line and draw short legs with feet on a ground line. Attach the tail at the lower back near the body base line and curve it outward. Check: head is the largest shape; body height is about 0.6 HU; body is narrower than the head; both feet touch the ground line; no limb crosses the face.
Four practice exercises
Exercise 1
A chibi cat base has a head height of 1 HU and a body height of 0.6 HU. The body base line is 0.6 HU below the chin line. If the chin line is at 4.0 cm from the top of the paper, where is the body base line?
Show answer and check
The body base line is at 4.0 + 0.6 = 4.6 cm from the top of the paper.
Why: The body zone starts at the chin line and extends downward by the body height. Adding 0.6 HU to the chin line position gives the body base line position.
Check: Re-measure the distance between the chin line and body base line; it should equal 0.6 HU. Confirm the body base line is below the chin line.
Exercise 2
An eye line is placed at 0.55 HU from the top of a 1 HU head. If the head is drawn 6 cm tall, how far from the top of the head is the eye line?
Show answer and check
The eye line is at 0.55 × 6 = 3.3 cm from the top of the head.
Why: The eye line position is a fraction of the head height. Multiply the fraction by the drawn head height to get the distance.
Check: Measure from the top of the head to the eye line; it should be about 3.3 cm. The eye line should sit slightly below the head's middle.
Exercise 3
A standing base uses shoulder joints 0.1 HU below the chin line and hip joints 0.1 HU above the body base line. If the body zone is 0.6 HU tall, what is the vertical distance between the shoulder joints and hip joints?
Show answer and check
The distance is 0.6 − 0.1 − 0.1 = 0.4 HU.
Why: The shoulder joints are 0.1 HU into the body zone from the top, and the hip joints are 0.1 HU up from the bottom. Subtract both offsets from the body height.
Check: Measure the body zone and the two offsets; the remaining middle distance should be 0.4 HU. Confirm the shoulder joints are above the hip joints.
Exercise 4
A tail is drawn 0.5 HU long from the lower back. If the head is 5 cm tall, what is the tail length in centimeters?
Show answer and check
The tail length is 0.5 × 5 = 2.5 cm.
Why: The tail length is given in head units. Multiply by the drawn head height to convert to centimeters.
Check: Measure the tail from its attachment point to its tip; it should be about 2.5 cm. Confirm the tail attaches near the body base line at the lower back.
Common mistakes
- Making the body too tall so it approaches or exceeds the head height. Re-measure the body zone from the chin line to the body base line and keep it near 0.6 HU as a starting example.
- Placing eyes too high or too low, which makes the face read as a different style. Use an eye line slightly below the head's middle and keep the one-eye-width gap between eyes.
- Attaching limbs inside the body outline so the silhouette becomes unclear. Place shoulder and hip joints near the body edges and draw limbs outside the body outline.
- Drawing the tail from the middle of the back instead of the lower back. Attach the tail near the body base line at the lower back and curve it outward.
Self-check rubric
- Head height is clearly larger than body height, with body height near the chosen ratio.
- Body is narrower than the head and centered under it.
- Facial landmarks are readable: eye line, one-eye-width gap, nose and mouth on the midline.
- Ears attach at the top and overlap the head outline slightly.
- Shoulder and hip joints are placed near the body edges, and limbs sit outside the body outline.
- Tail attaches at the lower back near the body base line.
- In a standing pose, both feet touch the ground line.
- Construction lines are light and final lines are darker and continuous.
- Valid stylistic alternatives are accepted if the landmarks and proportions remain readable.
Questions and answers
Do I have to use exactly 0.6 HU for the body height?
No. The 0.6 HU value is a hypothetical starting example. Keep the head clearly larger than the body and adjust the ratio to your style.
Can the ears be rounded instead of triangular?
Yes. Rounded ears are a valid alternative. Keep their bases overlapping the head outline slightly and maintain rough symmetry.
How do I check that the base is balanced?
Check that the head is the largest single shape, the body is narrower than the head, both feet touch the ground line in a standing pose, and no limb crosses the face.
What if I want a sitting pose?
Treat the body base line as the seat line, fold the legs forward, and keep the ground line for the feet or seat. The head-to-body ratio still applies.