Free original lessons
Chicken Jockey Pose Construction: Rider-and-Bird Alignment
Learn to draw a chicken jockey by building rider and bird poses separately, then aligning contact points for a stable, readable combined figure.
Free lesson
Four exercises
Worked answers
Object Drawing Lessons
This lesson focuses on the combined pose of a chicken jockey: a small rider seated on a large bird. You will construct the rider and the chicken as separate pose guides, then align them at three contact points: seat, hands, and feet. The goal is a clear, balanced silhouette rather than detailed anatomy. Work lightly, keep proportions simple, and check alignment before adding any finish. All measurements are hypothetical examples; measure your own paper and tools if you scale the drawing.
Practice materials: Printable downloads are not available for this lesson yet. Use the instructions and four exercises below.
Reference illustration
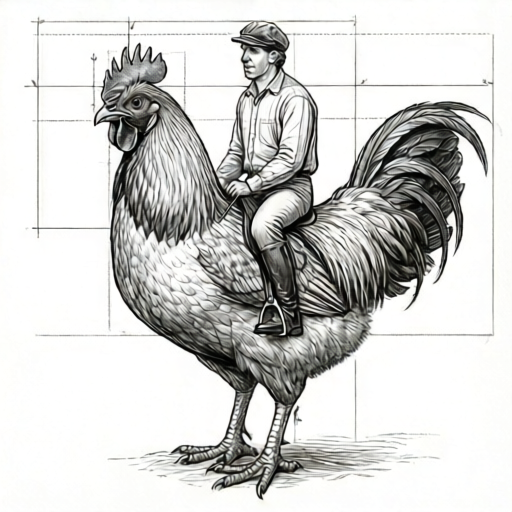
Use the stated measurements and conventions for each exercise.
Build the rider pose guide first
Start with the rider as a simple stick-and-oval figure. Draw a vertical spine line about 6 cm long on your paper (a hypothetical example; adjust to your sheet). Place a small oval for the head at the top, a rounded rectangle for the torso below it, and two bent leg lines that angle forward and down as if straddling a seat.
The rider's hips should sit lower than the shoulders, and the knees should point forward. Keep arms short and slightly bent, reaching forward to where reins or feathers would be gripped. Do not draw fingers or facial features yet; the pose guide is only for position and angle.
- Draw a light vertical spine line and mark shoulder and hip points.
- Add a head oval and a torso shape that tapers toward the hips.
- Draw two bent legs from the hips, angling knees forward.
- Add two bent arms from the shoulders, reaching forward.
- Check that hips are lower than shoulders and knees point forward.
Build the chicken body construction
On a separate area of the page, draw the chicken as a large teardrop body with a smaller head circle at the front-top. The body's long axis should run roughly horizontal, with the tail end higher and the chest lower. Add two sturdy leg lines beneath the body, spaced about one-third of the body length apart.
Mark a seat zone on the chicken's back: a shallow curve between the shoulders and the tail. This is where the rider's hips will rest. Mark a grip zone near the chicken's neck or upper chest where the rider's hands will reach. Mark a foot zone on each side of the body where the rider's feet will rest against the feathers.
- Draw a large teardrop body with the tail end slightly higher.
- Add a head circle at the front-top and a short beak wedge.
- Draw two leg lines beneath the body, spaced consistently.
- Mark the seat zone as a shallow curve on the back.
- Mark grip and foot zones on the neck and sides.
Align the three contact points
Place the rider guide over the chicken guide so the rider's hips touch the seat zone. Adjust the rider's spine angle until the hips rest naturally on the back curve. Next, move the arms so the hands reach the grip zone without stretching the torso. Finally, adjust the legs so the feet touch the foot zones on both sides.
Use a simple check: the seat contact should be the lowest point of the rider's torso, the hands should not cross the chicken's head, and the feet should not hang below the chicken's body line. If any contact point is off by more than about 1 cm (hypothetical example), redraw that part of the guide rather than forcing it.
- Overlay the rider guide on the chicken guide.
- Align hips to the seat zone and check spine angle.
- Align hands to the grip zone without overstretching.
- Align feet to the foot zones on both sides.
- Check that no contact point is off by more than the chosen tolerance.
Refine the combined silhouette
Once the contact points are aligned, trace a clean outline around both figures. Keep the rider's outline simple and slightly smaller than the chicken's body so the bird reads as the larger form. Add a short rein or feather line from the hands to the grip zone to show connection.
Check the silhouette by squinting: the rider should sit clearly on the bird, with no floating parts. If the rider looks like standing beside the bird, lower the hips and bend the knees more. If the bird looks too small, enlarge the body teardrop rather than shrinking the rider.
- Trace a clean outline around the aligned guides.
- Keep the rider smaller than the chicken body.
- Add a connection line from hands to grip zone.
- Squint-check for floating parts or unclear seating.
- Adjust hips, knees, or body size as needed.
Worked example
A rider guide has a 6 cm spine, hips at the bottom, and knees angled forward. The hips sit 1 cm behind the shoulders. The chicken guide has a seat zone 4 cm long and a grip zone 3 cm forward of the seat. The rider's arms reach 3 cm forward from the shoulders. Check whether the hands reach the grip zone and state one adjustment if not.
Worked answer
The grip zone is 3 cm forward of the seat, and the hips sit at the seat, so the grip zone is 3 cm forward of the hips. Because the hips are 1 cm behind the shoulders, the grip zone is 3 cm − 1 cm = 2 cm forward of the shoulders. The arms reach 3 cm, so the hands overshoot the grip zone by 1 cm. Adjustment: shorten the arm lines by 1 cm (to 2 cm), or move the grip zone 1 cm forward to 4 cm forward of the seat, which puts it 3 cm forward of the shoulders and matches the 3 cm arm reach.
Four practice exercises
Exercise 1
A rider guide has a 5 cm spine and hips 1 cm below the shoulders. The chicken seat zone is 2 cm below the rider's hips when overlaid. Describe how to adjust the rider guide to seat the hips correctly.
Show answer and check
Lower the rider guide by 2 cm so the hips meet the seat zone, or raise the chicken guide by 2 cm. Keep the spine angle unchanged.
Why: The contact point is the hips-to-seat alignment. A 2 cm gap is closed by moving one guide vertically by 2 cm.
Check: Measure the gap between hips and seat zone after adjustment; it should be 0 cm within your chosen tolerance.
Exercise 2
The chicken body is 8 cm long and the rider's torso is 4 cm wide. The rider's hips overhang the seat zone by 1 cm on each side. State whether the chicken is too small and give one fix.
Show answer and check
The chicken is too small for the rider's hip width. Enlarge the chicken body by at least 2 cm in width, or narrow the rider's hip guide by 2 cm total.
Why: Overhang of 1 cm per side means the seat zone is 2 cm narrower than the hips. The body must widen or the hips must narrow.
Check: Measure hip width and seat zone width; they should match within your tolerance after the fix.
Exercise 3
The rider's arms reach 4 cm forward from the shoulders. The grip zone is 5 cm forward of the seat, and the hips sit 1 cm behind the shoulders. Does the hand reach the grip zone? Show the arithmetic.
Show answer and check
Shoulder-to-grip distance is 5 cm minus 1 cm equals 4 cm. The arms reach 4 cm, so the hands reach the grip zone exactly.
Why: The hips are 1 cm behind the shoulders, so the grip zone is 4 cm forward of the shoulders. Arm reach equals that distance.
Check: Measure from shoulder to grip zone along the horizontal; it should equal arm reach within tolerance.
Exercise 4
Both feet are marked 2 cm below the chicken's body line, but the rider's legs are 3 cm long from hip to foot. The hips sit 1 cm above the body line. Do the feet reach the foot zones? Give one adjustment.
Show answer and check
Hip-to-foot vertical distance is 1 cm plus 2 cm equals 3 cm, matching leg length, so the feet reach. If the feet float, shorten the leg lines by 1 cm or raise the foot zones by 1 cm.
Why: The hip is 1 cm above the body line and the foot zone is 2 cm below it, totaling 3 cm, equal to leg length.
Check: Measure vertical distance from hip to foot zone and compare with leg length; adjust until equal within tolerance.
Common mistakes
- Drawing the rider standing beside the chicken instead of seated on it. Lower the rider's hips onto the seat zone and bend the knees forward so the legs straddle the body.
- Making the chicken body too small relative to the rider. Enlarge the chicken's teardrop body so the rider fits within the back curve without overhanging.
- Stretching the rider's arms past the grip zone or crossing the chicken's head. Shorten the arm lines and move the grip zone slightly back along the neck.
- Leaving feet floating above or below the foot zones. Adjust leg length or foot zone marks so both feet touch the chicken's sides consistently.
Self-check rubric
- Rider hips rest on the chicken's seat zone with no visible gap.
- Rider hands reach the grip zone without crossing the chicken's head.
- Both rider feet touch the foot zones on the chicken's sides.
- Chicken body is visibly larger than the rider's torso.
- Silhouette reads as one combined figure, not two separate figures.
- Labels, if used, are legible and consistently placed; no specific letter style is required.
Questions and answers
Do I need to draw a realistic chicken and human first?
No. This lesson uses simple pose guides: ovals, lines, and curves. Detail is added only after the contact points align.
How do I know if the rider is seated correctly?
The hips should rest on the lowest part of the seat zone, knees should point forward, and hands should reach the grip zone without stretching the torso.
What if my paper is a different size?
Scale the guide lengths to your sheet. The 6 cm spine and 1 cm tolerance are hypothetical examples; measure your own paper and choose consistent values.
Can I adjust the contact points if my paper is a different size?
Yes. Scale the guide lengths and the seat, grip, and foot zones together so their relative positions stay the same. The 6 cm spine and 1 cm tolerance are hypothetical examples; measure your own paper and choose consistent values.