Free original lessons
Comic Face Drawing: Exaggerated Eyes and Speech-Bubble Layout
Learn to construct a comic face with oversized eyes and plan a speech bubble that fits the panel. Includes a convention, worked example, four practice tasks, and a printable plan.
Free lesson
Four exercises
Worked answers
Object Drawing Lessons
Comic faces communicate quickly: the eyes carry emotion, and the speech bubble directs the reader's attention. This lesson teaches a repeatable construction method for a comic face with exaggerated eyes, then shows how to reserve space for a speech bubble so the two elements do not compete. You will use a simple convention: the eye line sits halfway between the top of the head and the chin, and each exaggerated eye is drawn as a large oval whose height is about one-third of the face height. These are design choices, not universal rules; valid alternatives are accepted when the reasoning is sound. All measurements are hypothetical examples you can scale to your paper. The printable plate and worksheet are planned resources, not yet built; the instructional text below is self-contained.
Practice materials: Printable downloads are not available for this lesson yet. Use the instructions and four exercises below.
Reference illustration
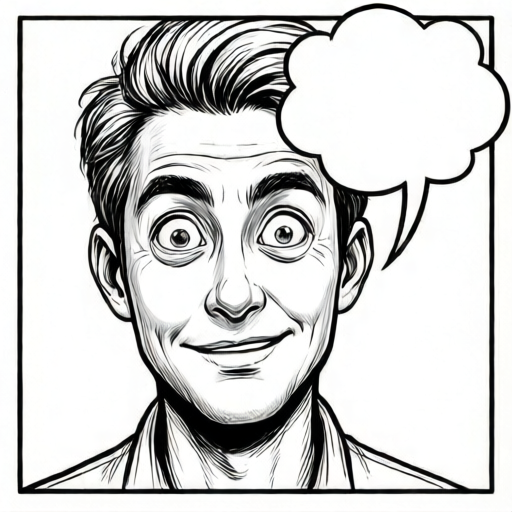
Use the stated measurements and conventions for each exercise.
Build the face plate and place exaggerated eyes
Start with a light construction rectangle for the head. Mark a vertical center line and a horizontal eye line. In this convention the eye line is halfway between the top of the head and the chin. Draw two large ovals centered on the eye line, one on each side of the center line. Make each oval about one-third of the face height tall and about one-quarter of the face width wide. Exaggeration comes from size and spacing, not from adding detail.
Keep the pupils large and place them slightly toward the direction of gaze. A small highlight inside each pupil adds liveliness without realism. The mouth and eyebrows are secondary: draw them after the eyes so they support the expression rather than compete with it.
- Draw a light rectangle for the head; mark the vertical center line.
- Mark the eye line halfway between the top and the chin.
- Draw two large ovals on the eye line, each about one-third of the face height.
- Add large pupils with a small highlight; angle them toward the gaze direction.
- Add eyebrows and a simple mouth that match the chosen expression.
Reserve space and lay out the speech bubble
Before drawing the bubble, decide which corner of the panel is free. The bubble should not cover the eyes. A practical convention is to keep the bubble at least one eye-width away from the nearest eye oval. Sketch the bubble as a rounded rectangle or oval, then draw a tail that points toward the speaker's mouth without crossing the eyes.
Write the text first in pencil, then size the bubble around it. Leave a margin inside the bubble equal to about half the height of a capital letter. If the bubble feels crowded, shorten the text rather than shrinking the letters. The tail should be a simple triangle or curved wedge; avoid a long tail that crosses the face.
- Choose a free corner of the panel; keep the bubble one eye-width from the nearest eye.
- Sketch the bubble shape and a short tail pointing toward the mouth.
- Write the text in pencil and check the inner margin.
- Adjust the bubble size or shorten the text, then finalize the outline.
Match expression variants to eye shape
Expression variants change the eye outline and pupil position while keeping the same construction. For surprise, make the ovals taller and the pupils smaller and centered. For anger, flatten the top of each oval and angle the eyebrows down toward the center. For worry, tilt the eyebrows up at the center and place the pupils slightly low. These are starting points; you may invent other variants as long as the eyes remain readable and the bubble stays clear.
Test readability by viewing the drawing from a short distance. If the expression is unclear, adjust the eyebrows or pupil position before adding more lines.
- Choose one expression variant: surprise, anger, or worry.
- Adjust the eye outline and pupil position according to the variant.
- Angle the eyebrows to support the expression.
- Check readability from a short distance and simplify if needed.
Worked example
A face rectangle is 12 cm tall and 8 cm wide. Using the convention, find the eye-line height from the top, the height of each exaggerated eye oval, and the minimum clearance from the nearest eye to the bubble.
Worked answer
Eye line: 6 cm from the top. Each eye oval: about 4 cm tall. Minimum bubble clearance: one eye-width, about 2 cm.
Why: The eye line is halfway between top and chin, so 12 divided by 2 equals 6 cm. Each eye oval is one-third of face height, so 12 divided by 3 equals 4 cm. The eye width is about one-quarter of face width, so 8 divided by 4 equals 2 cm; the bubble stays at least that far from the nearest eye.
Check: Add the eye-line distance to itself to confirm it equals the face height: 6 plus 6 equals 12 cm. Multiply the eye height by three to confirm it equals the face height: 4 times 3 equals 12 cm. Multiply the eye width by four to confirm it equals the face width: 2 times 4 equals 8 cm.
Four practice exercises
Exercise 1
A face rectangle is 10 cm tall and 6 cm wide. Using the convention, state the eye-line height from the top, the height of each eye oval, and the eye width used for bubble clearance.
Show answer and check
Eye line: 5 cm from the top. Each eye oval: about 3.33 cm tall. Eye width for clearance: about 1.5 cm.
Why: Half of 10 cm is 5 cm. One-third of 10 cm is about 3.33 cm. One-quarter of 6 cm is 1.5 cm.
Check: Double the eye-line value to get 10 cm; triple the eye height to get about 10 cm; quadruple the eye width to get 6 cm.
Exercise 2
A panel is 14 cm wide and 9 cm tall. The face occupies the left 8 cm. Using the convention, what is the minimum bubble clearance from the nearest eye, and how much horizontal space remains for the bubble?
Show answer and check
Minimum clearance: about 2 cm. Remaining horizontal space for the bubble: about 6 cm.
Why: Eye width is one-quarter of face width: 8 divided by 4 equals 2 cm. The free horizontal space is the panel width minus the face width: 14 minus 8 equals 6 cm. The bubble must stay at least 2 cm from the nearest eye, leaving about 4 cm of usable bubble width if the bubble starts at the clearance line.
Check: Add the face width and free space to confirm the panel width: 8 plus 6 equals 14 cm. Subtract the clearance from the free space to confirm usable bubble width: 6 minus 2 equals 4 cm.
Exercise 3
A speech text needs a bubble with an inner margin of 0.5 cm on each side. The text block is 4 cm wide. What is the minimum bubble width? If the available free space is 5 cm, does the bubble fit?
Show answer and check
Minimum bubble width: 5 cm. Yes, it fits exactly in 5 cm of free space.
Why: Add the left and right margins to the text width: 4 plus 0.5 plus 0.5 equals 5 cm. The available free space is 5 cm, so the bubble fits with no extra room.
Check: Subtract both margins from the bubble width to recover the text width: 5 minus 0.5 minus 0.5 equals 4 cm.
Exercise 4
A face is 12 cm tall. The eye line is placed 5 cm from the top instead of the halfway convention. Is this a valid alternative? Explain using the rubric and state one check.
Show answer and check
Yes, it is a valid alternative if the eyes remain readable and the bubble keeps at least one eye-width clearance. Check that the eye line is clearly marked and that the expression still reads from a short distance.
Why: The rubric accepts valid alternative conventions when readability and bubble clearance are maintained. Moving the eye line changes the expression but does not automatically violate the task.
Check: Measure the eye-line distance from the top and confirm it is consistently applied on both sides; then view the drawing from a short distance to confirm the expression is clear.
Common mistakes
- Drawing the speech bubble over one eye. Move the bubble to a free corner and keep at least one eye-width of clearance from the nearest eye oval.
- Making the eyes large but leaving the pupils tiny and centered so the face looks blank. Enlarge the pupils and shift them slightly toward the gaze direction; add a small highlight.
- Writing the speech text before sizing the bubble, causing cramped letters. Write the text first in pencil, then size the bubble around it with a margin of about half a capital-letter height.
- Letting the bubble tail cross the face or point away from the mouth. Keep the tail short and point it toward the mouth without crossing the eyes.
Self-check rubric
- Eye line is marked and consistent with the chosen convention.
- Both exaggerated eye ovals are large, readable, and roughly equal in size.
- Pupils and highlights support a clear gaze direction.
- Speech bubble is placed in a free area with at least one eye-width clearance from the nearest eye.
- Bubble tail points toward the mouth without crossing the eyes.
- Text fits inside the bubble with a visible inner margin.
- Expression variant is recognizable from the eyes and eyebrows.
- Valid alternative conventions are accepted when the drawing remains readable and the reasoning is explained.
Questions and answers
Do I have to use the one-third eye height convention?
No. It is a starting convention for exaggeration. Any consistent eye size that remains readable and leaves room for the bubble is acceptable.
Where should the eye line go?
In this lesson it sits halfway between the top of the head and the chin. You may move it if the expression still reads clearly.
How large should the speech bubble be?
Size it around the written text with an inner margin of about half a capital-letter height. Shorten the text if the bubble becomes crowded.
Can the bubble be round instead of rectangular?
Yes. Rounded rectangles and ovals are both valid; the key is clearance from the eyes and a short tail toward the mouth.