Free original lessons
Draw a Cornucopia: Horn, Produce, and Basket Construction
Learn to draw a cornucopia by building a spiral horn, arranging produce, and weaving a basket base with clear steps and checks.
Free lesson
Four exercises
Worked answers
Object Drawing Lessons
A cornucopia is a horn-shaped basket overflowing with produce. This guide breaks the drawing into three connected parts: the horn's spiral, the produce cluster, and the basket weave. You will use simple shapes, consistent units, and a defined convention for line placement so you can check your work and accept valid variations. All measurements are hypothetical examples; measure your own paper and tools.
Practice materials: Printable downloads are not available for this lesson yet. Use the instructions and four exercises below.
Reference illustration
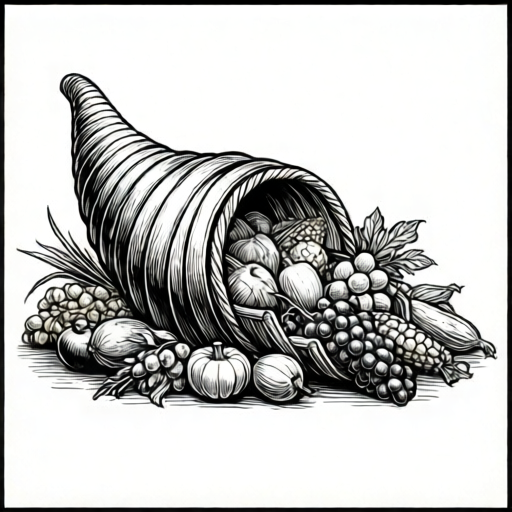
Use the stated measurements and conventions for each exercise.
Building the Horn Spiral
Start with a curved centerline that sweeps from a narrow tip to a wide opening. Mark the tip, the midpoint, and the opening edge. The horn tapers gradually; avoid sudden width changes. Use a light pencil for construction lines.
Define the opening as an ellipse tilted to match the horn's direction. The ellipse's major axis should align with the horn's curve. Draw the outer contour by connecting the tip to the ellipse's sides with smooth arcs. Keep the two arcs roughly parallel in width change.
- Draw a curved centerline from tip to opening; mark three points along it.
- Sketch a tilted ellipse at the opening; its width is a hypothetical 6 cm on a 20 cm horn.
- Connect tip to ellipse sides with two arcs that widen gradually.
- Add a spiral ridge line inside the horn, following the curve and spacing ridges evenly.
Arranging Produce
Produce should sit inside the opening and spill outward. Group fruits by size: large round forms near the opening, smaller ones toward the front. Overlap shapes to show depth. Use a consistent convention: draw the front edge of each fruit fully, and let the back edge stop where it meets another fruit.
Vary shapes: spheres for apples, ovals for grapes, tapered forms for carrots. Keep contact points clear so each item appears to rest on another or on the horn rim.
- Place three large round fruits just inside the opening, overlapping slightly.
- Add medium ovals in front, touching the large fruits.
- Fill gaps with small clusters, leaving some horn rim visible.
- Check that every fruit has a clear contact point or rests on the rim.
Weaving the Basket Base
The basket base is a woven band that wraps the horn's lower section. Draw two parallel curved lines to define the band's top and bottom. Inside, draw alternating horizontal and vertical strips. Use a simple over-under pattern: a strip goes over one crossing line and under the next.
Keep strip widths consistent; a hypothetical 1 cm width works on a 20 cm horn. The weave should follow the horn's curve, not a flat grid. Check that each strip alternates over and under at every crossing.
- Draw the band's top and bottom edges as curved lines parallel to the horn.
- Add vertical strips spaced evenly along the band.
- Add horizontal strips, alternating over and under each vertical strip.
- Erase construction lines and darken the final weave.
Checking Proportions and Line Quality
Use a simple ratio check: the opening width should be about one-third of the horn's length. If your horn is 18 cm long, the opening is a hypothetical 6 cm wide. Measure with a ruler or compare with a pencil mark.
Line quality: final contours should be smooth and confident. Construction lines can be lighter. Accept valid alternatives in produce placement and weave pattern as long as contact points and over-under logic remain clear.
- Measure horn length and opening width; compare to the one-third ratio.
- Trace the outer contour with a finger to check for sudden jumps.
- Verify each weave crossing alternates over and under.
- Confirm every produce item has a visible contact point.
Worked example
A student draws a horn 15 cm long with an opening 5 cm wide, three apples inside the rim, and a woven band with four vertical strips. Check the ratio, contact points, and weave.
Worked answer
Ratio: 5 cm opening to 15 cm length is one-third, which matches the guide. Contact points: each apple touches the rim or another apple, so they rest clearly. Weave: with four vertical strips, each horizontal strip must alternate over and under at four crossings; the student's pattern shows over-under-over-under, which is correct. The drawing passes all three checks.
Four practice exercises
Exercise 1
Draw a horn 12 cm long. Its opening should be one-third of the length. State the opening width and describe how you place the tilted ellipse.
Show answer and check
Opening width is 4 cm. The ellipse is tilted so its major axis follows the horn's centerline, with the narrower end toward the tip.
Why: One-third of 12 cm is 4 cm. The ellipse tilt matches the horn's curve to avoid a flat look.
Check: Measure the opening width; confirm it is 4 cm. Trace the ellipse's major axis to see it aligns with the centerline.
Exercise 2
A horn opening is 6 cm wide. You place two apples and one pear inside. Describe one valid arrangement with clear contact points.
Show answer and check
Place the two apples side by side touching the lower rim, and rest the pear on top of them, touching both apples and the upper rim.
Why: Each item touches the rim or another item, so nothing floats. The pear bridges the apples for stability.
Check: Point to each fruit and confirm at least one contact point with the rim or another fruit.
Exercise 3
Draw a woven band with three vertical strips. Describe the over-under pattern for one horizontal strip across all three crossings.
Show answer and check
The horizontal strip goes over the first vertical, under the second, and over the third.
Why: Alternating over and under at each crossing creates a valid weave.
Check: At each crossing, verify the pattern alternates: over, under, over.
Exercise 4
Your horn is 18 cm long and the opening is 7 cm wide. Is the one-third ratio met? If not, state a corrected opening width.
Show answer and check
No. One-third of 18 cm is 6 cm, so the opening should be 6 cm, not 7 cm.
Why: Divide length by three: 18 divided by 3 equals 6.
Check: Measure the opening; confirm it equals 6 cm or adjust the drawing to match.
Common mistakes
- Making the horn opening too circular instead of a tilted ellipse. Tilt the ellipse to match the horn's curve and check that its major axis follows the centerline.
- Produce floating without contact points. Draw each fruit touching the rim or another fruit; erase gaps behind overlaps.
- Weave strips that do not alternate over and under. At each crossing, say 'over, under' aloud and redraw the strip if two overs meet.
- Horn width changing abruptly. Redraw the two outer arcs so width increases gradually from tip to opening.
Self-check rubric
- Horn tapers gradually from tip to opening with no sudden width changes.
- Opening is a tilted ellipse aligned with the horn's curve.
- Produce items have clear contact points and overlap logically.
- Basket weave alternates over and under at every crossing.
- Final contours are smooth; construction lines are lighter or erased.
- Valid alternatives in produce choice and weave spacing are accepted if contact and over-under logic hold.
Questions and answers
Do I need to use exact measurements?
No. The numbers here are hypothetical examples. Measure your own paper and keep units consistent.
Can I change the produce types?
Yes. Any fruits or vegetables work if they have clear contact points and fit the opening's scale.
How do I know the weave is correct?
Check every crossing: each strip should go over one line and under the next in an alternating pattern.
What if my horn looks flat?
Add the tilted opening ellipse and a spiral ridge line inside the horn to suggest volume.