Free original lessons
Chibi Couple Drawing: Proportions, Poses, and Interaction Cues
Learn to draw a cute chibi couple using simple proportion guides, pose practice, and interaction cues. Includes a worked example, four exercises, and a rubric for self-checking.
Free lesson
Four exercises
Worked answers
Object Drawing Lessons
Chibi drawing simplifies the human figure into a large head, small body, and expressive limbs. For a cute couple, the challenge is not just drawing two chibi figures but making them look connected through pose and interaction cues. This lesson teaches a repeatable method: set a proportion guide, choose a pose that creates contact or near-contact, and use small cues like overlapping arms or shared gaze to show relationship. You will practice with four self-contained tasks and check your work against a clear rubric. All measurements are hypothetical examples; measure your own paper and tools. The convention for x-height is baseline to midline, and letter styles vary, so valid alternatives are allowed in any written labels.
Practice materials: Printable downloads are not available for this lesson yet. Use the instructions and four exercises below.
Reference illustration
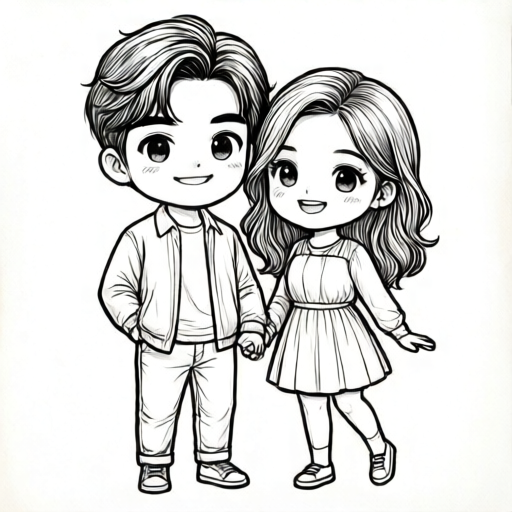
Use the stated measurements and conventions for each exercise.
Chibi Proportion Guide
A chibi figure typically uses a head that is roughly one-third to one-half of the total body height. For a couple, keep both figures on the same proportion system so they look like a matched pair. Start by drawing a vertical line for total height, then mark the head as a circle or rounded square. The body is a small tapered shape below, and limbs are short and simple. Use light pencil lines so you can adjust.
Define a consistent unit. For example, if the total height is 9 cm, a head of 4 cm and body of 5 cm is a hypothetical starting point. Measure your actual paper and adjust. The key is that both figures share the same head-to-body ratio unless you intentionally show a height difference. Mark the midline of the head for eyes and the baseline for the chin. X-height is baseline to midline, which helps place facial features consistently.
- Draw a vertical height line for each figure and mark the head circle at the top.
- Divide the head with a horizontal midline for eyes and a lower line for the mouth.
- Draw a small tapered body below the head, leaving a gap for the neck.
- Add short arms and legs as simple tubes, keeping them slightly curved for cuteness.
- Repeat for the second figure using the same head-to-body ratio.
Pose Practice for Two Figures
Pose practice means trying simple arrangements that create connection. Three reliable chibi couple poses are side-by-side with linked hands, one figure leaning toward the other, and back-to-back with heads turned. Each pose uses overlapping shapes to show contact. Draw the figures as separate guides first, then overlap the arms or shoulders where they meet.
Use a shared ground line to keep both figures standing on the same level. If one leans, tilt the body guide but keep the feet near the ground line. Interaction cues include touching hands, a hand on a shoulder, shared gaze, or matching accessories. Keep cues simple: one or two per drawing is enough. Avoid realistic anatomy; chibi arms can be short and slightly bendy.
- Choose one pose from the three options and sketch two proportion guides side by side.
- Mark the contact point, such as hands or shoulders, with a small circle.
- Draw the arms so they overlap at the contact point, using a single continuous curve.
- Turn both heads slightly toward each other or toward a shared object.
- Erase extra guide lines and darken the final outlines.
Interaction Cues and Expression
Interaction cues are small visual signals that tell the viewer the two figures are a couple. Common cues are linked hands, a shared scarf, matching hair clips, or one figure resting a head on the other's shoulder. Expressions should be simple: curved eyes, small smiles, and slight blushes. Keep both faces readable at chibi scale.
Place cues where they are easy to see, such as at the center between the figures. If you use a shared object, draw it after both figures so it overlaps correctly. For a leaning pose, the leaning figure's head can tilt toward the other's shoulder. Check that the cue does not hide important facial features. A single strong cue is better than many small ones.
- Pick one interaction cue, such as linked hands or a shared scarf.
- Draw the cue at the contact point between the two figures.
- Add simple expressions: curved eyes and small mouths.
- Check that the cue is visible and does not cover faces.
- Adjust the cue size so it matches the chibi scale.
Checking Your Couple Drawing
A good chibi couple drawing passes three checks: proportion consistency, pose connection, and cue clarity. Proportion consistency means both figures use the same head-to-body ratio unless a height difference is intentional. Pose connection means the figures overlap or touch at a clear point. Cue clarity means the interaction cue is visible and readable.
Use the rubric to score each check from 1 to 3. A score of 2 or higher on all three is a solid pass. If one check is low, revise only that part. For example, if the hands do not overlap, redraw the arms at the contact point. Keep your guide lines light so revisions are easy.
- Compare head sizes and body lengths of both figures.
- Trace the contact point and confirm the arms overlap.
- Look at the interaction cue from a short distance to test visibility.
- Score each check using the rubric and revise the lowest score.
Worked example
Draw a chibi couple in a side-by-side pose with linked hands. Use a total height of 9 cm per figure, a head of 4 cm, and a body of 5 cm. Mark the contact point at the hands and add one interaction cue: a shared scarf.
Worked answer
Two chibi figures stand on the same ground line. Each has a 4 cm head circle and a 5 cm tapered body. Their inner arms curve toward a marked contact point at hip height, where the hands overlap. A simple scarf loops from one neck to the other, crossing the contact point. Both faces have curved eyes and small smiles. The head-to-body ratio is the same for both figures, and the scarf is visible between them.
Four practice exercises
Exercise 1
Draw two chibi figures side by side with linked hands. Use a total height of 8 cm per figure, a head of 3 cm, and a body of 5 cm. Mark the contact point at the hands.
Show answer and check
Two figures with 3 cm heads and 5 cm bodies stand on the same ground line. Their inner arms curve to a marked contact point at hip height, where the hands overlap. Both faces have curved eyes and small smiles.
Why: The head-to-body ratio is 3:5 for both figures, so proportions match. The contact point is marked before drawing the arms, which makes the overlap clear. The ground line keeps both figures level.
Check: Measure both head circles and body lengths with the same unit. Confirm the hands overlap at the marked point and that both figures stand on the same ground line.
Exercise 2
Draw a chibi couple where one figure leans toward the other. Use a total height of 9 cm for the standing figure and 8 cm for the leaning figure. Add one cue: a hand on the shoulder.
Show answer and check
The standing figure has a 4 cm head and 5 cm body. The leaning figure has a 3.5 cm head and 4.5 cm body, tilted toward the standing figure. One hand rests on the standing figure's shoulder at a marked contact point. Both faces turn slightly toward each other.
Why: The leaning figure is slightly smaller, which is an intentional height difference. The tilt is shown by angling the body guide while keeping the feet near the ground line. The hand on the shoulder creates a clear contact point.
Check: Check that the leaning figure's feet are near the ground line and that the hand overlaps the shoulder. Confirm the head-to-body ratios are consistent within each figure.
Exercise 3
Draw a chibi couple back-to-back with heads turned toward each other. Use a total height of 10 cm per figure, a head of 4 cm, and a body of 6 cm. Add a shared scarf as the interaction cue.
Show answer and check
Two figures stand back-to-back on the same ground line, each with a 4 cm head and 6 cm body. Their heads turn toward each other so the faces are visible. A scarf loops from one neck to the other, crossing between them at shoulder height.
Why: Back-to-back poses need turned heads to show faces. The scarf creates a visible connection between the figures. The shared ground line keeps the pose stable.
Check: Confirm both figures use the same head-to-body ratio and stand on the same ground line. Check that the scarf is visible between the figures and does not cover either face.
Exercise 4
Draw a chibi couple with a shared accessory: matching hair clips. Use a total height of 7 cm per figure, a head of 3 cm, and a body of 4 cm. Add linked hands as a second cue.
Show answer and check
Two figures with 3 cm heads and 4 cm bodies stand side by side. Each has a small hair clip on the outer side of the head. Their inner hands overlap at a marked contact point at hip height. Both faces have small smiles.
Why: Matching hair clips are a simple cue that reads clearly at small scale. Linked hands add a second connection. The small total height tests whether the cues remain visible at chibi scale.
Check: Measure both figures with the same unit and confirm the hair clips are visible on both heads. Check that the hands overlap at the marked point and that the clips do not hide facial features.
Common mistakes
- Using different head-to-body ratios for each figure without intending a height difference. Measure both head circles and body lengths with the same unit, then adjust one figure to match.
- Drawing the figures side by side with no overlap or contact. Add a contact point such as linked hands or a hand on a shoulder, and overlap the arms there.
- Making the interaction cue too small or hidden behind a face. Move the cue to the center between the figures and enlarge it slightly.
- Using realistic arm lengths that make the chibi figures look stretched. Shorten the arms to about half the body length and keep them slightly curved.
Self-check rubric
- Proportion consistency: both figures use the same head-to-body ratio, or a height difference is clearly intentional (1-3).
- Pose connection: the figures overlap or touch at a clear contact point (1-3).
- Cue clarity: the interaction cue is visible and readable from a short distance (1-3).
- Expression: both faces have simple, readable chibi expressions (1-3).
- Line quality: guide lines are erased and final outlines are clean (1-3).
Questions and answers
Do both chibi figures need the same head size?
Not always. A small height difference can be cute, but keep the head-to-body ratio consistent unless you intentionally show one figure as taller. Measure both with the same unit.
How many interaction cues should I use?
One or two strong cues are enough. Linked hands, a shared scarf, or a head on a shoulder are clear at chibi scale. Too many cues can clutter the drawing.
What if my hands do not overlap correctly?
Redraw the arms from the shoulder to the contact point using a single curve. Keep the contact point marked with a small circle until the arms are finished.
Can I use different letter styles for labels?
Yes. The convention for x-height is baseline to midline, but letter styles vary. Any readable style is acceptable as long as labels are clear.