Free original lessons
Loomis Head Construction: Sphere, Planes, and Feature Placement
Build a head from a sphere, side-slice cues, brow line, face axis, and jaw-defined face plane, then place features with checkable guides.
Free lesson
Four exercises
Worked answers
Object Drawing Lessons
The Loomis head construction starts with a sphere for the cranium, a middle line through the sphere, and an equator that becomes the brow line. Loomis describes slicing a narrow section from each side, then using the jaw line to define the face plane. This lesson keeps those construction steps distinct from a custom vertical ear-position marker used only as a placement aid; Loomis does not define that marker as a plane cut. Eyes sit on either side of the face axis, while the nose base and mouth are centered on it. All measurements are hypothetical examples; measure your own paper and tools.
Practice materials: Printable downloads are not available for this lesson yet. Use the instructions and four exercises below.
Reference illustration
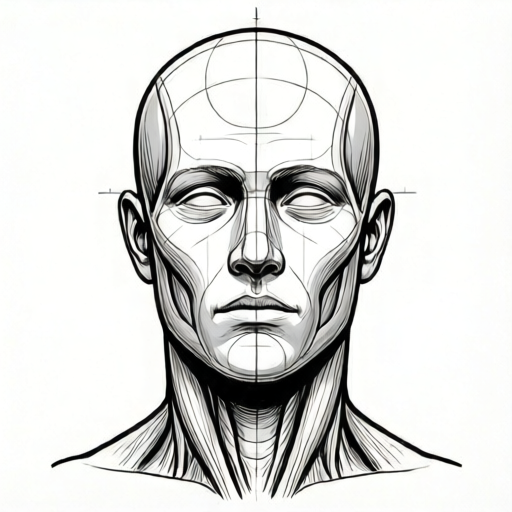
Use the stated measurements and conventions for each exercise.
The Sphere, Brow Line, and Side Slices
Start with a circle for the cranium. Draw a vertical middle line through the sphere and a horizontal line at its equator; in this front-view convention, the equator becomes the brow line. The vertical middle line is the face axis. To suggest the cranium’s side planes, draw the two side-slice arcs as construction cues; the arcs are not themselves extra face planes. Extend the jaw line below the sphere to define the face plane, as described in Andrew Loomis’s Drawing the Head and Hands, Plate 1. For this worksheet only, a separate short vertical ear-position marker indicates where to place the ear horizontally on the side plane; it is a drawing aid, not a Loomis plane cut. Ear height alignment is a simplified worksheet convention.
In the front view, the brow guide crosses the horizontal center of the sphere, the side-slice arcs flatten its left and right edges, and the face axis keeps the nose and mouth centered. The jaw line, rather than the brow or ear-position marker, outlines the face plane below the cranium. Treat the brow, axis, and ear-position marker as guides, not physical slices through the cranium.
- Draw a circle with a vertical and horizontal center line.
- Mark the brow line on the horizontal center.
- Draw two vertical arcs for the side planes, each about one-third of the radius in from the edge.
- Mark a separate vertical ear-position marker on the side plane near its outer edge; this is a worksheet placement aid.
- Extend the vertical center line below the circle to locate the chin.
Placing eyes, nose, and mouth on the constructed head
Use the brow line for the eyes. Place the eye line slightly below the brow line, about one-tenth of the sphere diameter down. The nose base sits halfway between the brow line and the chin, measured vertically along the face axis. The mouth line sits one-third of the way from the nose base to the chin, also measured vertically along the face axis. These are hypothetical proportions for practice; adjust only after checking the construction.
The eyes sit within the front plane, not on the side planes. The nose runs along the vertical face axis. The mouth is centered on the same face axis. In this worksheet convention, ear tops align with the brow guide and ear bottoms with the nose-base guide; the vertical ear-position marker only indicates horizontal placement on the side plane. This gives checkable relationships without claiming a single universal face.
- Draw the eye line just below the brow line.
- Mark the nose base halfway from brow line to chin.
- Mark the mouth line one-third from nose base to chin.
- Place eyes inside the front plane, centered left and right of the vertical axis.
- Align ear tops with the brow guide and ear bottoms with the nose-base guide; keep the vertical ear-position marker separate from the face axis.
Checking the construction with simple arithmetic
Choose a sphere diameter of 8 cm as a hypothetical example. The radius is 4 cm. The side planes sit about 1.3 cm in from each edge (one-third of the radius, rounded). The brow line is at the horizontal center. The face axis is at the vertical center. The custom vertical ear-position marker is separate from the face axis and sits on the side plane near its outer edge. The chin sits below the circle by about one radius, so 4 cm down from the bottom of the sphere.
Check that the nose base is halfway between brow line and chin. With an 8 cm sphere, the brow line is 4 cm from the top and 4 cm above the sphere bottom, and the chin is 4 cm below the sphere bottom, so the brow-to-chin distance is 4 + 4 = 8 cm. The midpoint is 4 cm below the brow line, which is where the nose base belongs. Measure with a ruler and confirm the mouth line is one-third from nose base to chin. These checks catch placement errors before rendering features.
- Measure the sphere diameter and record it.
- Confirm side planes are equal distances from each edge.
- Check brow line is horizontal and centered.
- Check that the face axis is vertical and centered, and that the custom ear-position marker is separate from it on the side plane.
- Verify nose base and mouth line using the stated fractions.
Worked example
A learner draws a sphere of 10 cm diameter. The brow line is at the horizontal center. The chin is 5 cm below the sphere bottom. Find the nose base height from the brow line and the mouth line height from the nose base.
Worked answer
The nose base is halfway from brow line to chin. The brow line is 5 cm from the top and 5 cm above the sphere bottom. The chin is 5 cm below the bottom, so the brow-to-chin distance is 5 + 5 = 10 cm. Half is 5 cm, so the nose base is 5 cm below the brow line. The mouth line is one-third from nose base to chin: one-third of 5 cm is about 1.7 cm below the nose base.
Four practice exercises
Exercise 1
A sphere has diameter 12 cm. The brow line is at the horizontal center. The chin is 6 cm below the sphere bottom. Calculate the distance from brow line to chin and the nose base position.
Show answer and check
Brow line to chin is 12 cm. Nose base is 6 cm below the brow line.
Why: The brow line is 6 cm from the top. The chin is 6 cm below the bottom. Total distance is 6 + 6 = 12 cm. Half is 6 cm.
Check: Measure the sphere diameter, confirm brow line at center, and verify nose base is the midpoint between brow line and chin.
Exercise 2
For a 12 cm sphere, the brow line is at the horizontal center and the chin is 6 cm below the sphere bottom. The nose base is halfway from brow to chin. Find the mouth line if it is one-third of the distance from the nose base to the chin.
Show answer and check
The mouth line is 2 cm below the nose base.
Why: Nose base to chin is 6 cm. One-third of 6 cm is 2 cm.
Check: Measure from nose base to chin and confirm the mouth line divides it into 2 cm and 4 cm segments.
Exercise 3
A learner draws side planes 2 cm in from each edge of a 12 cm sphere. The radius is 6 cm. Is this about one-third of the radius?
Show answer and check
Yes, 2 cm is about one-third of 6 cm.
Why: One-third of the radius 6 cm is 2 cm. The side planes are balanced.
Check: Measure both side plane distances from the edges and confirm they are equal and about one-third of the radius.
Exercise 4
A 10 cm sphere has its brow line at the horizontal center and its chin 5 cm below the sphere bottom, so the brow-to-chin distance is 10 cm. A draft places the eyes on the brow line, the nose base 4 cm below the brow, and a vertical ear-position marker on the face axis. Identify and correct all three placements.
Show answer and check
Move the eye line slightly below the brow. Move the nose base from 4 cm to 5 cm below the brow, the midpoint of the 10 cm brow-to-chin distance. Move the custom vertical ear-position marker off the face axis and onto the side plane near its outer edge; keep the nose base and mouth centered on the face axis.
Why: The lesson places eyes slightly below the brow, the nose base halfway from brow to chin, and the vertical ear-position marker on the side plane. The stated measurements make the correct nose-base coordinate checkable.
Check: Confirm the eye line is below the brow, the nose base is exactly 5 cm below it, and the vertical ear-position marker is separate from the face axis on the side plane. Confirm eyes straddle the axis while nose base and mouth center on it.
Common mistakes
- Drawing the side planes too close to the center, collapsing the front plane. Keep each side plane about one-third of the radius in from the edge and check both sides are equal.
- Placing the eyes on the brow line instead of slightly below it. Use a separate eye line about one-tenth of the sphere diameter below the brow line.
- Putting the nose base at the vertical ear-position marker instead of halfway to the chin. Measure from brow line to chin and mark the midpoint for the nose base; keep the custom vertical ear-position marker separate from the face axis and on the side plane near its outer edge.
- Letting the mouth drift off the vertical center line. Re-draw the vertical axis after the plane cuts and center the mouth on it.
Self-check rubric
- Sphere is circular and centered on the page.
- Vertical and horizontal center lines are present and cross at the sphere center.
- Brow line is horizontal and at the center.
- A custom vertical ear-position marker is separate from the face axis and placed near the outer edge of the side plane.
- Two side planes are drawn as vertical arcs, balanced left and right.
- Eye line is slightly below the brow line.
- Nose base is halfway between brow line and chin.
- Mouth line is one-third from nose base to chin.
- Eyes straddle the face axis; the nose base and mouth center on it.
- Ear tops align with brow line and ear bottoms with nose base.
- Valid alternatives are accepted if the checks above hold.
Questions and answers
Do I need a ruler for every drawing?
No. Use a ruler to learn the checks, then estimate the same fractions by eye. The arithmetic example is hypothetical and only for practice.
Can the side planes be curved differently?
Yes. The convention allows valid alternatives as long as both sides are balanced and the front plane remains readable.
Where does the vertical ear-position marker go?
This worksheet uses it only as a custom horizontal-placement aid: draw it vertically on the side plane near its outer edge. Align the ear’s top and bottom with the stated brow and nose-base guides; do not treat the marker as another face plane.
How do I know my feature placement is acceptable?
Check that the eye line is slightly below the brow, the nose base is halfway from brow to chin, and the mouth is one-third from nose base to chin. The eyes straddle the face axis; only the nose base and mouth center on it.