Free original lessons
Realistic Butterfly Drawing: Wing Venation, Body Segments, and Shading
Learn to draw a realistic butterfly step by step: map wing veins, segment the body, and shade wing scales for texture using a defined convention and checkable rubric.
Free lesson
Four exercises
Worked answers
Object Drawing Lessons
This lesson teaches a realistic butterfly drawing built on observable anatomy rather than cartoon simplification. You will establish a proportional outline, map a plausible wing venation pattern, segment the thorax and abdomen, and shade the wings to suggest overlapping scales. A single convention is used throughout: x-height means the distance from the baseline to the midline of a letter, and all lettering on the plate follows that measure so labels and guide marks stay consistent. Wing venation is treated as a branching network that radiates from the wing base toward the margin; exact vein counts vary among real species, so the pattern you draw must be internally consistent and clearly labeled rather than matched to one universal template. Shading is judged by contrast, direction, and edge quality, not by a single correct tone. All measurements below are hypothetical examples chosen for practice; measure your own paper and tools and label any values you adopt. The resources described are planned and free, not yet built.
Practice materials: Printable downloads are not available for this lesson yet. Use the instructions and four exercises below.
Reference illustration
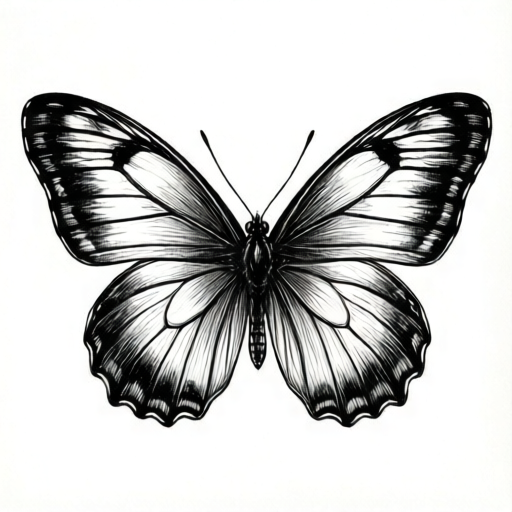
Use the stated measurements and conventions for each exercise.
Establishing Proportion and Body Segments
Begin with a light construction outline. Draw a vertical body axis and mark three body regions: head, thorax, and abdomen. The thorax is the anchor for both wing pairs and the legs; the abdomen tapers toward the rear. Use a soft pencil and keep pressure low so the construction lines can be erased or absorbed into the final drawing.
Set a working scale before drawing. As a hypothetical example, choose a body length of 60 mm on paper and a wingspan of 90 mm; these are practice values, not standards. Measure your actual paper and pencil, then record your chosen values at the top of the sheet so every later check uses the same units.
Place the forewings first, then the hindwings. The forewing leading edge runs from the thorax outward and slightly forward; the hindwing sits behind and below, often with a lobed inner margin. Check that the wing bases attach at the thorax, not at the abdomen, and that the two wings on each side share a plausible root point.
- Draw a vertical axis and mark head, thorax, and abdomen with three short crosslines.
- Measure your paper and pencil; write your chosen body length and wingspan in millimeters at the top of the sheet.
- Sketch the forewing outline from the thorax outward, then the hindwing below it.
- Check attachment points: both wing pairs must meet the thorax, and the abdomen must remain clear of the wing roots.
Mapping Wing Venation
Venation is a branching network. Start at the wing base and draw a small number of main veins that radiate toward the margin, then add secondary branches that split from those main veins. Keep the branching directional: veins should flow from base to margin and should not cross one another. A plausible practice pattern uses five main veins on the forewing and four on the hindwing, with secondary branches splitting once or twice; these counts are hypothetical examples, and other consistent counts are acceptable.
Label the veins with short letters placed along the wing base side, using the x-height convention: the baseline-to-midline distance of your lettering sets the label size. Keep labels outside the wing outline so they do not read as veins. If you use a blank wing template, draw the venation directly on it and transfer the pattern to the final drawing by aligning the template at the wing root.
Check internal consistency: every secondary branch must trace back to a main vein, and no vein should terminate abruptly in the middle of the wing. A vein that stops short is acceptable only if it is clearly a short cross-vein connecting two main veins.
- Mark the wing root and draw five main forewing veins radiating toward the margin.
- Add secondary branches that split from the main veins, keeping all branches directional.
- Draw four main hindwing veins and branch them once or twice.
- Label veins with x-height lettering placed outside the wing outline.
- Trace each secondary branch back to its main vein and erase any vein that crosses another.
Shading for Wing Texture
Shade to suggest overlapping scales, not flat color. Work in the direction of the veins: short strokes that follow the vein direction read as scale rows. Build tone in layers, starting light and increasing contrast near the wing base and along the margin where shadows accumulate. Keep the light source consistent; as a hypothetical example, place the light at the upper left so shadows fall to the lower right on both wings.
Use three tone zones: a light zone near the outer margin, a mid zone across the wing center, and a darker zone near the base and along vein intersections. Check contrast by squinting: the three zones should remain distinguishable. Edge quality matters; soft transitions suggest curvature, while crisp edges suggest a scale boundary. Neither is universally correct, so state your choice and apply it consistently.
Shade the body separately. The thorax is usually darker and more textured than the abdomen; use short strokes across the segment lines to suggest segmentation. Keep the abdomen shading lighter toward the rear to imply tapering.
- Choose a light direction and mark it at the top of the sheet.
- Lay a light tone across the whole wing, stroking in the vein direction.
- Add a mid tone across the wing center and a darker tone near the base and vein intersections.
- Shade the thorax darker than the abdomen and add short strokes across segment lines.
- Squint to confirm three distinguishable tone zones on each wing.
Final Checks and Presentation
Before finishing, run a consistency pass. Confirm that wing venation branches trace back to main veins, that both wing pairs attach at the thorax, and that shading follows one light direction. Check that labels use the x-height convention and sit outside the wing outline. Erase construction lines that are not part of the final drawing, but keep any guide marks you used for measurement until the check is complete.
Record your chosen numerical values and the light direction on the sheet. Because letter styles and vein counts vary, the rubric rewards internal consistency and clear labeling rather than a single universal answer. If you used a blank wing template, note where it was aligned so the venation pattern can be verified against the final drawing.
- Trace every secondary vein back to a main vein and confirm no crossings.
- Confirm both wing pairs meet the thorax and the abdomen is clear of wing roots.
- Check that all shading follows the marked light direction.
- Verify labels use x-height lettering and sit outside the wing outline.
- Erase non-final construction lines and record your chosen values and light direction.
Worked example
A student draws a butterfly with a 70 mm body and 100 mm wingspan on paper measured at 210 mm by 297 mm. They place the light at the upper right, draw five forewing main veins and four hindwing main veins, and add secondary branches. Their labels are 3 mm from baseline to midline. Check the drawing against the lesson conventions.
Worked answer
The drawing passes if: both wing pairs attach at the thorax; every secondary vein traces back to a main vein with no crossings; shading strokes follow vein direction and shadows fall to the lower left, consistent with an upper-right light; labels sit outside the wing outline at the stated x-height; and the recorded values match the measured paper. The vein counts are acceptable because they are internally consistent, not because they match a universal standard.
Four practice exercises
Exercise 1
On a blank wing template, draw a forewing venation pattern with four main veins radiating from the wing base and at least three secondary branches. Label the mains with x-height letters placed outside the outline. Describe how you checked the pattern.
Show answer and check
A valid pattern shows four mains from the base, each secondary branch tracing to one main, no crossings, and labels outside the outline at the chosen x-height. Exact branch positions vary.
Why: The task tests branching logic and labeling discipline rather than a fixed vein count. Any consistent four-main pattern with traceable secondaries satisfies the convention.
Check: Trace each secondary branch back to a main vein; confirm no vein crosses another; confirm labels sit outside the wing outline and use the x-height measure.
Exercise 2
A drawing has a 50 mm body and 80 mm wingspan on paper measured at 150 mm by 200 mm. The light is marked at the upper left. The student shades the forewing with strokes crossing the veins at 45 degrees and places labels inside the wing. Identify two convention violations and state a fix for each.
Show answer and check
Violation one: shading strokes cross the veins instead of following vein direction; fix by stroking in the vein direction. Violation two: labels sit inside the wing outline; fix by moving labels outside the outline at the x-height size.
Why: The lesson requires shading strokes to follow vein direction and labels to sit outside the wing so they do not read as veins. The light direction and measurements are consistent and are not violations.
Check: Compare stroke direction to vein direction; check label placement against the wing outline; confirm the recorded values match the measured paper.
Exercise 3
Draw a hindwing with three main veins and two secondary branches. Shade it using three tone zones with the light at the lower right. State your chosen body length and wingspan in millimeters and explain how you confirmed the three zones remain distinguishable.
Show answer and check
A valid hindwing shows three mains from the base, two traceable secondaries, no crossings, and three tone zones with shadows falling to the upper left. Chosen measurements vary but must be recorded and consistent.
Why: The exercise checks branching, consistent light direction, and tone separation. Any recorded measurements that fit the paper are acceptable.
Check: Trace secondaries to mains; confirm shadow direction matches the lower-right light; squint to verify three distinguishable zones; confirm recorded values match the measured paper.
Exercise 4
A student claims their butterfly is realistic because it is perfectly symmetrical. Explain why symmetry alone does not satisfy this lesson, and list three anatomy or shading checks they should perform instead.
Show answer and check
Symmetry alone does not satisfy the lesson because realism here depends on branching venation, thorax attachment of both wing pairs, body segmentation, and consistent shading. Checks: trace secondary veins to mains with no crossings; confirm both wing pairs attach at the thorax; confirm shading follows one marked light direction with three tone zones.
Why: The boundary excludes symmetry-only butterfly drawing. The lesson judges anatomy and shading conventions, which symmetry does not establish.
Check: Verify each listed check against the drawing: vein traceability, thorax attachment, and light-direction consistency with distinguishable tone zones.
Common mistakes
- Drawing veins as straight spokes that all meet at one point. Start with a few main veins from the wing base, then branch secondaries from those mains so the network reads as a branching pattern rather than a fan.
- Attaching the hindwing to the abdomen instead of the thorax. Re-check the wing roots against the body axis; both wing pairs must meet the thorax, and the abdomen should remain clear.
- Shading with strokes that cross the veins at random angles. Stroke in the vein direction so scale rows read consistently, and keep one light direction across both wings.
- Using labels that are larger than the wing features and read as veins. Apply the x-height convention to set label size and place labels outside the wing outline.
Self-check rubric
- Wing venation is a branching network: every secondary vein traces back to a main vein and no veins cross.
- Both wing pairs attach at the thorax, and the abdomen remains clear of wing roots.
- Shading uses strokes in the vein direction and one marked light direction across both wings.
- Three tone zones are distinguishable on each wing when squinting.
- Labels use the x-height convention and sit outside the wing outline.
- Chosen numerical values are recorded and match the measured paper and tools.
- Valid alternatives are accepted: different vein counts, letter styles, and light directions pass if internally consistent and clearly labeled.
Questions and answers
How many veins should a realistic butterfly wing have?
There is no single universal count. Use a small number of main veins that radiate from the wing base and add secondary branches; a practice pattern of five forewing mains and four hindwing mains is a hypothetical example. What matters is that every branch traces back to a main vein and no veins cross.
What does x-height mean in this lesson?
X-height is the distance from the baseline to the midline of a letter. It sets a consistent label size so annotations do not compete with the wing venation. Letter styles vary, so apply the convention to your own lettering rather than copying one font.
Can I use a different light direction?
Yes. Choose one light direction, mark it on the sheet, and apply it consistently to both wings and the body. The rubric checks consistency, not a specific direction.
Are the millimeter values required?
No. The 60 mm body and 90 mm wingspan are hypothetical practice examples. Measure your actual paper and pencil, choose values that fit, and record them so your checks use the same units.