Free original lessons
Ring Drawing: Band, Gem, and Metallic Shading Construction
Learn to draw a ring with correct band perspective, a faceted gemstone setting, and metallic shading using a clear, checkable construction method.
Free lesson
Four exercises
Worked answers
Object Drawing Lessons
This lesson teaches a reliable construction for drawing a ring: a circular band shown in perspective, a gemstone set into the band, and metallic shading that reads as polished metal. You will work from simple guide shapes to a finished drawing, using an explicitly defined convention for line placement and a rubric that allows valid stylistic alternatives. All measurements are hypothetical examples; measure your own paper and tools. The method is self-contained and uses only pencil, paper, and an eraser.
Practice materials: Printable downloads are not available for this lesson yet. Use the instructions and four exercises below.
Reference illustration
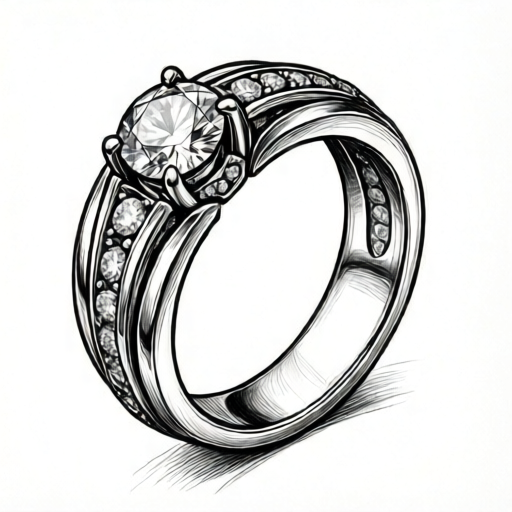
Use the stated measurements and conventions for each exercise.
Constructing the Band in Perspective
A ring band is a torus: a thick circular loop. In front view it looks like two concentric circles. In side view it looks like a narrow rectangle with rounded ends. In three-quarter view it looks like two ellipses offset along a short axis. The key convention is that the band's outer edge and inner edge share the same ellipse axis ratio; only their sizes differ. This keeps the band thickness consistent around the loop.
Start with a light construction ellipse for the outer edge. Draw a second ellipse inside it with the same axis ratio and the same center, scaled down so the band width is proportional around the loop. Note that concentric same-ratio ellipses give a proportional width, not a constant width: the gap is wider near the minor axis and narrower near the major axis. If you want a visually even band, offset the inner ellipse slightly toward the major axis or draw the inner edge as a true offset curve. To suggest the band's depth, add a small offset only at the sides where the band curves away, not as the thickness itself. Connect the two ellipses at the sides with short curved lines to show the band's depth. Keep all guide lines light so they can be erased later.
- Draw a light horizontal line for the band's major axis and a shorter vertical line for its minor axis.
- Sketch the outer ellipse using the axis lines as guides; keep the line light.
- Draw the inner ellipse with the same axis ratio and the same center, scaled down so the band width is proportional around the loop; remember this gives proportional, not constant, width.
- Add a small offset at the left and right sides only to suggest the band's depth, then connect the outer and inner ellipses there with short curves.
- Check that the band width is proportional around the loop and that any offset for even width is consistent; adjust before darkening.
Setting the Gemstone
The gem sits in a setting on top of the band. A simple setting is a small oval or round cup with a raised rim. Draw the setting as a shallow ellipse on the band's top edge, then add a second ellipse slightly above it for the rim. The gem itself is a faceted shape: a central table (flat top) surrounded by triangular facets that meet the rim.
Use a consistent facet convention: draw the table as a small polygon, then connect each table vertex to the rim with straight lines. Facets should share vertices; avoid crossing lines. The gem's outline should sit inside the setting rim so the metal reads as holding it. Shade facets with different values to suggest light reflection, but keep the light direction consistent with the metal shading.
- Mark the top center of the band and draw a shallow ellipse for the setting base.
- Draw a slightly larger ellipse above it for the rim, keeping the same axis ratio.
- Inside the rim, draw a small polygon for the gem's table.
- Connect each table vertex to the nearest rim point with straight lines to form facets.
- Erase construction lines inside the gem and refine facet edges before shading.
Metallic Shading and Highlights
Polished metal shows strong value contrast: dark reflections next to bright highlights. Choose one light direction and keep it consistent for band and setting. Shade the band with a gradient that follows its curvature: darker near the inner edge and lighter near the outer edge facing the light. Add a narrow highlight along the outer edge where the light hits most directly.
For the gem, assign each facet a value based on its angle to the light: facets facing the light get lighter values, facets angled away get darker values. A single bright highlight on the table and a few small highlights on facet edges suggest sparkle. Avoid uniform gray; metal reads as metal through contrast, not through even tone.
- Decide the light direction and mark it lightly outside the drawing.
- Shade the band with a gradient following its curve, darker on the side away from the light.
- Add a narrow highlight along the outer edge facing the light.
- Shade each gem facet with a value based on its angle to the light.
- Add a bright highlight on the table and small highlights on facet edges; check contrast.
Checking Proportions and Consistency
Before finalizing, check that the band's outer and inner ellipses share the same axis ratio, that the setting sits centered on the band's top edge, and that the gem's facets share vertices without crossing. Check that the light direction is consistent across band, setting, and gem. These checks catch most construction errors before shading.
Use a simple arithmetic check: measure the band's outer ellipse major axis and minor axis in millimeters, then divide minor by major to get the ratio. Measure the inner ellipse the same way; the ratios should be close. If they differ by more than about ten percent, redraw the inner ellipse. These numerical values are hypothetical examples; measure your own drawing.
- Measure outer ellipse major and minor axes; compute minor divided by major.
- Measure inner ellipse axes; compute the same ratio and compare; note that same-ratio concentric ellipses give proportional width, not constant width.
- Check that the setting ellipse is centered on the band's top edge.
- Trace each facet line to confirm shared vertices and no crossings.
- Confirm the light direction is the same on band, setting, and gem.
Worked example
Draw a ring in three-quarter view with a round band, a simple oval setting, and a six-facet gem. Use a light direction from the upper left. Show the construction steps and a final shaded drawing.
Worked answer
Construction: draw a light horizontal major axis of 60 mm and a vertical minor axis of 36 mm (hypothetical example). Sketch the outer ellipse. Draw the inner ellipse with the same ratio (minor divided by major equals 0.6) and the same center, using axes of 40 mm by 24 mm, so the band width is proportional around the loop. Note that this gives proportional, not constant, width; if you want even width, offset the inner ellipse slightly toward the major axis. Add a small offset at the left and right sides only to suggest depth, and connect the sides with short curves. Mark the top center and draw a setting base ellipse of 20 mm by 12 mm, then a rim ellipse of 24 mm by 14 mm. Inside the rim, draw a hexagonal table of 10 mm across. Connect each table vertex to the nearest rim point with straight lines to form six facets. Shading: light from upper left. Shade the band darker on the lower right, with a narrow highlight on the upper left outer edge. Shade facets facing upper left lighter, lower right darker. Add a bright highlight on the table and small highlights on two facet edges. Check: outer ratio 36 divided by 60 equals 0.6; inner ratio 24 divided by 40 equals 0.6; band width proportional around the loop; setting centered; facets share vertices; light direction consistent.
Four practice exercises
Exercise 1
Draw a ring in front view: two concentric circles for the band and a round setting centered at the top. Use a light direction from the right. Describe your construction and shading choices.
Show answer and check
Construction: draw an outer circle of 50 mm diameter and an inner circle of 40 mm diameter, both centered on the same point (hypothetical example). Mark the top center and draw a setting base circle of 16 mm diameter, then a rim circle of 20 mm diameter. Inside the rim, draw a small octagon table and connect its vertices to the rim to form facets. Shading: light from the right. Shade the band darker on the left, with a highlight on the right outer edge. Shade facets facing right lighter, left darker. Add a bright highlight on the table.
Why: Front view uses circles because the band faces the viewer directly. Concentric circles keep band thickness even. Centering the setting on the top mark keeps it aligned. Consistent light direction from the right determines which side of the band and which facets are lighter.
Check: Measure outer and inner diameters; the difference should be equal on all sides. Check that the setting center aligns with the band's top center. Trace facet lines for shared vertices. Confirm the highlight is on the right side of the band and on right-facing facets.
Exercise 2
Draw a ring in side view: a narrow rectangle with rounded ends for the band and a small oval setting on top. Use a light direction from above. Describe your construction and shading choices.
Show answer and check
Construction: draw a rectangle 40 mm long and 8 mm wide with rounded ends for the band (hypothetical example). Mark the top center and draw a setting base ellipse of 14 mm by 8 mm, then a rim ellipse of 18 mm by 10 mm. Inside the rim, draw a small hexagonal table and connect vertices to the rim. Shading: light from above. Shade the band darker at the bottom, with a highlight along the top edge. Shade facets facing up lighter, down darker. Add a highlight on the table.
Why: Side view shows the band as a narrow shape because the loop is seen edge-on. Rounded ends suggest the band's curvature. The setting appears as a shallow oval. Light from above means the top edge and upward-facing facets are lighter.
Check: Check that the band's rounded ends are symmetric. Confirm the setting is centered on the top edge. Trace facet lines for shared vertices. Confirm the highlight is along the top edge and on upward-facing facets.
Exercise 3
Draw a ring in three-quarter view with an oval band and a square gem. Use a light direction from the lower left. Describe your construction and shading choices.
Show answer and check
Construction: draw a light major axis of 55 mm and minor axis of 33 mm (ratio 0.6, hypothetical example). Sketch the outer ellipse. Draw the inner ellipse with the same ratio and the same center by scaling both axes by the same factor, for example 0.8, giving axes of 44 mm by 26.4 mm (ratio 0.6), so the band width is proportional around the loop. Note that this gives proportional, not constant, width; if you want even width, offset the inner ellipse slightly toward the major axis. Add a small offset at the left and right sides only to suggest depth, and connect the sides. Mark the top center and draw a setting base ellipse of 18 mm by 11 mm, then a rim ellipse of 22 mm by 13 mm. Inside the rim, draw a square table rotated slightly and connect its four vertices to the rim to form four facets. Shading: light from lower left. Shade the band darker on the upper right, with a highlight on the lower left outer edge. Shade facets facing lower left lighter, upper right darker. Add a highlight on the table.
Why: Three-quarter view uses ellipses with a consistent axis ratio. A square gem with four facets is a valid alternative to a many-faceted gem if vertices are shared. Light from lower left means the lower left side of the band and lower-left-facing facets are lighter.
Check: Measure outer and inner ellipse axes; compute minor divided by major for each and compare. Check that the setting is centered. Trace facet lines for shared vertices and no crossings. Confirm the highlight is on the lower left outer edge and on lower-left-facing facets.
Exercise 4
Draw a ring in three-quarter view with a band and a gem, then intentionally create one construction error and correct it. Describe the error, the correction, and how you checked the result.
Show answer and check
Construction: draw a three-quarter ring with outer ellipse 60 mm by 36 mm and inner ellipse 50 mm by 30 mm, same center, so the band width is proportional around the loop (hypothetical example). Intentionally draw the inner ellipse with a different ratio (for example, 48 mm by 24 mm) so the band looks uneven. Correction: redraw the inner ellipse with the same ratio as the outer (minor divided by major equals 0.6) and the same center, using 50 mm by 30 mm, so the band width is proportional around the loop. Note that this gives proportional, not constant, width; if you want even width, offset the inner ellipse slightly toward the major axis. Add a small offset at the left and right sides only to suggest depth. Add a setting and six-facet gem. Shade with light from upper right. Check: outer ratio 36 divided by 60 equals 0.6; corrected inner ratio 30 divided by 50 equals 0.6; band width proportional around the loop; facets share vertices; highlight on upper right.
Why: The error is a mismatched axis ratio between outer and inner ellipses, which makes band thickness uneven. Correcting the ratio restores even thickness. The check method uses simple arithmetic to compare ratios and visual inspection for shared vertices and consistent light direction.
Check: Compute minor divided by major for outer and inner ellipses; they should be close. Measure band width at several points around the loop; it should be proportional, or visually even if an offset method was used. Trace facet lines for shared vertices. Confirm the highlight is on the upper right side and on upper-right-facing facets.
Common mistakes
- Drawing the inner and outer band ellipses with different axis ratios, making the band look uneven. Use the same axis ratio for both ellipses; only change size and offset. Check by measuring minor divided by major for each. Remember that same-ratio concentric ellipses give proportional width, not constant width; if you want even width, offset the inner ellipse.
- Placing the gem setting off-center on the band's top edge. Mark the band's top center first, then center the setting ellipse on that mark before drawing the rim.
- Shading metal with even gray tones, so it looks like plastic. Increase contrast: place a dark reflection next to a bright highlight along the band's curve, following one light direction.
- Letting gem facet lines cross or not share vertices. Draw the table polygon first, then connect each vertex to the rim with straight lines; erase any crossing lines before shading.
Self-check rubric
- Band outer and inner ellipses share the same axis ratio within about ten percent.
- Band width is proportional around the loop, consistent with the same-ratio concentric construction, or visually even if an offset method was used.
- Setting is centered on the band's top edge and sits inside the band outline.
- Gem facets share vertices and do not cross.
- Shading uses strong value contrast with one consistent light direction.
- Highlights are placed on band and gem in positions consistent with the light direction.
- Construction lines are erased or faint in the final drawing.
- Valid stylistic alternatives are accepted: facet count, gem shape, and light direction may vary if consistency checks pass.
Questions and answers
Do I need a compass or ellipse template?
No. You can sketch ellipses freehand using axis lines as guides. A compass helps for circles but not for ellipses; freehand is fine if you check the axis ratio.
How many facets should the gem have?
Any number that reads clearly. A simple gem can have six to ten facets around the table. The rubric checks shared vertices and consistent shading, not a specific count.
Can I use a different light direction?
Yes. Choose any single direction and keep it consistent across band, setting, and gem. The rubric checks consistency, not a particular direction.
What if my band looks too thick or too thin?
Adjust the offset between outer and inner ellipses. A band width of about one-fifth to one-quarter of the outer ellipse's minor axis is a hypothetical starting point; measure and adjust to your drawing. Note that concentric same-ratio ellipses give proportional width, not constant width; offset the inner ellipse if you want even width.