Free original lessons
Draw a White Star: Point-Spacing Construction and Tracing Practice
Learn to draw a white star by spacing five points evenly on a circle, connecting them with symmetry lines, and tracing graded outlines for clean results.
Free lesson
Four exercises
Worked answers
Object Drawing Lessons
A white star looks simple, but its clean shape depends on even point spacing and deliberate symmetry. This lesson teaches a construction method: start with a circle, mark five points at equal intervals, connect them in the star order, and then trace the outline with graded guides. You will also learn how to check spacing by eye and by simple measurement, and how to adapt the method when your drawing surface or tools differ. The convention used here is that a star point is a sharp outward vertex, and the inner vertices sit on a smaller concentric circle. Line styles vary, so the rubric accepts any consistent, legible construction that meets the spacing and symmetry checks. All numerical values below are hypothetical examples for teaching; measure your own paper and tools before relying on any number.
Practice materials: Printable downloads are not available for this lesson yet. Use the instructions and four exercises below.
Reference illustration
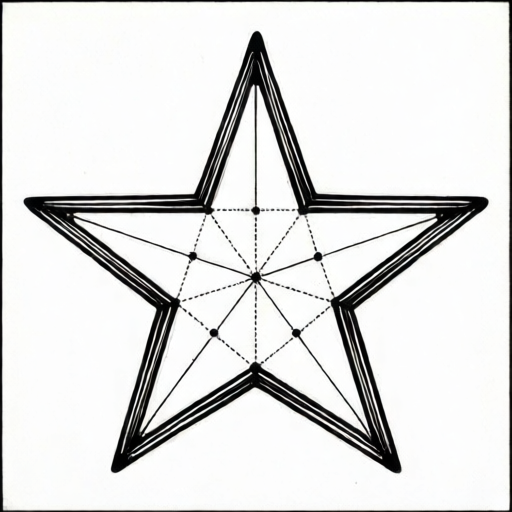
Use the stated measurements and conventions for each exercise.
Why point spacing controls star shape
A five-pointed star is defined by two rings of vertices: five outer points on a circle and five inner points on a smaller concentric circle. If the outer points are unevenly spaced, the star looks lopsided even when the lines are straight. Even spacing means the angle between neighboring outer points is the same all the way around. For five points, that angle is 360 divided by 5, or 72 degrees. You do not need a protractor to begin: folding a paper circle into five equal wedges is a practical way to mark spacing.
Symmetry lines help you place inner points. In this lesson, each inner vertex lies on a line from the center that bisects the angle between two adjacent outer points on the circle. Drawing those bisector lines first gives you a scaffold, so the inner points do not drift. The inner radius is a chosen aesthetic value rather than a fixed regular-star value, so keep it consistent all the way around. The construction is not about memorizing a single perfect star; it is about a repeatable sequence that you can check and correct.
- Draw a circle with a radius you can measure, for example 6 cm as a hypothetical value.
- Mark one outer point at the top of the circle.
- Divide the circle into five equal arcs using folding or measured angles of 72 degrees.
- Mark the remaining four outer points on those divisions.
- Draw light symmetry lines from the center through each midpoint between adjacent outer points (for example, between the top point and the next point clockwise); these are the lines that will carry the inner points.
- Place one inner point on each symmetry line at the same smaller radius. This inner radius is a chosen aesthetic value, not a fixed regular-star value; a hypothetical example is 2.5 cm on a 6 cm outer circle. Label the outer points O1 to O5 clockwise and the inner points I1 to I5, where I1 lies on the symmetry line between O1 and O2, I2 between O2 and O3, and so on. Then connect in star order: O1 to I1 to O3 to I2 to O5 to I3 to O2 to I4 to O4 to I5 back to O1.
Tracing with graded guides
Tracing is not copying a finished star blindly; it is practicing the order of connections. A graded guide shows the star in stages: first the circle and five outer points, then the symmetry lines, then the inner points, and finally the complete outline. Trace each stage with a light pencil, then darken only the final star outline. This keeps construction marks visible for checking but separates them from the finished shape.
Use a consistent convention for the white star: the star is drawn as an outline only, with no fill, and the interior remains the paper color. If you shade, shade outside the star, not inside, so the white shape stays clear. Line quality matters: aim for smooth, continuous strokes rather than short scratchy segments. A slightly wobbly line is acceptable if the vertices and spacing are correct.
- Trace the circle and mark the five outer points lightly.
- Trace the symmetry lines from center through each midpoint between adjacent outer points.
- Trace the inner points on the midpoint lines.
- Connect outer to inner to outer in star order with one continuous stroke per segment.
- Erase construction marks only after checking spacing and symmetry.
- Darken the final outline with a consistent line weight.
Checking spacing and symmetry
A practical check is to compare neighboring gaps between outer points. If one gap looks wider, the star will lean. You can measure chord distances between adjacent outer points with a ruler; for a circle of radius 6 cm, the chord between points 72 degrees apart is about 7.05 cm as a hypothetical example. This measures the spacing of the marked points on the circle, not the star's connecting segments. All five chords should be equal within your measurement uncertainty. Another check is to fold the paper along a symmetry line: the two halves of the star should align.
Inner points should sit at the same distance from the center. Measure from the center to each inner point; the values should match. If one inner point is too far out, the star looks spiky; too far in, it looks blunt. Adjust before darkening. These checks are simple arithmetic and observation, not a claim about any standard or printer tolerance.
- Measure the five outer chord distances and compare.
- Measure center-to-inner-point distances and compare.
- Fold along each symmetry line to test alignment.
- Check that each outer point is sharp and each inner vertex is consistent.
- Correct the light construction before final tracing.
Adapting the construction to your materials
If you lack a compass, trace a circular object and mark its center by folding or by measuring the diameter. If you lack a protractor, fold a paper circle into five wedges by trial: adjust the folds until the arcs look equal, then unfold and mark. The method still works because the star depends on equal spacing, not on a specific tool. When your paper is small, reduce the inner radius proportionally; when it is large, increase it. Keep the ratio consistent so the star does not become too spiky or too blunt.
For a white star on dark paper, use a white pencil or chalk and keep the same construction order. The convention remains an outline-only star with a clear interior. If you use a ruler, measure actual equipment rather than assuming a printed size. Any numerical example in this lesson is hypothetical and should be replaced by your own measurements.
- Find or make a circle and locate its center.
- Mark five equal divisions by folding or measured angles.
- Choose an inner radius that looks balanced, then keep it consistent.
- Trace the construction stages before the final outline.
- Check spacing and symmetry with simple measurements.
Worked example
Construct a five-pointed white star on a circle of radius 6 cm using equal spacing. Mark outer points at 72-degree intervals, place inner points at a hypothetical chosen inner radius of 2.5 cm on the bisector lines, connect in star order, and describe one check.
Worked answer
Draw the 6 cm circle and mark the top outer point. Divide the circle into five equal arcs of 72 degrees and mark the other four outer points. Draw symmetry lines from the center through each midpoint between adjacent outer points. On each such line, mark an inner point at 2.5 cm from the center; this is a chosen aesthetic value, not a fixed regular-star value. Connect outer to inner to outer in star order around the circle. Check by measuring the five chord distances between adjacent outer points; they should be equal within measurement uncertainty, and the five center-to-inner-point distances should all be about 2.5 cm.
Four practice exercises
Exercise 1
A student marks five outer points on a circle but one gap is visibly wider. Describe two checks to find the error and one correction.
Show answer and check
Measure the chord distances between adjacent outer points; the wider gap will have a larger chord. Fold along symmetry lines to see if halves align. Correction: re-divide the circle into five equal arcs and move the misplaced point to the correct division.
Why: Equal spacing means equal chords for equal angular intervals. A wider gap indicates a larger angle, which breaks symmetry.
Check: Compare all five chord measurements and confirm they match within measurement uncertainty after correction.
Exercise 2
On a circle of radius 8 cm, a student places inner points at 3 cm, 3 cm, 4 cm, 3 cm, and 3 cm from the center. What is the likely visual effect and how should it be fixed?
Show answer and check
The inner point at 4 cm will make one part of the star look more spiky or deep. Fix by moving that inner point to 3 cm on its symmetry line, then recheck all five inner radii.
Why: Inner points should sit at a consistent radius; one outlier changes the star's proportions locally.
Check: Measure all five center-to-inner-point distances and confirm they are equal within measurement uncertainty.
Exercise 3
Describe the connection order for a five-pointed star using labels O1 to O5 for outer points clockwise and I1 to I5 for inner points between them. Start at O1 and go clockwise.
Show answer and check
One valid order is O1 to I1 to O3 to I2 to O5 to I3 to O2 to I4 to O4 to I5 back to O1, where I1 lies on the symmetry line between O1 and O2, I2 between O2 and O3, I3 between O3 and O4, I4 between O4 and O5, and I5 between O5 and O1. The key is to skip one outer point each time and pass through an inner point between.
Why: Star order connects non-adjacent outer points, with inner points acting as the inward vertices between them; each inner point sits on the bisector of the angle between two adjacent outer points on the circle.
Check: Trace the sequence and confirm it closes at O1 without crossing itself incorrectly and produces five sharp outer points.
Exercise 4
You have no compass and no protractor. Explain how to mark five equal divisions on a traced circle using folding, and state one limitation.
Show answer and check
Fold the circle in half, then adjust folds until five equal wedges overlap; unfold and mark the crease intersections on the circle. Limitation: folding is approximate, so check chord distances and adjust by eye or ruler.
Why: Equal wedges create equal angular intervals, which is the spacing requirement. Folding avoids tools but introduces small errors.
Check: Measure adjacent chord distances after marking; if one is larger, adjust the nearest point toward equal spacing.
Common mistakes
- Marking outer points by eye without equal divisions. Fold the circle into five wedges or measure 72-degree intervals, then mark points on the divisions.
- Placing inner points randomly instead of on symmetry lines. Draw bisector lines between adjacent outer points and place inner points on those lines at a consistent radius.
- Connecting points in the wrong order, producing a pentagon or tangled shape. Follow star order: outer point, skip one outer point, connect to the next inner point, and continue around.
- Darkening construction lines before checking spacing. Keep construction light, measure chords and inner radii, then darken only the final outline.
- Filling the star interior when the task asks for a white star. Leave the interior as paper color and shade outside the outline if contrast is needed.
Self-check rubric
- Five outer points are spaced equally within a reasonable visual or measured tolerance.
- Five inner points lie on symmetry lines and at a consistent distance from the center.
- Connections follow star order and produce a closed five-pointed outline.
- The star is outline-only with a white interior, or shading is outside the star.
- Construction marks are light and final outline is clean and continuous.
- Valid alternatives are accepted if spacing and symmetry checks pass, even if line style differs.
Questions and answers
Do I need a protractor to draw a five-pointed star?
No. Folding a paper circle into five equal wedges is a practical alternative. A protractor helps, but equal spacing is the goal, not a specific tool.
How large should the inner circle be?
There is no single required size. A common teaching example uses an inner radius about 40 percent of the outer radius, but this is a chosen aesthetic value, not a fixed regular-star value. Adjust until the star looks balanced and keep it consistent.
Can I use a ruler to check spacing?
Yes. Measure the chord distances between adjacent outer points; they should be equal within your measurement uncertainty. Also measure center-to-inner-point distances.
What if my star looks slightly uneven?
Check the outer chord distances and the inner radii first. Correct the light construction marks before darkening. Small line wobble is acceptable if vertices and spacing are correct.
Is a white star different from any other star?
The construction is the same; the convention here is an outline-only star with a white interior. Decorative styles are outside this lesson.