Free original lessons
Dragonfly Wing Venation: Symmetry Drawing Practice
Learn to draw dragonfly wing veins and cells with bilateral symmetry. Includes a labeled diagram plan, half-wing template, and freehand practice outline.
Free lesson
Four exercises
Worked answers
Object Drawing Lessons
Dragonfly wings are defined by a network of veins that form repeating cells, and by bilateral symmetry across the body. This lesson teaches you to draw that venation pattern accurately, using a simple convention: veins are lines of consistent thickness, cells are enclosed spaces, and symmetry is checked against a midline. You will study a labeled wing diagram, complete a mirrored half-wing, and then draw freehand venation on a blank outline. All resources are planned as free printables; this text describes them so you can work from the instructions alone.
Practice materials: Printable downloads are not available for this lesson yet. Use the instructions and four exercises below.
Reference illustration
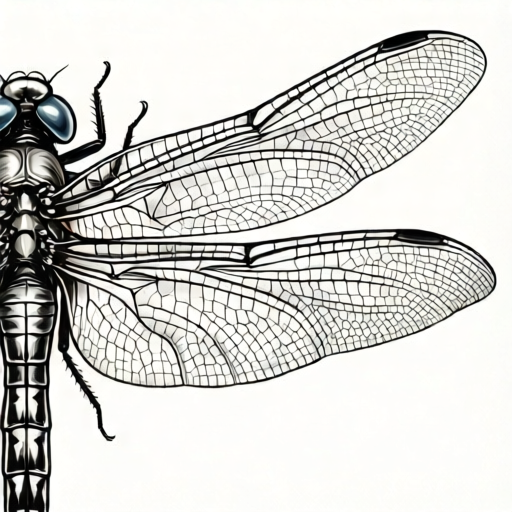
Use the stated measurements and conventions for each exercise.
Wing Structure and Vein Convention
A dragonfly wing has a leading edge (costal margin) that is slightly thicker and straighter than the trailing edge. Near the tip of the leading edge is the nodus, a small notch where a major vein crosses. From the wing base, longitudinal veins run outward; cross-veins connect them to form cells. The pattern is not random: cells near the leading edge tend to be narrow and rectangular, while cells toward the trailing edge are broader and more polygonal.
Use this drawing convention: draw all veins as single lines. Primary longitudinal veins are drawn with a medium line weight; cross-veins and secondary branches use a lighter line weight. A cell is any enclosed area bounded by veins. Do not shade or fill cells; the pattern is read from the lines alone. This convention allows valid stylistic variation: vein thickness may vary slightly as long as primary and secondary veins remain distinguishable, and cell shapes may be irregular as long as they are enclosed and connected.
- Draw the wing outline: a long, narrow oval with a slightly straighter leading edge and a rounded tip.
- Mark the nodus as a small notch on the leading edge, about two-thirds of the way from base to tip.
- Draw four to six longitudinal veins from the base toward the tip, fanning outward.
- Add cross-veins between longitudinal veins to create a row of narrow cells along the leading edge.
- Continue adding cross-veins toward the trailing edge, making cells progressively broader.
- Check that every cell is enclosed and that no veins cross without forming a junction.
Bilateral Symmetry and the Half-Wing Template
Bilateral symmetry means the left and right wings are mirror images across the body midline. In practice, you draw one half-wing, then mirror it. The planned half-wing template shows the left wing with its venation complete and a vertical symmetry check line at the body midline. Your task is to complete the right wing by reflecting each vein across that line.
To mirror accurately, measure the distance from the symmetry line to each vein endpoint on the completed half, then mark the same distance on the opposite side. Connect the mirrored points in the same order. The nodus, leading edge, and tip should align across the midline. Small differences in line weight are acceptable; the check is positional, not stylistic.
- Place the symmetry check line vertically at the center of the template.
- For each vein junction on the completed half, measure its horizontal distance from the check line.
- Mark the mirrored point at the same distance on the blank half.
- Connect mirrored points to form the same vein network.
- Verify that the nodus and wing tip are equidistant from the check line.
- Confirm that every cell on the new half has a corresponding cell on the completed half.
Freehand Venation on a Blank Outline
The planned blank wing outline provides only the wing shape and the symmetry line. You will draw the full venation freehand, using the labeled diagram as a reference. Begin with the leading edge and nodus, then add longitudinal veins, then cross-veins. Work from the leading edge toward the trailing edge so that narrow cells are established first.
Keep the pattern consistent: cells along the leading edge should be narrower than cells near the trailing edge. Avoid isolated cells that do not connect to the rest of the network. If a vein branch does not meet another vein, extend it until it does, or remove it. The goal is a connected, enclosed cell pattern that reads as a dragonfly wing.
- Draw the leading edge and mark the nodus.
- Add longitudinal veins from base to tip, spacing them evenly.
- Draw cross-veins between longitudinal veins near the leading edge.
- Continue cross-veins toward the trailing edge, widening the cells.
- Check that all cells are enclosed and connected.
- Compare your pattern to the labeled diagram for overall cell distribution.
Worked example
A half-wing template shows a vein junction 3 cm to the left of the symmetry line and 5 cm above the wing base. Where should the mirrored junction be placed on the right wing?
Worked answer
3 cm to the right of the symmetry line, at the same height of 5 cm above the wing base.
Four practice exercises
Exercise 1
On a blank wing outline, draw five longitudinal veins from the base to the tip. Mark a nodus on the leading edge two-thirds of the way from base to tip. Describe where your first cross-vein should go and why.
Show answer and check
The first cross-vein should connect two adjacent longitudinal veins just behind the leading edge, near the nodus, creating a narrow rectangular cell. This establishes the narrow-cell pattern along the leading edge before broader cells are added toward the trailing edge.
Why: The leading edge has the narrowest cells in a dragonfly wing. Starting cross-veins there sets the correct cell distribution and provides anchor points for the rest of the network.
Check: Verify that the cross-vein connects two longitudinal veins and encloses a cell. Check that the cell is narrower than the spaces you plan for the trailing edge.
Exercise 2
A symmetry template has a vein junction 4 cm left of the check line and 6 cm above the wing base. A second junction is 2 cm left of the check line and 3 cm above the base. State the mirrored positions and explain how you would verify them.
Show answer and check
The first mirrored junction is 4 cm right of the check line at 6 cm above the base. The second is 2 cm right of the check line at 3 cm above the base. Verify by measuring the horizontal distance from the check line to each original junction and marking the same distance on the opposite side at the same height.
Why: Bilateral symmetry reflects each point across the midline, so horizontal distance is preserved and height remains unchanged.
Check: Fold the paper along the check line or use a ruler to confirm that each mirrored junction is equidistant from the line and at the same height as its original.
Exercise 3
You have drawn a wing with ten cells. Three cells near the trailing edge are isolated: their veins do not connect to the main network. Describe two ways to fix this and state which is preferable.
Show answer and check
Option one: extend a vein from each isolated cell until it meets the nearest longitudinal vein. Option two: remove the isolated cell boundaries and redraw cross-veins that connect to the main network. Extending veins is preferable because it preserves the cell pattern and adds connectivity without erasing work.
Why: A connected network is a core requirement of the venation pattern. Extending veins maintains the intended cell shapes while satisfying connectivity.
Check: Trace each cell boundary with a finger to confirm it reaches a longitudinal vein or the wing margin. Count the number of isolated cells; it should be zero.
Exercise 4
Draw a freehand wing with at least eight cells. Use medium lines for longitudinal veins and light lines for cross-veins. Then check symmetry by describing how you would compare your drawing to a mirrored version.
Show answer and check
After drawing, mark the symmetry check line at the body midline. For each vein junction, measure its horizontal distance from the line. On a separate sheet or by folding, confirm that the mirrored junction would fall at the same distance on the opposite side. The nodus and wing tip should be equidistant from the line.
Why: Symmetry is a positional property: each junction has a mirror counterpart at the same distance from the midline and the same height. Measuring and folding are reliable checks.
Check: Use a ruler to measure three junctions on each side of the check line. Confirm that each pair has equal horizontal distance and equal height. Check that the nodus and tip align across the fold.
Common mistakes
- Drawing veins that stop in the middle of a cell without connecting to another vein. Extend each vein until it meets another vein or the wing margin, so every cell is enclosed.
- Making all cells the same size and shape. Narrow the cells along the leading edge and broaden them toward the trailing edge to match the reference pattern.
- Mirroring the wing by eye without measuring from the symmetry line. Measure horizontal distances from the check line for each junction and mark the mirrored point before connecting.
- Using the same line weight for primary and secondary veins. Draw primary longitudinal veins with a medium line and cross-veins with a lighter line so the hierarchy is visible.
Self-check rubric
- Wing outline is present and includes a leading edge, trailing edge, tip, and nodus.
- Longitudinal veins run from base toward tip and are distinguishable from cross-veins by line weight.
- Cells are enclosed by veins and connected to the overall network; no isolated cells.
- Cells along the leading edge are narrower than cells toward the trailing edge.
- The mirrored half aligns with the completed half across the symmetry check line: nodus, tip, and major junctions are equidistant.
- Valid alternatives: slight variation in vein thickness, irregular cell shapes, and minor outline differences are acceptable if the network is connected and symmetry is maintained.
Questions and answers
Do I need to copy the exact number of cells from the diagram?
No. The diagram shows a representative pattern. Your drawing should have a connected network with narrower cells near the leading edge and broader cells near the trailing edge. Exact cell counts vary and are not the grading criterion.
How do I check symmetry without a ruler?
Fold the paper along the symmetry check line, or hold it up to a light. The nodus, wing tip, and major vein junctions should align. Small differences in line weight are acceptable.
Can I use a different vein thickness convention?
Yes, as long as primary and secondary veins are distinguishable. The rubric checks that the hierarchy is visible, not that a specific thickness is used.
What if my freehand wing outline is not perfectly oval?
The outline is a guide. Focus on the venation pattern and symmetry. A slightly irregular outline is acceptable if the vein network is connected and the cell distribution is correct.