Free original lessons
Ink Bird Drawing: Feather Strokes, Beak Shapes, and Line-Weight Control
Learn to draw birds in ink by practicing feather stroke direction, beak shapes, and line-weight control with clear steps, checks, and exercises.
Free lesson
Four exercises
Worked answers
Object Drawing Lessons
Ink bird drawing rewards deliberate strokes: each feather mark has a direction, each beak has a simple geometric plan, and each line weight communicates form. This lesson isolates those three skills so you can practice them separately, then combine them in a small bird study. You will use a defined stroke convention, compare three beak shapes, and test line weight on your actual paper and pen. All measurements are examples; measure your own tools and label any chosen numbers as hypothetical.
Practice materials: Printable downloads are not available for this lesson yet. Use the instructions and four exercises below.
Reference illustration
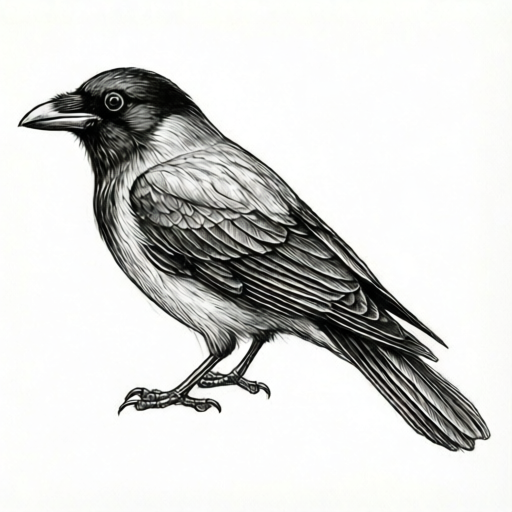
Use the stated measurements and conventions for each exercise.
Feather Stroke Direction and Shape
Use a simple convention: a feather stroke starts at the feather base, travels toward the tip, and tapers by lifting the pen slightly before the tip. Short strokes cover small body feathers, medium strokes cover wing coverts, and long strokes cover primary feathers. Direction arrows on a reference strip show base-to-tip flow; on a bird, body feathers generally flow from head toward tail, while wing feathers flow outward from the wing base.
Keep strokes separated enough to read as individual feathers. Overlap only where feathers layer naturally. A useful check is to trace each stroke backward with a dry pen: if the taper is at the base instead of the tip, the direction is reversed.
- Draw a horizontal reference strip with three zones: short, medium, and long.
- In each zone, make five strokes that start thick at the base and taper toward the tip.
- Add a small arrow above each zone pointing from base to tip.
- On a simple bird oval, place short strokes from the head toward the tail.
- Add medium strokes on the wing coverts flowing outward.
- Add long primary strokes flowing from the wing base toward the tip.
Beak Shapes: Cone, Hooked, and Flat
Treat beaks as three basic plans. A cone beak is a short triangle with a straight upper edge and a slightly curved lower edge. A hooked beak has a curved upper mandible that overhangs the lower one. A flat beak is wide and shallow, like a rounded rectangle with a slight dip. Draw the beak in two strokes: the upper mandible first, then the lower mandible, meeting at the gape line.
Check beak proportion against the head: a cone beak is often about one-third of head length, a hooked beak about one-half, and a flat beak about one-quarter in height. These are hypothetical examples; adjust to your chosen bird and measure your drawing.
- Draw three head circles in a row.
- On the first, add a cone beak with a straight top edge and a short lower curve.
- On the second, add a hooked beak with an overhanging upper curve.
- On the third, add a flat beak with a wide, shallow shape.
- Mark the gape line where upper and lower mandibles meet.
- Check each beak against its head circle using the example proportions.
Line-Weight Control on Your Paper
Line weight is the thickness of an ink mark. Test it on the actual paper and pen you will use. Make a sample bar with five marks: light, medium, firm, firm-with-pressure, and lifted taper. Label the pressure you used for each, because pen response varies. Use lighter lines for feather details and firmer lines for the beak outline and primary feather shafts.
A practical check is to hold the sample bar at arm's length: the five marks should be visibly different. If two marks look identical, change pressure or stroke speed and relabel. Do not assume a standard pen width; measure your own marks with a ruler if needed.
- Draw a horizontal bar divided into five boxes.
- In box one, make a light continuous line.
- In box two, make a medium line with steady speed.
- In box three, make a firm line with slight pressure.
- In box four, make a firm line with more pressure.
- In box five, make a line that starts firm and lifts to a taper.
- Label each box with the pressure and speed you used.
Combining Skills in a Small Bird Study
Choose a simple bird silhouette: an oval body, a round head, a tail wedge, and one visible wing. Draw the beak first using one of the three plans, then the eye, then the body feathers, and finally the wing feathers. Keep the beak outline firmer than the feather strokes. Use the reference strip to decide stroke length for each area.
Check the study by asking three questions: do feather strokes taper toward the tip, does the beak match one plan, and are line weights visibly different? If any answer is no, adjust one element at a time.
- Draw the body oval and head circle lightly.
- Add the chosen beak plan and the eye.
- Place short body feathers flowing head to tail.
- Add medium wing coverts flowing outward.
- Add long primary strokes from wing base to tip.
- Firm the beak outline and check the three questions.
Worked example
A student draws a small bird with a cone beak, short body feathers, and medium wing coverts. The beak outline is light, feather strokes taper at the base, and all lines look similar. Identify three fixes and state one check.
Worked answer
Fix one: reverse feather strokes so they taper toward the tip. Fix two: firm the beak outline and add a gape line. Fix three: make a five-mark line-weight sample bar and relabel pressure. Check: trace each feather backward and hold the sample bar at arm's length to confirm five distinct weights.
Four practice exercises
Exercise 1
Draw a reference strip with three zones: short, medium, and long. Make five strokes in each zone that taper toward the tip. Add direction arrows.
Show answer and check
A strip with three labeled zones, five tapered strokes per zone, and arrows pointing from base to tip.
Why: The strip isolates stroke direction and length before combining them on a bird.
Check: Trace each stroke backward; the taper should be at the tip, not the base.
Exercise 2
Draw three head circles and add a cone, hooked, and flat beak. Mark the gape line on each.
Show answer and check
Three heads with distinct beak plans and a visible gape line where upper and lower mandibles meet.
Why: Comparing plans builds shape control and proportion checking.
Check: Confirm each beak matches its plan and the gape line is present.
Exercise 3
Make a five-mark line-weight sample bar on your paper. Label pressure and speed for each mark. Hold it at arm's length and confirm five distinct weights.
Show answer and check
A labeled bar with five visibly different marks.
Why: Line weight must be tested on actual materials, not assumed.
Check: At arm's length, no two marks should look identical; relabel if they do.
Exercise 4
Draw a small bird study using one beak plan, short body feathers, and medium wing coverts. Firm the beak outline and check the three questions from the lesson.
Show answer and check
A study with tapered feathers, a planned beak with gape line, and visibly different line weights.
Why: Combining skills reveals whether each element works together.
Check: Answer yes to: taper at tip, beak matches a plan, line weights differ.
Common mistakes
- Feather strokes taper at the base instead of the tip. Start each stroke at the base with slight pressure and lift toward the tip; trace backward to check.
- Beak drawn as a single outline without a gape line. Draw upper mandible first, then lower, and mark where they meet.
- All lines have the same weight. Make a five-mark sample bar on your paper and label pressure; use lighter lines for feathers and firmer for beak and shafts.
- Feather strokes cross randomly and read as scribble. Keep strokes separated and follow the base-to-tip direction arrows; overlap only where feathers layer.
Self-check rubric
- Feather strokes start at the base and taper toward the tip, following the defined convention.
- Beak matches one of the three plans and includes a gape line.
- Line weights are visibly different on the student's own paper and pen.
- Stroke lengths are chosen for body, covert, and primary areas.
- Valid alternatives are accepted if the convention is stated and consistently applied.
Questions and answers
Do I need a specific pen?
No. Use any ink pen you have, but test it on your paper first because line weight varies by pen and paper.
How long should feather strokes be?
Use short strokes for body feathers, medium for wing coverts, and long for primaries. Measure your own reference strip to set lengths.
Can I change the beak proportions?
Yes. The proportions given are hypothetical examples; adjust to your chosen bird and check against the head size.
What if my line weights look the same?
Change pressure or stroke speed, relabel the sample bar, and check again at arm's length.