Free original lessons
Realistic Star Drawing: Point Geometry and Glow Shading
Learn to construct five- and six-point stars with precise point spacing, then add radial glow and facet highlights for a realistic look.
Free lesson
Four exercises
Worked answers
Object Drawing Lessons
Realistic stars are not cartoon shapes; they are geometric constructions with controlled point spacing and layered shading. This lesson teaches a repeatable method for drawing five-point and six-point stars using a circle-and-chord approach, then adds glow and facet highlights to suggest light emission. All measurements are hypothetical examples; measure your own paper and tools. The convention for shading is defined explicitly so that valid alternatives are accepted.
Practice materials: Printable downloads are not available for this lesson yet. Use the instructions and four exercises below.
Reference illustration
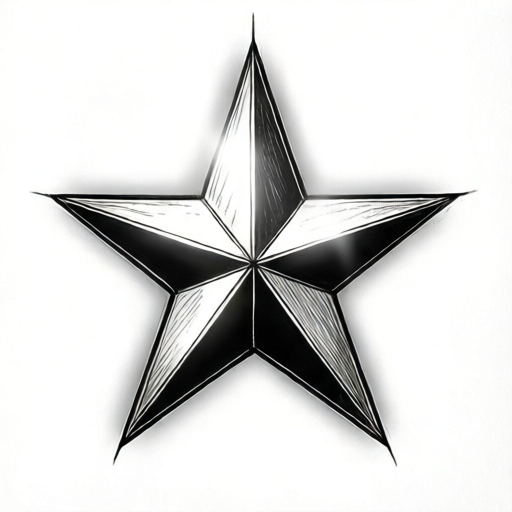
Use the stated measurements and conventions for each exercise.
Point-Spacing Geometry for Five- and Six-Point Stars
A realistic star begins with a circle divided into equal arcs. For a five-point star, divide the circle into five equal arcs of 72 degrees each. For a six-point star, use six arcs of 60 degrees. Mark points on the circumference at these intervals using a protractor or by stepping a compass chord. The chord length for a given circle radius r and arc angle theta is 2r sin(theta/2). For example, with r = 40 mm and theta = 72 degrees, chord = 2 × 40 × sin(36°) ≈ 47.0 mm. With theta = 60 degrees, chord = 40 mm exactly. These are hypothetical values; measure your actual compass setting.
Connect every second point for a five-point star (skip one point each time) to form the pentagram outline. For a six-point star, connect every second point to form two overlapping triangles (a hexagram); connecting adjacent points instead forms a hexagon, not a star. The inner intersections define the star's core. Keep pencil lines light so you can adjust spacing before committing.
- Draw a circle of radius r using a compass. Label the center O.
- Mark the first point at the top of the circle (12 o'clock).
- For a five-point star, set the compass to chord length 2r sin(36°) and step around the circle to mark five equally spaced points. For a six-point star, set the compass to r and step around to mark six points.
- For a five-point star, connect every second marked point to form the pentagram outline. For a six-point star, connect every second point to form two overlapping triangles (hexagram).
- Check that all outer points lie on the circle and that the angles between adjacent radii are equal (72° or 60°).
Glow Shading with Radial Gradient
Glow is the appearance of light spreading from the star's center outward. Use a radial gradient convention: the brightest area is at the star's core, fading smoothly to the background at the outer points. Define your gradient by three zones: core (highest value), mid-glow (medium value), and outer falloff (lowest value). You may use pencil blending, colored pencil layering, or digital gradients; the convention is that value decreases monotonically from center to edge. Valid alternatives include using a soft eraser to lift highlights or stippling with decreasing density.
To keep the glow realistic, avoid hard edges. Blend the transition between zones with a tortillon or soft brush. The glow should extend slightly beyond the star's outline to suggest emission. Measure the falloff distance as a fraction of r; for example, a hypothetical falloff of 0.3r beyond the points. Record your chosen values so the result is checkable.
- Identify the star's core (the central polygon formed by intersecting lines).
- Apply the darkest value at the outer background, then layer progressively lighter values toward the core.
- Use a radial gradient: start at the core with the lightest value and blend outward to the background.
- Extend the glow beyond the star outline by a measured distance (e.g., 0.3r) and blend softly.
- Check that the value changes smoothly with no abrupt jumps; use a value scale to verify at least three distinct zones.
Facet Highlight Placement
Facets are the flat triangular regions between the star's points and its core. Realistic stars show highlights on facets facing the light source. Choose a single light direction (e.g., from the upper left) and place highlights on the facets whose surfaces would catch that light. Use a consistent convention: highlight the facet edge nearest the light with a thin, bright line, and shade the opposite edge darker. This creates a faceted, three-dimensional look.
Valid alternatives include highlighting the entire facet with a lighter value or using a gradient within each facet. The rubric accepts any placement that is consistent with the chosen light direction and shows at least two distinct facet values. Avoid highlighting every facet equally; that flattens the form.
- Draw light construction lines from the core to each outer point to define facets.
- Choose a light direction and mark it with a small arrow outside the star.
- On each facet, place a highlight along the edge closest to the light direction.
- Shade the opposite edge of each facet with a darker value to suggest depth.
- Check consistency: all highlights should be on the same side relative to the light direction.
Combining Geometry, Glow, and Facets
Combine the three stages in order: geometry first, then glow, then facets. The glow provides the overall light emission, while facets provide local surface detail. Keep the glow soft and the facet highlights crisp to contrast diffuse and specular light. Use a hypothetical value scale of 1 (darkest) to 5 (lightest): background at 2, outer glow at 3, core at 5, facet highlights at 5, facet shadows at 3. These values are examples; adjust to your medium.
Check the final drawing by stepping back: the star should read as a single luminous object with clear points and a soft halo. If the glow overwhelms the facets, reduce the glow's outer falloff. If the facets look flat, increase the contrast between highlight and shadow within each facet.
- Complete the star geometry and verify point spacing.
- Apply the radial glow from core to background.
- Add facet highlights and shadows consistent with the light direction.
- Blend any hard edges in the glow while keeping facet highlights sharp.
- Verify that the star reads as luminous and three-dimensional from a distance.
Worked example
Construct a five-point star with radius r = 30 mm. Calculate the chord length for 72-degree spacing, describe the glow zones using a hypothetical value scale of 1 to 5, and state where to place facet highlights if the light comes from the upper right.
Worked answer
Chord = 2 × 30 × sin(36°) ≈ 35.3 mm. Mark five points at 72-degree intervals using this chord. Glow zones: background value 2, outer falloff value 3, core value 5. Facet highlights go on the upper-right edge of each facet, with shadows on the lower-left edge. Check that all points lie on the circle and that the value changes smoothly from core to background.
Four practice exercises
Exercise 1
A six-point star is drawn on a circle of radius 25 mm. Calculate the chord length for 60-degree spacing and state how many points you mark. Describe the glow zones using a value scale of 1 to 5.
Show answer and check
Chord = 2 × 25 × sin(30°) = 25 mm. Mark six points at 60-degree intervals. Glow zones: background 2, outer falloff 3, core 5.
Why: The chord formula 2r sin(theta/2) with theta = 60° gives 2 × 25 × 0.5 = 25 mm. Six points are needed for a six-point star. The glow zones follow the radial gradient convention.
Check: Verify that six chord steps of 25 mm return to the starting point, forming a regular hexagon inscribed in the circle (perimeter 6 × 25 = 150 mm; the arc length between adjacent points is 2π × 25 / 6 ≈ 26.2 mm, so the chord is shorter than the arc—this is expected, not an error). Check that all six points lie on the circle and are 60° apart.
Exercise 2
A five-point star has radius 40 mm. Calculate the chord length for 72-degree spacing. If the light direction is from the left, describe where facet highlights go and give one check for consistency.
Show answer and check
Chord = 2 × 40 × sin(36°) ≈ 47.0 mm. Highlights go on the left edge of each facet; shadows on the right edge. Check that all highlights are on the left side relative to the light direction.
Why: The chord formula gives 2 × 40 × 0.5878 ≈ 47.0 mm. Facet highlights follow the light direction: left-facing edges catch light from the left.
Check: Measure the chord with a compass and step around the circle; all five points should align. For facets, verify that no highlight appears on the right edge of any facet.
Exercise 3
Describe how to apply a radial glow to a star with radius 20 mm, including the falloff distance beyond the outline. Use a hypothetical falloff of 0.3r and state the value at the core and background on a 1-to-5 scale.
Show answer and check
Falloff distance = 0.3 × 20 = 6 mm beyond the outline. Core value 5, background value 2, with a mid-glow value 3 at the outline. Blend smoothly from core to background.
Why: The falloff distance is a fraction of the radius, here 0.3r = 6 mm. The value scale decreases monotonically from core to background.
Check: Measure 6 mm beyond the star points and confirm the glow fades to background value 2. Check that the value at the outline is approximately 3 and that no hard edges appear.
Exercise 4
A student draws a five-point star but the points are uneven. List two checkable steps to diagnose and fix the spacing, including a numerical example with r = 35 mm.
Show answer and check
First, recalculate the chord: 2 × 35 × sin(36°) ≈ 41.1 mm. Second, step the compass around the circle and verify that five steps return to the start. If not, adjust the compass and repeat.
Why: Uneven spacing usually comes from an incorrect chord setting or slipping compass. Recalculating and re-stepping provides a checkable fix.
Check: After re-stepping, measure the angle between adjacent radii with a protractor; each should be 72° ± 2°. Confirm all points lie on the circle.
Common mistakes
- Unequal point spacing causing a lopsided star. Re-measure the chord length and step around the circle again; verify each arc angle with a protractor.
- Glow applied as a hard-edged circle instead of a smooth gradient. Blend the transition zones with a tortillon or soft brush; check for at least three distinct value zones.
- Highlights placed randomly on facets without a consistent light direction. Mark the light direction first, then place all highlights on the side facing that direction.
- Glow too strong, washing out facet detail. Reduce the outer falloff distance or lower the core value so facets remain visible.
Self-check rubric
- All outer points lie on the construction circle and are equally spaced (72° or 60°).
- The star outline connects every second point correctly for the chosen number of points.
- Glow shows a smooth radial gradient with at least three distinct value zones from core to background.
- Glow extends slightly beyond the star outline and blends softly.
- Facet highlights are consistent with a single stated light direction.
- At least two distinct facet values are visible, with highlights on the light-facing edge.
- The final drawing reads as a luminous, three-dimensional star from a distance.
- Valid alternatives (e.g., stippling, erasing, colored pencil layering) are accepted if the gradient and facet conventions are followed.
Questions and answers
Do I need a protractor to draw a realistic star?
A protractor helps verify angles, but you can also use a compass chord method. For a five-point star, set the compass to 2r sin(36°) and step around the circle. Measure your actual compass setting rather than relying on a fixed number.
Can I use colored pencils instead of graphite?
Yes. The radial gradient convention applies to any medium: layer lighter colors at the core and darker colors at the background. Keep the value change monotonic from center to edge.
How do I know if my glow is realistic?
Check that the value decreases smoothly from core to background and extends slightly beyond the star outline. Use a value scale to confirm at least three zones. Valid alternatives include stippling or erasing highlights, as long as the gradient is smooth.
What if my star has six points instead of five?
Use the same method with a 60-degree arc. The chord length equals the radius r. Connect every second point to form two overlapping triangles (a hexagram), then apply the same glow and facet conventions.