Free original lessons
Small Panda Drawing: Patch Placement and Proportion Steps
Learn to draw a small panda with sequenced body mass, head, ears, and eye-patch placement, plus contrast shading and self-checking practice.
Free lesson
Four exercises
Worked answers
Object Drawing Lessons
This lesson teaches a reliable sequence for drawing a small panda: establish body mass, place the head, add ears, then position the eye patches using a simple midline-and-spacing convention. Because panda drawings vary in style, the rubric rewards consistent proportion and deliberate patch placement rather than a single universal outline. All measurements below are hypothetical examples chosen for clarity; measure your own paper and tools if you adapt them. Work lightly at first, then darken confirmed lines.
Practice materials: Printable downloads are not available for this lesson yet. Use the instructions and four exercises below.
Reference illustration
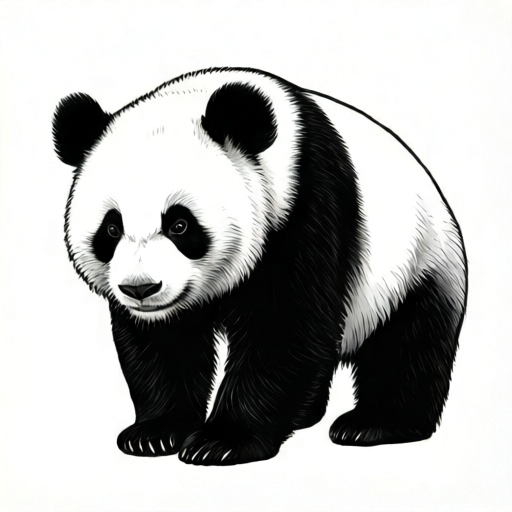
Use the stated measurements and conventions for each exercise.
Body Mass Before Detail
Begin with a rounded body mass rather than a detailed outline. A small panda reads clearly when the torso is wider than tall and the head sits slightly forward of the body center. Use a light pencil and keep the first shape loose.
A practical convention: treat the head as a circle and the body as an oval about one and a half head-widths wide. These are hypothetical proportions, not standards. Adjust to your paper size and chosen style.
- Draw a light oval for the body, wider than tall.
- Draw a circle for the head overlapping the top of the body oval.
- Check that the head circle is roughly one third the body oval width.
- Erase or lighten construction lines only after the head and body relationship looks stable.
Head, Ears, and the Midline Convention
Mark a vertical midline through the head circle and a horizontal midline at the circle's middle. The horizontal midline is the baseline for eye-patch height; the vertical midline separates left and right patches. Ear placement uses the top of the head circle as a reference.
Ears sit on the upper sides of the head circle, not on top of the midline. Keep them small and rounded. A common error is making ears too large, which changes the panda's silhouette.
- Draw the vertical and horizontal midlines lightly.
- Place two small rounded ears at the upper left and upper right of the head circle.
- Check that each ear overlaps the head circle edge slightly.
- Confirm each ear base sits above the horizontal midline and overlaps the head circle edge.
Eye-Patch Placement
Eye patches are the defining feature. Place them symmetrically around the vertical midline, with their centers slightly below the horizontal midline. Patches should not touch the head outline or each other. A gap of about one patch-width between them is a useful hypothetical guide.
Patch shape varies by style: rounded ovals, teardrops, or soft rectangles are all valid if placement and symmetry are consistent. Draw both patches lightly, compare them, then darken.
- Mark two points slightly below the horizontal midline, equally spaced from the vertical midline.
- Draw a light oval centered on each point.
- Check the gap between patches is roughly one patch-width.
- Adjust one patch at a time rather than redrawing both.
Black and White Contrast Shading
Pandas read as black and white through contrast, not through detailed fur. Shade the ears, eye patches, and limbs darkly, leaving the face and body light. Keep shading direction consistent, for example short strokes angled downward.
Use a test strip on scrap paper to compare your dark pencil value against the white paper. If the dark areas look gray rather than black, increase pressure or layer strokes. Avoid shading the white areas except for a faint ground shadow.
- Shade the eye patches evenly, keeping their edges crisp.
- Shade the ears and limbs with consistent stroke direction.
- Leave the face and torso white.
- Add a faint shadow under the body to ground the figure.
Worked example
A learner draws a head circle 6 cm wide and places eye-patch centers 1 cm apart on the horizontal midline. The patches are 2 cm wide each. Are the patches too close?
Worked answer
Yes. Each patch half-width is 1 cm, so the two half-widths total 2 cm. With centers 1 cm apart, the edge gap is 1 cm minus 2 cm = -1 cm, meaning the patches overlap by 1 cm. To achieve an edge gap of about one patch-width (2 cm), the centers must be about 4 cm apart. Since the current centers are 1 cm apart, move each center outward by about 1.5 cm: 1 cm plus 1.5 cm plus 1.5 cm equals 4 cm.
Four practice exercises
Exercise 1
A head circle is 8 cm wide. Using the hypothetical convention that each eye patch is one quarter of the head width, what is each patch width, and what is the recommended gap between patch edges?
Show answer and check
Each patch is 2 cm wide. The recommended edge gap is about one patch-width, so about 2 cm.
Why: One quarter of 8 cm is 2 cm. The convention sets the gap equal to one patch width, so the gap is also 2 cm.
Check: Multiply patch width by 4 to recover the head width: 2 cm times 4 equals 8 cm. Confirm the gap equals the patch width.
Exercise 2
On a head circle 10 cm wide, a learner places patch centers 3 cm apart. Each patch is 2 cm wide. Do the patches overlap, and by how much?
Show answer and check
The patches do not overlap; the edge gap is 1 cm.
Why: Center distance is 3 cm. Half of each patch is 1 cm, so the two half-widths total 2 cm. The edge gap is 3 cm minus 2 cm, which is 1 cm. A positive edge gap means the patches do not overlap.
Check: Add the two half-widths (1 cm plus 1 cm equals 2 cm) and compare with center distance (3 cm). Since 3 cm is greater than 2 cm, there is a 1 cm gap.
Exercise 3
A body oval is 9 cm wide and the head circle is 3 cm wide. Is the head about one third of the body width as the convention suggests?
Show answer and check
Yes, 3 cm is one third of 9 cm.
Why: Divide body width by 3: 9 cm divided by 3 equals 3 cm, matching the head width.
Check: Multiply head width by 3: 3 cm times 3 equals 9 cm, matching the body width.
Exercise 4
A learner shades the eye patches but leaves the ears white. Using the contrast convention, what is the main problem and one fix?
Show answer and check
The ears should be dark to match the black-and-white contrast convention. Fix by shading the ears with the same consistent stroke direction as the patches.
Why: The convention assigns dark values to ears, patches, and limbs. Leaving ears white weakens the panda silhouette.
Check: Compare the ear value to the patch value on a scrap strip; both should read as dark against white paper.
Common mistakes
- Drawing eye patches touching the head outline. Move each patch inward by about half a patch-width and recheck the gap to the outline.
- Making ears too large or placing them on the midline. Reduce ear size and shift them to the upper sides of the head circle.
- Shading the white face to create fur texture. Keep the face light; reserve dark values for ears, patches, and limbs.
- Drawing the body taller than wide. Widen the body oval and recheck the head-to-body width ratio.
Self-check rubric
- Body mass is wider than tall and head-to-body width ratio is consistent with the chosen convention.
- Head circle, vertical midline, and horizontal midline are clearly established before patches.
- Ears sit on the upper sides of the head circle and overlap its edge slightly.
- Eye patches are placed symmetrically around the vertical midline, slightly below the horizontal midline, and do not touch the head outline.
- Gap between eye patches is approximately one patch-width, or a deliberate alternative is explained.
- Dark values are concentrated on ears, patches, and limbs; white areas remain light.
- Shading direction is consistent across dark areas.
- Valid style alternatives (patch shape, ear shape) are accepted if placement and contrast remain consistent.
Questions and answers
Do the eye patches have to be perfectly symmetrical?
No. Slight variation is acceptable if placement relative to the midlines is consistent and the patches do not touch the outline.
What if my paper is a different size?
Scale the hypothetical proportions to your paper. The head-to-body ratio and patch gap are relative guides, not fixed measurements.
Can I use a pen instead of pencil?
Yes, but construction lines are harder to correct. Light pencil first is recommended for learning patch placement.
How dark should the black areas be?
Dark enough to contrast clearly with the white paper. Compare on a scrap strip; if it looks gray, layer more strokes.