Free original lessons
Drawing Uniform Garments: Panels, Badges, and Seams
Construct a uniform garment with clear panels, badge placement, and seams using a proportional grid and checkable centimetre arithmetic.
Free lesson
Four exercises
Worked answers
Object Drawing Lessons
Uniform garments look convincing when their construction is legible: where panels meet, how a badge sits on a pocket, and how seam lines follow the body. This lesson builds a generic jacket or shirt with a collar, placket, sleeve seam, and badge. Badge lettering is optional; the checks focus on panel placement, margins, and seams, not a typographic measurement. All numerical values are hypothetical examples.
Practice materials: Printable downloads are not available for this lesson yet. Use the instructions and four exercises below.
Reference illustration
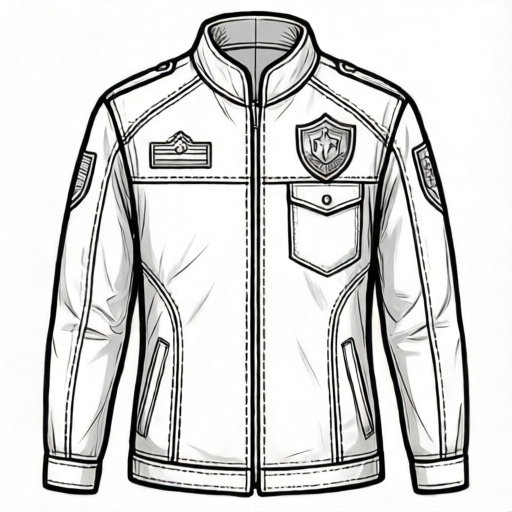
Use the stated measurements and conventions for each exercise.
Set a proportional grid before drawing panels
Start with a rectangle for the torso front. For a hypothetical example, use a 12 cm by 16 cm rectangle. Mark a vertical center line and a horizontal guide 8 cm from the top. Divide the width into four equal 3 cm columns. The inner columns indicate the chest area, split by a 2 cm central placket; after allowing for the placket, each usable inner chest panel is 2 cm wide. The grid keeps repeated drawings consistent.
Define the collar as a band 2 cm deep along the top edge, with a 2 cm gap at the center for the placket. The placket is a vertical strip 2 cm wide centered on the midline, running from the collar to the hem. Sleeve seams begin at the shoulder corners and curve outward; for the example, place the shoulder point 1 cm inside each top corner and draw a seam that ends 3 cm down the side edge. Label each part lightly before adding details.
- Draw the 12 by 16 cm torso rectangle and mark the center line and 8 cm midline.
- Divide the width into four 3 cm columns and label inner and outer panels.
- Add the 2 cm collar band with a 2 cm center gap matching the placket width.
- Draw the 2 cm placket from collar to hem.
- Mark shoulder points 1 cm inside each top corner and draw sleeve seams ending 3 cm down the side edges.
Place badges using the midline and panel edges
A badge should sit on one panel, not float across a seam. On a 12 cm torso, measure page x from the left edge: the centerline is x=6, the left inner panel spans x=3 to x=5, and the placket’s left edge is x=5. Set a hypothetical 0.75 cm badge so its placket-side (page-right) edge is x=4, exactly 1 cm from the placket; it then spans x=3.25 to x=4 and leaves 0.25 cm to the panel’s outer edge at x=3. A 2 cm badge cannot fit this position while preserving the margin. If lettering is included, draw simple readable marks with clear margins.
Record the badge dimensions and its distance from the placket so repeated drawings stay uniform. Leave at least 2 mm between any visible mark and the badge border in this example. A badge may be a rectangle, circle, or shield as long as its outline stays inside one panel.
- Choose a panel for the badge and mark its center using the panel edges.
- Draw a badge 0.75 cm wide by 2 cm tall, with its top edge 1 cm below the horizontal guide and its placket-side (page-right) edge at x=4 cm; the left panel spans x=3 to x=5 and the placket edge is x=5.
- Check that the badge’s placket-side edge is 1 cm from the placket, its page-left edge stays 0.25 cm inside the panel edge at x=3, and it does not cross a seam.
- Add optional simple lettering or a symbol, keeping at least 2 mm from the badge border.
- Record the badge size and its page coordinates so the placement can be repeated.
Draw seam lines that follow construction
Seam lines should connect logical points: collar to placket, placket to hem, shoulder to sleeve, and side panel to front panel. Use a light line first, then darken only the seams you want to emphasize. For the example, draw the placket seam as two parallel lines 2 cm apart, the collar seam as a single line 2 cm below the top edge, and the sleeve seam as a curve from the shoulder point to the 3 cm mark on the side edge. Keep seam lines inside the garment outline.
Check seam spacing with simple arithmetic: the placket is 2 cm wide, so the distance between its two lines is 2 cm. The collar band is 2 cm deep, so the collar seam sits 2 cm below the top edge. If a seam crosses a badge, move the badge rather than breaking the seam. Label each seam with a short name such as collar, placket, or sleeve so the construction is readable.
- Lightly draw all seam lines before darkening any.
- Draw the placket as two parallel lines 2 cm apart.
- Draw the collar seam 2 cm below the top edge.
- Draw the sleeve seam from the shoulder point to the 3 cm side mark.
- Check that no seam crosses a badge and label each seam.
Use a convention and rubric for valid alternatives
Because garment details vary, use a convention rather than a single exact design. Here, panels follow the grid, badges stay inside a panel with a stated margin, and seams connect labeled construction points. Alternative badge shapes and seam emphasis can pass if these placement and spacing checks remain clear.
Apply the rubric consistently: panels match the grid, badge placement stays clear of seams, seam lines connect labeled points, and any optional labels remain readable. Record changes to the hypothetical values so the drawing can be repeated.
- State the grid values, panel boundaries, and badge margin before drawing.
- Check each badge against panel edges and seam lines.
- Verify seam spacing with the stated arithmetic.
- Allow alternative badge shapes and seam emphasis that meet the stated checks.
- Record any changed values for future drawings.
Worked example
Draw a generic uniform shirt front on a 12 by 16 cm rectangle with a 2 cm collar band, a 2 cm placket, a badge on the left chest panel, and a sleeve seam ending 3 cm down the side edge. State the badge position and check the placket width.
Worked answer
Use page coordinates x=0..12 cm and y=0..16 cm, with the centerline x=6 and horizontal guide y=8. The collar band is 2 cm deep with a 2 cm center gap matching the placket; the placket spans x=5..7. The left inner panel is x=3..5. Place a 0.75 cm-wide, 2 cm-tall badge with its top at y=9 and its placket-side (page-right) edge at x=4. Its bounds are x=3.25..4 and y=9..11: the right edge is 1 cm from the placket edge x=5, and the left edge leaves a 0.25 cm margin to the panel edge x=3. The sleeve seam runs from the defined shoulder point to the 3 cm side mark. Check the placket width is 2 cm at top, middle, and bottom; confirm the badge margins and that it does not cross a seam.
Four practice exercises
Exercise 1
On a 10 by 14 cm torso rectangle, divide the width into four equal columns and place a 2 cm placket centered on the midline and a 1.5 by 2 cm rectangular badge on the right chest panel. State the badge position and check that it clears the placket by at least 0.5 cm and stays inside the inner panel.
Show answer and check
On a 10 cm-wide torso, each of the four equal columns is 2.5 cm wide. The centered 2 cm placket spans 1 cm on either side of the midline. The right inner panel is the part outside the placket, from 1 cm to 2.5 cm right of the midline, so it is 1.5 cm wide. Place the badge’s placket-side edge 0.5 cm beyond the placket edge, at 1.5 cm right of the midline. A 1.5 cm-wide badge then ends at 3 cm, crossing the panel edge at 2.5 cm by 0.5 cm, so it fails. A 0.75 cm-wide badge ends at 2.25 cm and leaves a 0.25 cm margin to the panel edge. Its top edge can sit 1 cm below the midline. Check that the badge width plus the 0.5 cm clearance is less than the 1.5 cm available panel width.
Why: The inner panel is 1.5 cm wide (from 1 cm to 2.5 cm right of the midline). A badge starting 0.5 cm from the placket edge (1 cm right of the midline) and extending 1.5 cm ends at 3 cm right of the midline, which is 0.5 cm past the panel's outer edge at 2.5 cm, so the stated badge does not fit. The available run from the placket edge to the panel edge is 1.5 cm; subtracting the 0.5 cm clearance leaves 1 cm for the badge. A 1 cm-wide badge ends exactly at the panel edge and therefore does not stay strictly inside; a 0.75 cm-wide badge leaves a 0.25 cm margin and satisfies the requirement.
Check: Measure the gap between the badge and the placket; it should be at least 0.5 cm. Confirm the badge's outer edge does not cross the inner panel's outer edge at 2.5 cm right of the midline, and that it does not cross the midline. Add the badge width and the clearance; the total must be less than 1.5 cm so the badge stays strictly inside the panel.
Exercise 2
Draw a collar band 1.5 cm deep on a 12 cm wide top edge with a 2 cm center gap. Draw the placket 2 cm wide and check that the collar gap aligns with the placket edges.
Show answer and check
The collar band is a 1.5 cm deep strip along the top edge with a 2 cm gap centered on the midline. The placket is 2 cm wide centered on the same midline. Check: the collar gap edges and the placket edges both lie 1 cm either side of the midline, so they align.
Why: Both features are centered on the midline, so alignment is guaranteed if the center line is drawn first. A 2 cm gap matches the 2 cm placket width, so the collar opening lines up with the placket edges rather than overlapping them.
Check: Measure from the left edge to each collar gap edge and to each placket edge; on a 12 cm wide top edge the gap edges and placket edges should both sit 5 cm and 7 cm from the left edge.
Exercise 3
On a 12 by 16 cm torso rectangle, divide the width into four equal columns and center a 2 cm placket on the 6 cm midline. Test a circular badge 2 cm in diameter with its center 2.5 cm outward from the midline. Does it fit inside the left inner chest panel with at least 0.5 cm clearance from both the placket and the panel’s outer edge? Give a corrected center and radius if it does not.
Show answer and check
The 2 cm diameter badge has radius 1 cm. With center distance d=2.5 cm, it spans from 1.5 cm to 3.5 cm left of the midline, so it crosses the panel edge at 3 cm and fails. A valid correction is center distance d=2 cm with radius r=0.5 cm (a 1 cm diameter badge). It spans from 1.5 cm to 2.5 cm left of the midline, leaving exactly 0.5 cm to the placket edge at 1 cm and 0.5 cm to the panel edge at 3 cm.
Why: For the left inner panel, the placket boundary is 1 cm from the midline and the outer panel boundary is 3 cm from it. To leave at least 0.5 cm on both sides, the nearest badge edge must satisfy d−r≥1.5 and the farthest edge must satisfy d+r≤2.5. The proposed 2 cm diameter circle violates the outer-edge condition; d=2 and r=0.5 satisfy both exactly.
Check: Let d be the badge-center distance outward from the midline and r its radius. Confirm d−r≥1.5 cm and d+r≤2.5 cm. For the corrected example d=2 and r=0.5, the edges are at 1.5 and 2.5 cm, exactly 0.5 cm from the placket and panel boundaries.
Exercise 4
On a 12 by 16 cm torso, measure x from the left edge and y downward from the top. Draw the left sleeve seam as a straight segment from shoulder point (1,0) to side-edge point (0,3). Draw a left-panel badge rectangle with bounds x=3.25..4 cm and y=9..11 cm; the placket edge is x=5 and the panel outer edge is x=3. Check that the seam stays inside the torso and does not cross the badge.
Show answer and check
Draw the sleeve seam from (1,0) to (0,3) and the badge rectangle from x=3.25 to 4 and y=9 to 11. Every point on the seam has x between 0 and 1, while every point in the badge has x between 3.25 and 4, so the seam cannot cross the badge. The seam meets the torso side at (0,3) and starts 1 cm inside the top-left corner.
Why: The horizontal coordinate ranges are disjoint: seam x∈[0,1], badge x∈[3.25,4]. The minimum horizontal separation is 3.25−1=2.25 cm; therefore the seam stays clear of the badge independent of their y positions.
Check: Confirm the seam endpoints are (1,0) and (0,3), all seam points stay within x=0..1, and the badge bounds are x=3.25..4, y=9..11. Check the minimum x-gap is 2.25 cm and that the seam ends on the side edge.
Common mistakes
- Drawing a badge across the placket or a seam. Move the badge fully inside one panel and check its stated clearance from both the placket and the panel edge; do not assume the two margins are the same.
- Making the placket lines uneven in width. Measure the 2 cm width at the top, middle, and bottom, and adjust the lines until all three match.
- Letting the collar seam sit at the very top edge. Place the collar seam 2 cm below the top edge and label the band depth.
- Letting optional badge marks touch the border. Reduce or omit the marks so the stated 2 mm margin remains.
Self-check rubric
- Panels match the stated grid and are labeled.
- Collar band depth and center gap match the stated values.
- Placket width is consistent at top, middle, and bottom.
- Badge sits inside one panel with the stated margin and does not cross a seam or the panel's outer edge.
- Optional badge marks remain readable and leave the stated margin.
- Seam lines connect the labeled points and do not cross badges.
- Labels are readable and consistent with the recorded values.
- Alternative badge shapes and seam emphasis pass when placement and spacing checks remain clear.
Questions and answers
Do I need a specific historical uniform to use this method?
No. The lesson uses a generic jacket or shirt with panels, a badge, and seams. The grid and checks work for any uniform-style garment you define.
Does a badge need lettering?
No. A simple emblem or blank badge works. If you add marks, keep them readable and inside the stated margin; no typographic measurement is required.
Are the numerical values fixed rules?
No. The 12 by 16 cm torso, 2 cm placket, and 0.75 by 2 cm badge are hypothetical examples. In the 12 cm example, the badge’s placket-side edge is 1 cm from the placket; the opposite edge is 0.25 cm inside the outer panel boundary. Measure your own paper and record chosen values so the checks remain consistent.
How do I check seam spacing without a ruler?
Use the grid: each column is 3 cm in the example, so the 2 cm placket is two-thirds of a column. Compare the gap to the grid marks and adjust until it matches.