Free original lessons
Chibi Cat Drawing: Oversized Head, Tiny Body Construction Guide
Learn to draw a chibi cat with a large head and small body using clear proportion steps, simple face features, and practice poses.
Free lesson
Four exercises
Worked answers
Object Drawing Lessons
Chibi cat drawings rely on a deliberate proportion shift: the head is much larger than the body, and the face stays simple. This guide defines a repeatable construction method from head circle to body, ear placement, and facial features. You will use a head-to-body ratio, checkable measurements, and a convention for line placement so that different drawing styles can still be evaluated fairly. All practice resources are planned and free; they are not yet built.
Practice materials: Printable downloads are not available for this lesson yet. Use the instructions and four exercises below.
Reference illustration
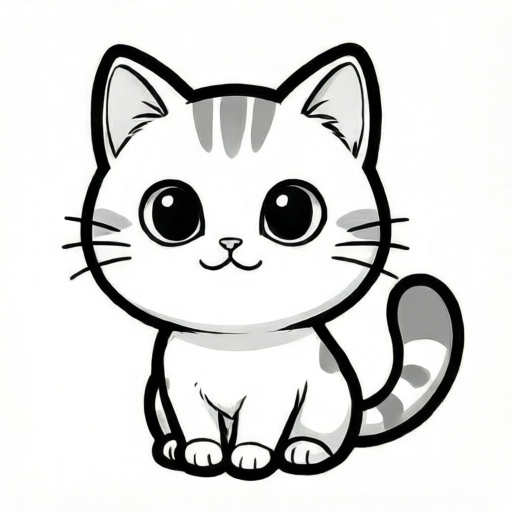
Use the stated measurements and conventions for each exercise.
Proportion Convention and Head-to-Body Ratio
Use a head unit H equal to the diameter of the head circle. For a chibi cat, choose a body height between 0.6H and 0.9H. This guide uses 0.75H as a hypothetical example, not a universal standard. The total figure height is then about 1.75H. Measure your own paper and pencil to set H; do not assume a printer tolerance.
Place the head circle first. Mark the baseline (bottom of the head circle) and the midline (horizontal center of the head circle). X-height in this drawing convention means the distance from baseline to midline, used only to position the eyes and nose consistently. Letter styles and facial feature styles vary, so the convention fixes relative placement, not a single correct look.
- Draw a circle for the head and label its diameter H.
- Mark the baseline at the bottom of the circle and the midline across its center.
- Decide body height as 0.75H and mark a body box below the head.
- Check that the body box width is about 0.5H to 0.6H.
- Keep the neck gap at zero or a very small overlap so the head reads as oversized.
Ear Placement and Simple Face Features
Ears sit on the upper half of the head circle. A practical convention is to place each ear base at about 60 to 70 percent of the head width from the center, with ear tips rising about 0.25H above the head circle. These are hypothetical example values; adjust to your style while keeping both ears balanced.
For the face, place eyes on or slightly above the midline, separated by about 0.35H. The nose sits just below the midline, and the mouth is a small curve below the nose. Whiskers are optional and should be short. Because facial styles vary, the rubric rewards consistent placement and clear readability rather than one exact face.
- Mark ear base points on the upper half of the head circle.
- Draw triangular ears with tips about 0.25H above the circle.
- Place two eye marks on the midline, separated by about 0.35H.
- Add a small nose below the midline and a short mouth curve.
- Check that the face features stay inside the lower two-thirds of the head circle.
Body, Limbs, and Tail Construction
The body is a small rounded box or egg shape below the head. Keep shoulders narrow and legs short. A simple convention is leg length about 0.25H and tail length about 0.5H, both hypothetical examples. The tail can curve outward from the lower body.
Draw the body outline after the head so the head remains dominant. Add two front legs and two back legs as short rounded shapes. Paws can be simple ovals. Check that no limb is longer than the body height, otherwise the chibi proportion weakens.
- Draw a rounded body box of height 0.75H and width about 0.55H.
- Add four short legs, each about 0.25H long.
- Attach a curved tail about 0.5H long from the lower back.
- Check that the head circle is visibly larger than the body box.
- Erase construction marks only after the proportion check.
Pose Variation and Final Check
Once the basic construction is stable, vary the pose by tilting the head circle up to 15 degrees and shifting the tail. Keep the head-to-body ratio unchanged. A sitting pose can shorten the visible legs, but the body height should still read as about 0.75H.
Final check: measure H on your drawing, then measure body height and compare. If body height is outside 0.6H to 0.9H, adjust before inking. Confirm ear tips, eye spacing, and tail length using the same H unit so the arithmetic stays consistent.
- Tilt the head circle slightly and redraw the midline.
- Keep the body box at 0.75H and adjust leg visibility for the pose.
- Measure H, body height, ear tip height, and tail length.
- Record the measurements and compare them to the chosen ratio.
- Make one correction pass, then finalize the drawing.
Worked example
A learner draws a head circle with diameter H = 4 cm. They plan a body height of 3 cm, ear tips 1 cm above the head circle, and a tail 2 cm long. Check whether these values fit the guide's hypothetical proportions.
Worked answer
Body height 3 cm divided by H 4 cm equals 0.75H, which is inside the 0.6H to 0.9H range. Ear tip height 1 cm equals 0.25H, matching the example convention. Tail length 2 cm equals 0.5H, also matching. The proportions pass the check. If the body had been 4 cm, that would be 1.0H and outside the range, so it would need shortening.
Four practice exercises
Exercise 1
A head circle has H = 5 cm. A learner draws a body height of 4.5 cm. Is this inside the guide's 0.6H to 0.9H range? Show the arithmetic.
Show answer and check
Yes. 4.5 cm divided by 5 cm equals 0.9H, which is exactly the inclusive upper boundary of the 0.6H to 0.9H range, so it is inside the range. Only a body height greater than 4.5 cm would fail.
Why: The range is 0.6H to 0.9H. Multiply 5 cm by 0.6 to get 3 cm and by 0.9 to get 4.5 cm. The body height equals the upper limit, so it passes only at the boundary.
Check: Recompute 5 times 0.9 and compare to 4.5. Then confirm the body is not drawn larger than 4.5 cm.
Exercise 2
H = 6 cm. Ear tips are planned 1.5 cm above the head circle. Using the hypothetical 0.25H convention, is this correct?
Show answer and check
Yes. 0.25 times 6 cm equals 1.5 cm, so the ear tip height matches the convention.
Why: Multiply H by 0.25 to find the example ear tip height. The planned value equals the result, so the ear placement passes.
Check: Measure the vertical distance from the top of the head circle to each ear tip and compare both to 1.5 cm.
Exercise 3
A drawing has H = 4 cm and eye marks separated by 1.6 cm. The guide suggests about 0.35H. Is the spacing close enough, and by how much does it differ?
Show answer and check
The suggested spacing is 1.4 cm. The drawing is 0.2 cm wider than the suggestion, so it is close but slightly wide.
Why: 0.35 times 4 cm equals 1.4 cm. Subtract 1.4 cm from 1.6 cm to get 0.2 cm. The difference is small, so the drawing can pass if the face still reads clearly.
Check: Measure the distance between eye centers, compute 0.35H, and subtract to find the difference.
Exercise 4
H = 3 cm. A learner draws legs 1.2 cm long and a tail 1.5 cm long. Using the hypothetical 0.25H leg and 0.5H tail conventions, which value is off and by how much?
Show answer and check
The legs are off. The suggested leg length is 0.75 cm, so 1.2 cm is 0.45 cm too long. The tail at 1.5 cm equals 0.5H and is correct.
Why: 0.25 times 3 cm equals 0.75 cm for legs. 1.2 minus 0.75 equals 0.45 cm. For the tail, 0.5 times 3 cm equals 1.5 cm, which matches.
Check: Measure each leg and the tail, compute the suggested values from H, and compare the differences.
Common mistakes
- Drawing the body nearly as large as the head. Set body height to 0.75H and measure it before adding details.
- Placing ears too low on the head circle. Move ear bases to the upper half and keep tips about 0.25H above the circle.
- Spacing the eyes too widely or too narrowly. Use about 0.35H between eye marks and check against the midline.
- Making legs longer than the body height. Keep each leg near 0.25H and shorten any limb that exceeds the body box.
Self-check rubric
- Head circle diameter H is clearly larger than the body height.
- Body height is between 0.6H and 0.9H, with measurements shown or stated.
- Ear bases sit on the upper half of the head circle and ears are balanced.
- Eyes are placed near the midline with spacing close to 0.35H.
- Nose and mouth are simple and readable inside the lower head area.
- Legs and tail are short relative to H, and no limb exceeds body height.
- Construction marks are light or erased after the proportion check.
- Valid style alternatives are accepted if placement and ratio checks pass.
Questions and answers
What head-to-body ratio should a chibi cat use?
Use a body height between 0.6H and 0.9H, where H is the head circle diameter. This guide uses 0.75H as a hypothetical example.
Where do the eyes go on a chibi cat face?
Place eye marks on or slightly above the midline, separated by about 0.35H. The nose sits just below the midline.
Can I change the ear shape?
Yes. The convention fixes ear base placement and balance, not a single ear shape. Rounded or pointed ears are both valid if they sit on the upper half.
How do I check my drawing without a template?
Measure H, body height, ear tip height, and tail length with a ruler. Compare each to the chosen ratio and correct any value outside the stated range.