Free original lessons
Drawing a Child's Face: Rounded Proportions and Feature Placement
Learn to draw a child's face using rounded proportions, eye-line guides, and cheek placement. Includes steps, common mistakes, and four practice tasks.
Free lesson
Four exercises
Worked answers
Object Drawing Lessons
Drawing a child's face is not simply shrinking an adult portrait. Children have shorter faces, larger eyes relative to the head, rounder cheeks, and features placed lower on the face. This guide uses a simple proportion plate and step-by-step construction to help you place features consistently. You will work from an oval to a finished face, using checkable measurements and a convention for x-height and letter styles where handwriting appears. All numerical values are hypothetical examples; measure your own paper and tools. The approach allows valid stylistic alternatives, so treat the rubric as a guide to proportion and placement, not a single correct drawing.
Practice materials: Printable downloads are not available for this lesson yet. Use the instructions and four exercises below.
Reference illustration
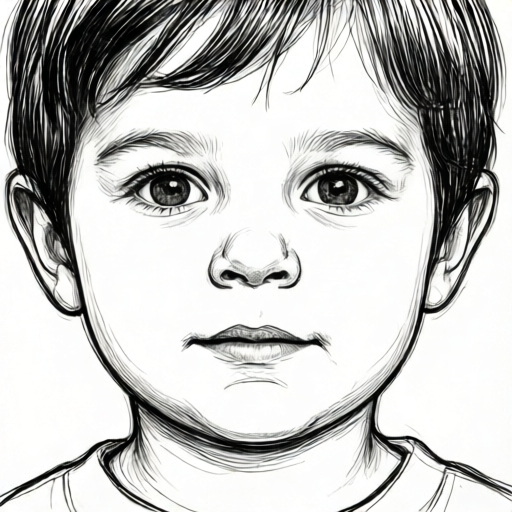
Use the stated measurements and conventions for each exercise.
Understanding Child Facial Proportions
A child's head is proportionally larger than an adult's relative to the body, but within the face the key differences are vertical. The face is shorter from hairline to chin, the eyes sit lower on the head, and the cheeks are fuller. A useful convention is to mark three horizontal guides: the eye line near the vertical midpoint of the head, the nose line halfway between the eye line and the chin, and the mouth line about one-third of the way from the nose line to the chin. In an adult, the eye line sits higher and the lower face is longer. Use a light pencil to mark these lines before drawing features.
Eye size is another guide. Children's eyes appear larger because the face around them is smaller. A common starting point is to make each eye about one-fifth of the face width, with a gap of about one eye width between them. These are starting proportions, not rules. Rounded cheeks can be suggested by curving the jawline outward below the eye line and keeping the chin short and soft. Avoid sharp angles at the jaw.
- Draw a light oval for the head, slightly wider at the top than the chin.
- Mark a horizontal eye line at about the vertical midpoint of the oval.
- Mark a nose line halfway between the eye line and the chin.
- Mark a mouth line about one-third of the way from the nose line to the chin.
- Sketch two eye shapes on the eye line, each about one-fifth of the face width, with one eye-width between them.
- Add rounded cheek curves from the outer eye corners down toward the jaw.
- Place the nose between the eye line and nose line, keeping it small and soft.
- Draw the mouth on the mouth line, slightly wider than the nose.
- Refine the jaw and chin with gentle curves, then erase construction lines.
Building the Face from Oval to Features
Start with the oval and construction lines, then add features in a fixed order: eyes, nose, mouth, ears, hair. This order prevents features from drifting. Keep your pencil light until the placement is confirmed. For the eyes, draw the upper lid curve first, then the lower lid, then the iris. The iris should touch both lids slightly in a child's face to suggest a large, open eye. The nose can be a small curved line or a soft triangle; avoid a long bridge. The mouth is a shallow curve with a slight dip in the center.
When adding ears, place them between the eye line and nose line. In children, ears can appear slightly lower and smaller relative to the face. Hair should follow the skull curve, not sit flat on top. Use the construction lines as checkpoints: the eyes should sit on the eye line, the nose base on the nose line, and the mouth on the mouth line. If a feature drifts, adjust the construction line rather than forcing the feature.
- Lightly sketch the oval and the three horizontal guide lines.
- Draw the eye shapes and irises, checking the one-eye-width gap.
- Add the nose using the nose line as the base.
- Draw the mouth on the mouth line, then add a subtle lower lip curve.
- Place the ears between the eye and nose lines.
- Add hair following the top curve of the oval.
- Check all features against the guide lines before darkening any lines.
Using a Convention for Handwriting and Labels
If you label your drawing or add notes, use a clear convention so your work can be checked. Define x-height as the distance from the baseline to the midline of lowercase letters. Choose a letter style, such as a simple rounded print, and keep it consistent. This convention allows valid alternatives: you may use cursive or block letters as long as the x-height is defined and the labels are readable. For proportion notes, write measurements in the same units, such as centimeters or arbitrary grid units. Do not mix units on one drawing.
A practical check is to measure the x-height of three lowercase letters in your label. They should be equal within a small tolerance you set, for example two millimeters. This is a self-check, not a universal standard. The goal is consistency, not a single correct handwriting style. If you use a grid, state the grid size and use it for all measurements.
- Choose a letter style and write a sample word.
- Mark the baseline and midline for lowercase letters.
- Measure the x-height of three letters and compare.
- Use the same units for all proportion notes.
- Keep labels short and place them outside the face outline.
Comparing Child and Adult Proportions
A side-by-side comparison helps avoid adult habits. In an adult face, the eye line is often slightly above the middle of the head, and the face is longer below the eyes. The nose is longer, the jaw more angular, and the eyes smaller relative to the face. In a child, the forehead may appear larger, the eyes lower and larger, and the chin shorter. Use the same three-line guide for both, then adjust the spacing: for a child, reduce the distance from nose line to chin and increase the eye size slightly.
A simple comparison plate can show two ovals of the same height, one with child guides and one with adult guides. Label the eye line, nose line, and mouth line on each. This makes the differences visible without claiming a universal standard. Remember that individual faces vary; the plate is a teaching aid, not a rule.
- Draw two ovals of equal height side by side.
- Mark child guides on the left oval: eye line at midpoint, short lower face.
- Mark adult guides on the right oval: eye line slightly higher, longer lower face.
- Compare the eye size and cheek curves.
- Note differences in a short label using your handwriting convention.
Worked example
Draw a child's face on a 10 cm by 12 cm oval. Place the eye line at the vertical midpoint, the nose line halfway between the eye line and chin, and the mouth line one-third from the nose line to the chin. Use eyes each 2 cm wide with a 2 cm gap. Describe the construction and a check.
Worked answer
Draw the oval 10 cm wide and 12 cm high. Mark the eye line at 6 cm from the top. Mark the nose line at 9 cm from the top (halfway between 6 cm and 12 cm). Mark the mouth line at 10 cm from the top (one-third of the 3 cm distance from nose line to chin). Draw two eyes on the eye line, each 2 cm wide, with a 2 cm gap, centered. Add a small nose at the nose line and a mouth on the mouth line. Check: eye line at 6 cm, nose line at 9 cm, mouth line at 10 cm, eye widths 2 cm, gap 2 cm. All units are centimeters.
Four practice exercises
Exercise 1
On a 9 cm by 11 cm oval, mark the eye line at the vertical midpoint, the nose line halfway from eye line to chin, and the mouth line one-third from nose line to chin. State the distances from the top in centimeters.
Show answer and check
Eye line at 5.5 cm from the top; nose line at 8.25 cm; mouth line at 9.17 cm (rounded to two decimals).
Why: The oval height is 11 cm. Midpoint is 5.5 cm. Halfway from 5.5 to 11 is 8.25 cm. One-third of the 2.75 cm distance from nose line to chin is about 0.92 cm, so mouth line is 8.25 + 0.92 = 9.17 cm.
Check: Add the segments: 5.5 + 2.75 + 0.92 = 9.17, and 9.17 + 1.83 = 11. Confirm each line is below the previous one.
Exercise 2
A child's face is 8 cm wide. Using the one-fifth guide, calculate each eye width and the gap between eyes. Then state where the eyes sit vertically if the head is 10 cm high.
Show answer and check
Each eye is 1.6 cm wide; the gap is 1.6 cm. The eye line sits at 5 cm from the top.
Why: One-fifth of 8 cm is 1.6 cm. The gap equals one eye width, so 1.6 cm. For a child, the eye line is near the vertical midpoint of a 10 cm head, which is 5 cm.
Check: Total width used by eyes and gap is 1.6 + 1.6 + 1.6 = 4.8 cm, leaving 3.2 cm for the sides, which is reasonable. Confirm 5 cm is half of 10 cm.
Exercise 3
Describe how to adjust an adult-style drawing to a child-style drawing using three changes: eye line, eye size, and lower face length. Give one check for each change.
Show answer and check
Lower the eye line to about the midpoint; enlarge each eye to about one-fifth of face width; shorten the nose-to-chin distance. Checks: eye line at midpoint, eye width about one-fifth, nose-to-chin shorter than eye-to-nose.
Why: Child faces have lower eye lines, larger eyes relative to the face, and shorter lower faces. These three changes address the main proportion differences.
Check: Measure the eye line position, eye width, and the two vertical segments. Compare the nose-to-chin segment with the eye-to-nose segment; it should be shorter in the child version.
Exercise 4
You label a drawing with the word 'child'. Define x-height as baseline to midline. If the x-height is 4 mm and the ascender of 'h' is 7 mm above baseline, what is the total height of 'h' from baseline? State the unit.
Show answer and check
The x-height is 4 mm. The ascender of 'h' reaches 7 mm above the baseline, so the total height of 'h' from baseline is 7 mm.
Why: The ascender height is given as 7 mm above baseline. The x-height describes lowercase letters like 'c' and 'i', not the ascender. The total height of 'h' is the ascender height.
Check: Write the word 'child' with an x-height of 4 mm and an ascender height of 7 mm, then measure to confirm: the lowercase 'c' should measure 4 mm from baseline to midline, and the 'h' should measure 7 mm from baseline to its top. All measurements are in millimeters.
Common mistakes
- Drawing adult-sized eyes and placing them too high on the head. Lower the eye line to about the vertical midpoint and enlarge each eye to about one-fifth of the face width.
- Making the face too long below the nose. Shorten the distance from nose line to chin and keep the chin rounded and small.
- Using sharp jaw angles instead of rounded cheeks. Curve the jawline outward below the eye line and soften all corners.
- Placing the mouth too close to the nose or too low. Mark the mouth line about one-third of the way from the nose line to the chin before drawing the mouth.
- Mixing measurement units in proportion notes. Choose one unit, such as centimeters or grid squares, and use it for every note.
Self-check rubric
- Eye line is near the vertical midpoint of the head.
- Eyes are relatively large, each about one-fifth of face width, with a consistent gap.
- Nose line and mouth line are marked and features sit on them.
- Cheeks and jaw are rounded, with a short chin.
- Construction lines are light and erased or left faint.
- Labels, if any, use a defined x-height convention and one unit of measurement.
- Valid stylistic alternatives are allowed if proportions and placement remain consistent.
Questions and answers
How large should the eyes be in a child's face drawing?
A starting guide is each eye about one-fifth of the face width, with one eye-width between them. Adjust for style, but keep the eyes relatively large compared with an adult face.
Where should the eye line sit on the head?
For a child, place the eye line near the vertical midpoint of the head. This is a guide, not a fixed rule; check against your oval.
Can I use cursive handwriting for labels?
Yes, if you define x-height as baseline to midline and keep the style consistent. The convention allows valid alternatives.
Do I need special paper or tools?
No. Use any paper and a pencil. Measure your actual paper if you record dimensions, and label any chosen numbers as hypothetical examples.