Free original lessons
Draw a Kawaii Puppy: Oversized Head, Simple Body
Learn cute kawaii puppy drawing with a big head, tiny rounded body, and clear placement guides. Includes practice steps, common fixes, and four self-check tasks.
Free lesson
Four exercises
Worked answers
Object Drawing Lessons
Kawaii puppy drawing is a proportion game, not a realism test. The goal is an oversized head, a compact simplified body, and rounded features that read clearly at small size. This lesson defines a simple convention: the head is a large rounded shape, the body is roughly half the head's height, and all major forms use soft curves. You will place ears and eyes with checkable guides, then vary expression without changing the core proportions. Every measurement here is a drawing convention, not a manufacturing standard. Use any pencil and paper; measure your own marks with a ruler if you want numerical checks. The four practice tasks are self-contained and solvable from the text alone.
Practice materials: Printable downloads are not available for this lesson yet. Use the instructions and four exercises below.
Reference illustration
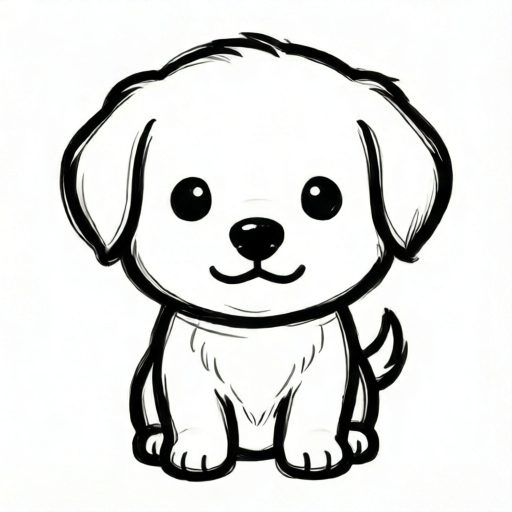
Use the stated measurements and conventions for each exercise.
Set the head-to-body ratio
Start with the head as the dominant shape. Draw a rounded oval or circle that fills about two-thirds of the total figure height. The body sits below and is roughly half the head's height, so the full puppy is about one and a half head-heights tall. This ratio is a convention for cuteness, not a rule from nature.
Keep the body as a simple rounded bean or egg shape. Avoid a long torso, visible ribs, or realistic leg joints. Short, stubby legs and a small tail support the oversized head without competing with it.
- Draw a large rounded head shape and mark its height with two light ticks.
- Below the head, draw a body about half that height, centered under the head.
- Add four short rounded legs and a small curved tail.
- Check that the head is clearly the largest single shape before adding details.
Place ears and eyes with simple guides
Use a midline and a horizontal eye line. The midline runs vertically through the head center. The eye line sits slightly below the head's vertical midpoint, which keeps the face looking young and cute. Place two large oval eyes on that line, spaced about one eye-width apart.
Ears attach near the top sides of the head. Floppy ears can hang beside the cheeks; upright ears can rise above the head outline. Either style is valid if the ears stay rounded and do not overwhelm the head. A small rounded muzzle and a tiny nose sit below the eye line.
- Draw a light vertical midline and a horizontal eye line slightly below the head midpoint.
- Place two large oval eyes on the eye line with about one eye-width between them.
- Attach rounded ears at the top sides, choosing floppy or upright.
- Add a small rounded muzzle and nose below the eyes, then a simple mouth curve.
Round every feature and simplify the body
Kawaii style favors soft curves over sharp corners. Round the head outline, the ear tips, the paws, and the tail. The body should read as one compact shape, not a stack of anatomical parts. Keep leg length short and even so the puppy looks balanced.
Expression comes from small changes: eye shape, mouth curve, and brow tilt. You can make a happy puppy with curved eyes, a curious puppy with one raised brow, or a sleepy puppy with half-closed eyes. These variants are valid alternatives, not a single correct answer.
- Soften any sharp corners on the head, ears, paws, and tail.
- Keep the body as one rounded shape with short, even legs.
- Choose one expression variant and adjust only the eyes, brows, and mouth.
- Recheck the head-to-body ratio after changes.
Check and refine the drawing
Use simple arithmetic checks. If the head height is 6 cm, the body height should be about 3 cm, and the total figure about 9 cm. These numbers are hypothetical examples; measure your own drawing and compare ratios rather than copying exact values.
Check symmetry by folding the paper lightly or by measuring from the midline to each eye. Valid alternatives include different ear styles, eye shapes, and tail curves, as long as the oversized head and compact body remain clear.
- Measure head height and body height; confirm the body is about half the head.
- Measure eye spacing from the midline; adjust if one eye is much farther out.
- Confirm the head is the largest single shape.
- Erase construction lines lightly and darken the final rounded outlines.
Worked example
A learner draws a puppy with a head height of 8 cm and a body height of 6 cm. The eyes sit above the head midpoint and are far apart. Identify the proportion and placement issues and give corrected hypothetical measurements.
Worked answer
The body is too tall: it should be about half the head height, so about 4 cm instead of 6 cm. The total figure would then be about 12 cm. Move the eye line slightly below the head midpoint and space the eyes about one eye-width apart, using the midline as a symmetry check.
Four practice exercises
Exercise 1
A drawing has a head height of 10 cm and a body height of 7 cm. Using the lesson convention, state the target body height and whether the current body is too tall or too short.
Show answer and check
Target body height is about 5 cm, so the current 7 cm body is too tall.
Why: The body should be about half the head height. Half of 10 cm is 5 cm. Since 7 cm is greater than 5 cm, the body is too tall.
Check: Divide head height by two and compare with the measured body height.
Exercise 2
A head is 6 cm tall. The eye line is placed 4 cm down from the top. Is the eye line above or below the head midpoint, and what is the midpoint value?
Show answer and check
The midpoint is 3 cm from the top, so the eye line at 4 cm is below the midpoint.
Why: Half of 6 cm is 3 cm. The eye line should sit slightly below the midpoint, so 4 cm is acceptable placement.
Check: Halve the head height and compare the eye-line measurement to that value.
Exercise 3
Two eyes are placed on an eye line. From the midline, the left eye center is 2 cm away and the right eye center is 4 cm away. Describe the symmetry issue and a simple fix.
Show answer and check
The eyes are not symmetric about the midline. Move the right eye inward so both eye centers are about the same distance from the midline, for example 2 cm each.
Why: Symmetry means equal distances from the midline. The 2 cm and 4 cm distances differ, so one eye is too far out.
Check: Measure each eye center to the midline and compare the two distances.
Exercise 4
A puppy drawing has a head height of 9 cm and a body height of 4 cm. State the target body height, whether the body is too tall or too short, and one rounded-feature check.
Show answer and check
Target body height is about 4.5 cm, so the 4 cm body is slightly too short. Check that ears, paws, and tail have rounded tips rather than sharp corners.
Why: Half of 9 cm is 4.5 cm. The measured 4 cm is less than 4.5 cm, so the body is slightly short. Rounded features are a separate style check.
Check: Halve the head height, compare with body height, then inspect ear, paw, and tail outlines for sharp corners.
Common mistakes
- Making the body too long or too realistic. Shorten the body to about half the head height and keep it as one rounded bean shape.
- Placing eyes too high or too far apart. Put the eye line slightly below the head midpoint and space the eyes about one eye-width apart.
- Using sharp corners on ears, paws, or tail. Redraw those edges with soft curves and rounded tips.
- Letting details crowd the face. Keep the muzzle and nose small, and leave clear space around the large eyes.
Self-check rubric
- Head is the largest single shape and roughly two-thirds of total figure height.
- Body is compact and about half the head height.
- Eyes sit slightly below the head midpoint and are spaced about one eye-width apart.
- Ears, paws, and tail use rounded forms.
- Expression variant is clear and does not break the core proportions.
- Valid alternatives in ear style, eye shape, and tail curve are accepted.
Questions and answers
Do I need special paper or tools?
No. Any pencil and paper work. A ruler helps with ratio checks but is optional.
Is there one correct ear style?
No. Floppy and upright ears are both valid if they are rounded and proportionate to the oversized head.
How do I know the head is big enough?
The head should be the largest single shape and roughly two-thirds of the total figure height.
Can I change the expression?
Yes. Adjust eyes, brows, and mouth while keeping the head-to-body ratio and rounded forms.