Free original lessons
Draw a Layered Magnolia Bloom on a Branch
Learn to draw a magnolia with layered petals and a believable branch attachment using a clear sequence, comparison, and practice outline.
Free lesson
Four exercises
Worked answers
Object Drawing Lessons
A magnolia bloom reads as layered because petals overlap in a specific order and attach to a central cup, not to the branch directly. This lesson gives you a repeatable sequence for the bloom, a guide for attaching it to a branch, and a bloom-to-bud comparison so you can vary scale without losing structure. You will use simple shapes, consistent units, and a convention for line weight so your drawing stays checkable. All practice resources are planned and free; none are built yet.
Practice materials: Printable downloads are not available for this lesson yet. Use the instructions and four exercises below.
Reference illustration
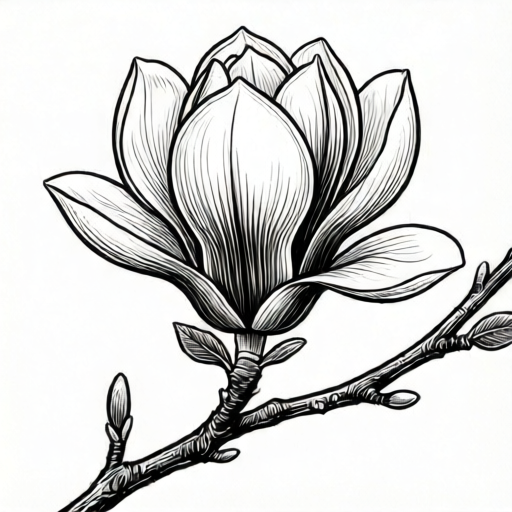
Use the stated measurements and conventions for each exercise.
Build the bloom as a cup of overlapping petals
Start with a shallow cup shape: an oval for the bloom's opening and a curved base where petals meet the receptacle. The receptacle is the small swollen tip of the branch that holds the flower. Draw three petal groups in order: back petals first, then side petals, then front petals. Each petal is a teardrop with a rounded tip and a narrow base that tucks into the cup.
Use a consistent overlap rule: a petal drawn later crosses over the petal drawn earlier at its base, but its tip stays free. This creates depth without shading. Keep petal widths varied: back petals are often narrower, front petals broader. A simple convention for line weight: outline petals at 1 unit, internal overlap lines at 0.5 unit, and the branch at 1.5 units. These numbers are hypothetical examples; measure your own tools and label your chosen values.
- Draw the cup oval and mark the receptacle as a small circle at its base.
- Add three back petals, tips pointing outward and bases inside the cup.
- Add two side petals that overlap the back petals at their bases.
- Add two front petals that overlap the side petals, leaving a small gap at the center.
- Check that every petal base meets the cup, not the branch.
Attach the bloom to the branch
The bloom connects through a short stalk to the branch. Draw the branch first as a slightly tapered line, then add the stalk as a shorter curve from the branch to the receptacle. The stalk should meet the branch at a small angle, not a right angle, and should be narrower than the branch. Add a small node at the joint: a short crossline or a slight swelling.
Avoid drawing petals directly on the branch. The receptacle is the only contact point. If your bloom is large, shorten the stalk and thicken the node; if small, lengthen the stalk slightly. Use the same unit for stalk width and branch width so the joint looks consistent.
- Draw the branch with a gentle taper and mark the joint point.
- Draw the stalk from the joint to the receptacle circle.
- Add a node mark at the joint and check stalk width is less than branch width.
- Erase any petal line that touches the branch directly.
Compare bloom and bud to keep scale believable
A magnolia bud is a narrow teardrop with overlapping scales, while the open bloom is a wider cup with free petal tips. Draw them side by side using the same receptacle size. The bud's length is about half the bloom's width in this hypothetical example; measure your own reference and label your ratio. The bud attaches to the branch with a shorter stalk and a tighter node.
Use the comparison to plan a branch with one open bloom and one bud. Keep the bud's tip pointing up or slightly outward, and keep the bloom's cup facing the viewer or slightly tilted. The branch should pass behind the bloom, not through it.
- Draw two receptacles of equal size on the same branch.
- Add a bud as a narrow teardrop with two scale lines.
- Add the open bloom using the petal sequence.
- Check that the branch passes behind both and that stalk lengths differ.
Practice outline and self-check
Use a practice outline with three boxes: one for the cup and back petals, one for side and front petals, and one for the branch joint. In each box, draw only the lines named. This keeps the sequence visible and prevents premature detail. After drawing, check three things: every petal base meets the cup, the stalk meets the branch at a node, and no petal touches the branch.
Line weight is a convention, not a universal answer. Choose your own values and write them beside the outline. Valid alternatives include using a single weight for all lines or using dashed lines for hidden overlaps. The rubric below accepts any consistent convention that preserves the overlap order.
- Draw three boxes and label them cup, petals, joint.
- Complete each box in order without skipping ahead.
- Mark your line-weight values beside the outline.
- Run the three checks and note any line that fails.
Worked example
Draw a magnolia bloom with seven petals on a branch. Use a cup oval 4 units wide and 3 units tall, a receptacle circle 1 unit wide, a stalk 2 units long, and a branch 6 units long. Label your line weights.
Worked answer
Draw the branch as a tapered line 6 units long. Mark a joint at 3 units. Draw the stalk 2 units from the joint to a receptacle circle 1 unit wide. Draw the cup oval 4 by 3 units above the receptacle. Add three back petals with bases inside the cup, then two side petals overlapping the back bases, then two front petals overlapping the side bases. Keep all petal tips free. Use outline 1 unit, overlap 0.5 unit, branch 1.5 units as hypothetical values. Check that no petal touches the branch and that the stalk meets the node.
Four practice exercises
Exercise 1
Draw a bloom with five petals: two back, one side, two front. Use a cup oval 3 units wide and 2 units tall, a receptacle 0.5 unit wide, and a stalk 1.5 units long. State your overlap order.
Show answer and check
Back petals first, then side, then front. The side petal overlaps both back bases; front petals overlap the side base. All bases meet the cup.
Why: Five petals still follow the three-group order. The side petal bridges back and front so the cup reads as layered.
Check: Trace each petal base to the cup; confirm no base touches the branch and the overlap order matches your statement.
Exercise 2
A branch is 8 units long with a joint at 4 units. Draw a bud with a stalk 1 unit long and a bloom with a stalk 2 units long from the same joint. Use equal receptacles. State a hypothetical bud-to-bloom width ratio.
Show answer and check
Bud is a narrow teardrop with two scale lines; bloom uses seven petals. Hypothetical ratio: bud length is half the bloom width. Both stalks meet the same node.
Why: Equal receptacles keep scale comparable. Different stalk lengths show bud and bloom attachment without changing the joint.
Check: Measure both receptacles to confirm equality; check both stalks meet the node and the branch passes behind both.
Exercise 3
Draw a bloom tilted 30 degrees to the left. Keep the cup oval 4 by 3 units and the receptacle 1 unit wide. Describe how the petal tips shift and where the stalk meets the branch.
Show answer and check
The cup oval tilts left; back petal tips point left and up, side tips point left and out, front tips point left and down. The stalk meets the branch at a node below the receptacle.
Why: Tilting the cup rotates all petal tips together while bases stay in the cup. The stalk remains the only branch contact.
Check: Check that all petal bases still meet the tilted cup and that the stalk meets the node at a small angle.
Exercise 4
Draw a branch with one open bloom and one bud. Use a branch 10 units long, a joint at 3 units for the bud and a joint at 7 units for the bloom. State your line-weight values and check the three rules.
Show answer and check
Bud at 3 units with a 1-unit stalk; bloom at 7 units with a 2-unit stalk. Hypothetical weights: outline 1, overlap 0.5, branch 1.5. All petal bases meet cups; both stalks meet nodes; no petal touches the branch.
Why: Two joints on one branch test attachment consistency. Declared weights make the drawing checkable.
Check: Verify each joint has a node, each stalk is narrower than the branch, and the three rules pass for both flowers.
Common mistakes
- Drawing petals directly on the branch. Erase petal lines that touch the branch and redraw them so their bases meet the cup.
- Making all petals the same width and length. Vary back petals narrower and front petals broader, keeping tips free.
- Attaching the stalk at a right angle. Redraw the stalk at a small angle and add a node at the joint.
- Using inconsistent line weights. Write your chosen weights beside the drawing and apply them to outline, overlap, and branch.
Self-check rubric
- Bloom shows three petal groups in back, side, front order.
- Every petal base meets the cup, not the branch.
- Stalk connects receptacle to a node on the branch at a small angle.
- Line-weight convention is declared and applied consistently.
- Bloom and bud comparison uses the same receptacle size and a stated ratio.
Questions and answers
How many petals should I draw?
Use seven to nine petals in three groups: three back, two or three side, two or three front. The exact count is flexible; the overlap order matters more.
Where does the bloom attach?
The bloom attaches through a short stalk to a node on the branch. The receptacle is the contact point, not the petals.
Can I use one line weight?
Yes, if you keep it consistent. The rubric accepts any declared convention that preserves overlap order.
How do I check my drawing?
Check that every petal base meets the cup, the stalk meets the branch at a node, and no petal touches the branch.