Free original lessons
Mandarin Duck Drawing: Sail Feather, Crest, and Patterned Plumage
Learn to draw a mandarin duck with its distinctive sail feather, crest, and patterned plumage using clear placement guides and a simple convention.
Free lesson
Four exercises
Worked answers
Object Drawing Lessons
The mandarin duck is recognizable by three features: the male's orange sail feather, a swept-back crest, and blocky patterned plumage. This guide uses a simple drawing convention: x-height is measured from baseline to midline of lowercase letters, and letter styles vary, so treat all measurements as relative guides rather than fixed rules. You will place the body outline, add the sail feather and crest, then map pattern zones. All numerical values are hypothetical examples for practice; measure your own paper and tools. The approach is checkable with simple arithmetic and consistent units.
Practice materials: Printable downloads are not available for this lesson yet. Use the instructions and four exercises below.
Reference illustration
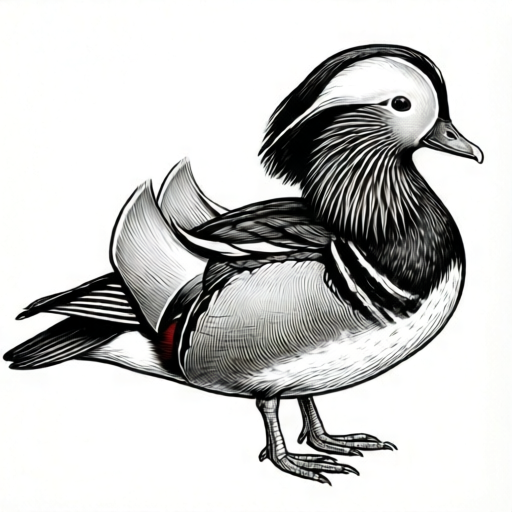
Use the stated measurements and conventions for each exercise.
Set the body outline and reference points
Begin with a light oval for the body, tilted slightly upward at the tail. Mark a baseline and a midline using the x-height convention: if your lowercase x is 10 mm tall, the midline sits 5 mm above the baseline. This gives a consistent vertical reference for the crest and sail feather.
Place three reference points: the bill base, the shoulder, and the tail tip. Keep the body length about three x-heights and the height about two x-heights. These are hypothetical proportions; adjust to your paper size while keeping the ratios consistent.
- Draw a baseline and a midline 5 mm apart (if x-height is 10 mm).
- Sketch a tilted oval: length 30 mm, height 20 mm, using the midline as a guide.
- Mark the bill base at the front, the shoulder at the top third, and the tail tip at the back.
- Check that the oval's long axis rises about 15 degrees above horizontal.
Add the crest and sail feather
The crest sweeps back from the crown in a curved wedge. Its length is about one and a half x-heights, and its widest point sits above the shoulder. The sail feather rises from the back, just behind the shoulder, and curves upward like a small sail. Its height is about two x-heights, and its width is about half an x-height.
Use the midline to keep the crest and sail feather aligned vertically. The crest tip should sit above the tail tip, and the sail feather should overlap the back edge of the body oval by about 3 mm.
- Draw a curved wedge from the crown backward, length 15 mm, width 5 mm at the base.
- Draw the sail feather as a narrow triangle with a curved top, height 20 mm, width 5 mm.
- Position the sail feather 5 mm behind the shoulder point.
- Check that the crest tip and sail feather tip are both above the midline.
Map patterned plumage zones
Mandarin duck plumage is blocky, not smooth. Divide the body into four zones along its length: breast from 0 to one-third, flank from one-third to two-thirds, back from two-thirds to four-fifths, and tail from four-fifths to the tail tip. These fractions sum to the full body length, so every part of the body belongs to exactly one zone. Use simple shapes—rectangles, chevrons, and stripes—to suggest pattern without copying a single photograph.
Keep pattern marks inside their zones. A valid alternative is to use dots instead of stripes, as long as the zone boundaries remain clear. The rubric rewards clear zone separation and consistent mark size, not a single universal pattern.
- Draw a vertical line at one-third body length for the breast-flank boundary.
- Draw a second vertical line at two-thirds body length for the flank-back boundary.
- Draw a third vertical line at four-fifths body length for the back-tail boundary.
- Add three chevrons in the breast zone, each 4 mm wide.
- Add two stripes in the flank zone, each 6 mm long and 2 mm apart.
- Check that no pattern mark crosses a zone boundary by more than 2 mm.
Refine edges and check proportions
Darken the body outline, crest, and sail feather with a consistent line weight. Leave pattern marks lighter so the silhouette reads first. Measure the sail feather height and crest length against your x-height to confirm the ratios. If the sail feather is shorter than one and a half x-heights, extend it; if the crest is wider than one x-height at its base, narrow it.
A simple arithmetic check: body length divided by x-height should be about 3. Sail feather height divided by x-height should be about 2. Crest length divided by x-height should be about 1.5. These are hypothetical targets for practice, not standards.
- Trace the final outline with a 0.5 mm pen or pencil.
- Measure body length, sail feather height, and crest length in millimetres.
- Divide each by your x-height and compare to the targets 3, 2, and 1.5.
- Adjust any ratio that differs by more than 0.3.
Worked example
A learner sets x-height to 8 mm. They draw a body 24 mm long, a sail feather 16 mm tall, and a crest 12 mm long. Check the ratios and state whether the drawing meets the hypothetical targets.
Worked answer
Body ratio: 24 ÷ 8 = 3. Sail feather ratio: 16 ÷ 8 = 2. Crest ratio: 12 ÷ 8 = 1.5. All three match the targets, so the proportions are consistent with the guide.
Four practice exercises
Exercise 1
With x-height 10 mm, draw a body 30 mm long and a sail feather 20 mm tall. State the two ratios.
Show answer and check
Body ratio 3; sail feather ratio 2.
Why: Divide each measurement by the x-height: 30 ÷ 10 = 3 and 20 ÷ 10 = 2.
Check: Re-measure in millimetres and confirm both divisions give 3 and 2.
Exercise 2
A crest is 18 mm long with x-height 12 mm. Is it within 0.3 of the target ratio 1.5?
Show answer and check
Yes. 18 ÷ 12 = 1.5, which equals the target.
Why: The ratio is exactly 1.5, so the difference from the target is 0.
Check: Divide 18 by 12 and compare the result to 1.5.
Exercise 3
You draw three pattern zones: breast 10 mm wide, flank 10 mm wide, and back 10 mm wide. A stripe in the flank crosses 3 mm into the breast zone. Does it meet the 2 mm overlap limit?
Show answer and check
No. The overlap is 3 mm, which exceeds the 2 mm limit.
Why: Compare the measured overlap (3 mm) to the limit (2 mm); 3 is greater than 2.
Check: Measure the crossing distance with a ruler and compare to 2 mm.
Exercise 4
With x-height 6 mm, a sail feather is 9 mm tall. What is the ratio, and how many millimetres should it gain to reach the target ratio 2?
Show answer and check
Ratio is 1.5; it should gain 3 mm to reach 12 mm (ratio 2).
Why: 9 ÷ 6 = 1.5. Target height is 2 × 6 = 12 mm, so 12 − 9 = 3 mm.
Check: Add 3 mm to 9 mm, divide by 6, and confirm the result is 2.
Common mistakes
- Drawing a generic duck body with no sail feather or crest. Add the sail feather behind the shoulder and the swept-back crest from the crown before adding pattern.
- Making the sail feather too wide or too short. Keep width about half an x-height and height about two x-heights; measure with a ruler.
- Letting pattern marks cross zone boundaries. Draw zone boundary lines first and keep marks inside them, allowing at most 2 mm overlap.
- Using inconsistent units when checking proportions. Measure everything in millimetres and divide by the same x-height value.
Self-check rubric
- Sail feather is present behind the shoulder and is clearly taller than wide.
- Crest sweeps back from the crown and is distinct from the body outline.
- Patterned plumage is divided into at least three clear zones.
- Pattern marks stay mostly inside their zones, with no more than 2 mm overlap.
- Proportions are checked with consistent units and simple arithmetic.
- Valid alternatives in pattern shape or mark style are accepted if zones remain clear.
Questions and answers
Do I need to copy a real mandarin duck exactly?
No. The goal is to show the distinctive sail feather, crest, and patterned plumage. Valid alternatives include different pattern shapes as long as zones remain clear.
What is the x-height convention?
X-height is the distance from baseline to midline of lowercase letters. Letter styles vary, so measure your own writing to set a consistent vertical unit.
Are the numerical values fixed rules?
No. All numbers are hypothetical examples for practice. Measure your paper and tools, then keep ratios consistent.
How can I check my drawing without an image?
Use the arithmetic checks: body length divided by x-height near 3, sail feather height near 2, crest length near 1.5.