Free original lessons
Draw a Matcha Whisk: Bamboo Tines and Handle Construction
Learn to draw a chasen matcha whisk with clear tine arrangement, curved bamboo prongs, and a sturdy handle using a defined drawing convention.
Free lesson
Four exercises
Worked answers
Object Drawing Lessons
This lesson teaches a repeatable method for drawing a matcha whisk, or chasen, focusing on the bamboo tines and the handle. You will use a simple convention: the whisk's overall height is divided into a handle zone and a tine zone, and each tine is drawn as a smooth curve from the handle base to the tine tip. Because hand-drawn whisk styles vary, the rubric accepts any tine count from 60 to 120 and any handle-to-tine height ratio between 1:2 and 1:3, provided the drawing is internally consistent and clearly labeled. All measurements below are hypothetical examples; measure your own paper and tools before drawing.
Practice materials: Printable downloads are not available for this lesson yet. Use the instructions and four exercises below.
Reference illustration
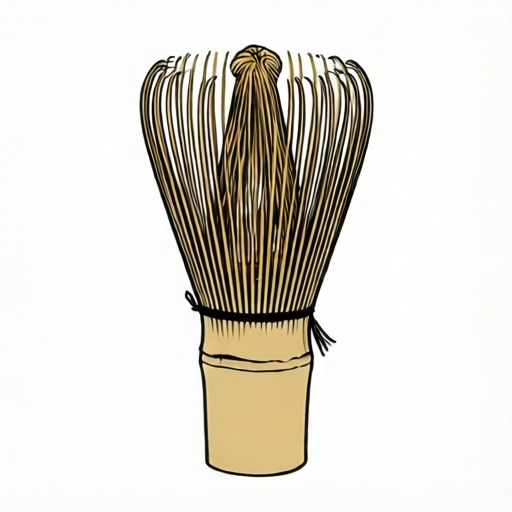
Use the stated measurements and conventions for each exercise.
Set the Overall Proportions
Begin by deciding the total height of your whisk drawing. For a practice sheet, a total height of 12 cm is a convenient hypothetical example. Divide this into a handle zone and a tine zone. A common chasen has a shorter handle and a longer tine section; a ratio of 1:2 (handle to tines) gives a 4 cm handle and an 8 cm tine zone. Mark these two zones lightly with a horizontal baseline and a midline.
The handle is a narrow cylinder. Draw two vertical lines about 1.5 cm apart for the handle width, centered on your vertical axis. The tine zone begins at the bottom of the handle and widens slightly before curving inward to the tips. Keep all measurements in the same unit, and label the total height, handle height, and tine height on your practice sheet.
- Draw a vertical center line 12 cm long (hypothetical example).
- Mark the handle zone from the top down to 4 cm; mark the tine zone from 4 cm to 12 cm.
- Draw the handle as two parallel vertical lines 1.5 cm apart, centered on the axis.
- Lightly sketch the outer tine envelope: a gentle outward bulge near the top of the tine zone, then a curve inward to the tips.
Arrange the Bamboo Tines
A chasen's tines are thin bamboo prongs that curve outward from the handle base and then inward toward the tips. Draw them in three groups: a central group, a left group, and a right group. For a practice drawing, use 80 tines total as a hypothetical example, split into 30 central, 25 left, and 25 right. Each tine starts at the handle base, follows a smooth curve, and ends at a tip along the lower arc.
Space the tines evenly within each group. The central tines are nearly vertical with a slight inward curl; the side tines curve more strongly outward before turning inward. Draw each tine as a single continuous line, then add a second parallel line for thickness if desired. Keep the tine tips aligned along a shallow arc so the whisk looks balanced.
- Mark the handle base as the starting line for all tines.
- Divide the lower arc into 80 evenly spaced tip positions (hypothetical example).
- Draw the 30 central tines first, using gentle S-curves.
- Add the 25 left and 25 right tines, increasing the outward curve toward the sides.
- Check that no two tines cross and that all tips lie on the same shallow arc.
Draw the Handle and Binding
The handle of a chasen is a short bamboo cylinder. Draw it with two vertical sides and a slightly rounded top. Add a binding band near the base of the handle where the tines begin; this band is a horizontal rectangle about 0.5 cm tall (hypothetical example). The binding helps visually separate the handle from the tines.
Inside the handle, add a few light vertical lines to suggest bamboo grain. Keep these lines subtle so they do not compete with the tines. At the top of the handle, draw a small oval to show the rounded end. Label the handle height and the binding height on your practice sheet.
- Draw the handle sides from the top mark to the handle base.
- Add a rounded top oval.
- Draw the binding band as a horizontal rectangle at the handle base.
- Add two or three light vertical grain lines inside the handle.
Refine the Tine Curves and Tips
Refine each tine by smoothing the curve from the handle base to the tip. The curve should be continuous, with no sharp kinks. For the central tines, the curve is nearly straight with a slight inward bend near the tip. For the side tines, the curve bows outward in the middle and then turns inward. Use a light eraser to remove construction lines after the tines are clear.
Check the tip arc: the tips should form a shallow curve that mirrors the outer envelope. If a tip falls outside the arc, adjust its curve. Finally, add a thin outline around the tine group to show the overall silhouette, but do not close the top of the tine zone; the tines remain separate.
- Smooth each tine curve with a single continuous stroke.
- Adjust any tip that falls outside the shallow tip arc.
- Erase construction lines lightly.
- Add a thin silhouette outline around the tine group, leaving individual tines visible.
Worked example
Draw a matcha whisk with a total height of 12 cm, a handle-to-tine ratio of 1:2, 80 tines, and a binding band. Label the handle height, tine height, and tine count.
Worked answer
The drawing shows a 12 cm vertical axis. The handle occupies the top 4 cm and the tine zone the lower 8 cm. The handle is 1.5 cm wide with a rounded top and a 0.5 cm binding band at its base. Eighty tines are arranged in three groups: 30 central, 25 left, and 25 right. Each tine curves from the handle base to a tip on a shallow lower arc. Labels read: total height 12 cm, handle 4 cm, tines 8 cm, tine count 80.
Four practice exercises
Exercise 1
A student draws a whisk with a total height of 15 cm and a handle height of 5 cm. What is the tine height, and is the handle-to-tine ratio within the accepted range?
Show answer and check
Tine height is 10 cm. The ratio is 5:10, or 1:2, which is within the accepted 1:2 to 1:3 range.
Why: Subtract the handle height from the total height: 15 cm minus 5 cm equals 10 cm. Compare the handle and tine heights as a ratio: 5 to 10 simplifies to 1 to 2.
Check: Re-add the handle and tine heights to confirm the total: 5 cm plus 10 cm equals 15 cm. Confirm the ratio 1:2 lies between 1:2 and 1:3.
Exercise 2
A drawing uses 90 tines split into three equal groups. How many tines are in each group? If the total height is 18 cm and the handle is 6 cm, what is the tine height?
Show answer and check
Each group has 30 tines. The tine height is 12 cm.
Why: Divide 90 by 3 to get 30 tines per group. Subtract the handle height from the total height: 18 cm minus 6 cm equals 12 cm.
Check: Multiply 30 by 3 to confirm 90 tines. Add 6 cm and 12 cm to confirm 18 cm total.
Exercise 3
A whisk drawing has a handle-to-tine ratio of 1:3 and a tine height of 9 cm. What is the handle height and the total height?
Show answer and check
Handle height is 3 cm; total height is 12 cm.
Why: A 1:3 ratio means the handle is one-third of the tine height. One-third of 9 cm is 3 cm. Add the handle and tine heights: 3 cm plus 9 cm equals 12 cm.
Check: Confirm the ratio 3:9 simplifies to 1:3. Re-add 3 cm and 9 cm to get 12 cm.
Exercise 4
A student draws 100 tines with 40 central, 30 left, and 30 right. The total height is 20 cm and the handle is 5 cm. State the tine height, the handle-to-tine ratio, and whether the tine count and grouping are acceptable.
Show answer and check
Tine height is 15 cm. The ratio is 5:15, or 1:3, which is acceptable. The tine count of 100 is within 60 to 120, and the groups sum to 100, so the grouping is acceptable.
Why: Subtract 5 cm from 20 cm to get 15 cm. Simplify 5:15 to 1:3. Check that 100 is between 60 and 120 and that 40 plus 30 plus 30 equals 100.
Check: Re-add 5 cm and 15 cm to confirm 20 cm. Confirm 1:3 is within the accepted range. Re-add the group counts to confirm 100.
Common mistakes
- Drawing all tines as straight lines. Use gentle curves: central tines nearly straight with a slight inward tip, side tines bowing outward before turning inward.
- Making the handle too wide or too tall relative to the tines. Use a handle-to-tine height ratio between 1:2 and 1:3 and a handle width about one-eighth of the total height.
- Letting tines cross or bunch unevenly. Space tips evenly along the lower arc and draw each tine from a distinct starting point at the handle base.
- Forgetting the binding band at the handle base. Add a horizontal rectangle about 0.5 cm tall (hypothetical example) where the handle meets the tines.
Self-check rubric
- Total height, handle height, and tine height are labeled and use the same unit.
- Handle-to-tine height ratio is between 1:2 and 1:3.
- Tine count is between 60 and 120 and is stated on the drawing.
- Tines are drawn as smooth curves with no crossings.
- Tine tips lie on a shallow arc and are evenly spaced within groups.
- Handle is a narrow cylinder with a rounded top and a binding band at its base.
- Drawing is balanced and internally consistent; valid alternative styles are accepted.
Questions and answers
How many tines should I draw?
Any count from 60 to 120 is acceptable under this convention. Choose a number you can space evenly, such as 80, and keep the groups balanced.
What ratio should the handle and tines use?
Use a handle-to-tine height ratio between 1:2 and 1:3. For a 12 cm total height, a 4 cm handle and 8 cm tine zone is one valid example.
Do the tines need to be perfectly symmetrical?
No. Hand-drawn whisk styles vary. The drawing should be balanced and internally consistent, but small asymmetries are acceptable if the tip arc and tine spacing remain clear.
How do I check my drawing?
Measure the total height, handle height, and tine height; confirm the ratio is within 1:2 to 1:3. Count the tines and check that tips lie on a shallow arc without crossings.