Free original lessons
Pencil Pine Tree Drawing: Tiered Branches and Needle Strokes
Learn to draw a pine tree in pencil using tiered branch scaffolds, directional needle strokes, and simple cone detail. Includes practice tasks and a rubric.
Free lesson
Four exercises
Worked answers
Object Drawing Lessons
This lesson teaches a reliable pencil method for drawing a pine tree with tiered branches, needle strokes, and cone detail. You will build the tree from a central trunk and stacked branch tiers, then add needles in consistent directions and place cones where branches meet the trunk. The convention for needle strokes is a short, tapered mark made from the branch line outward, with the tip lifting slightly. Letter styles and handwriting vary, so the rubric rewards clear direction and spacing rather than one exact stroke shape. All measurements are hypothetical examples; measure your own paper and pencil before starting.
Practice materials: Printable downloads are not available for this lesson yet. Use the instructions and four exercises below.
Reference illustration
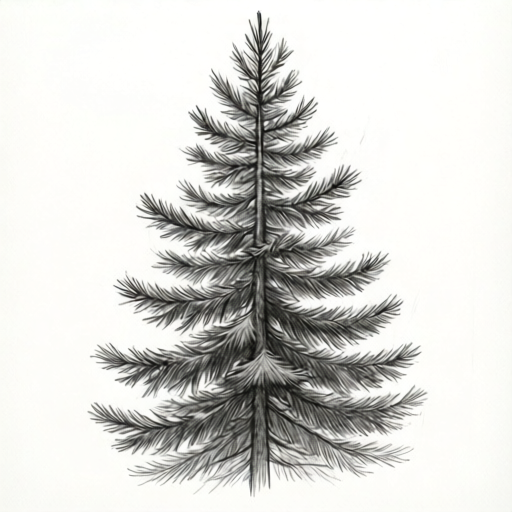
Use the stated measurements and conventions for each exercise.
Build the tiered branch scaffold
Start with a light vertical trunk line. Mark a top point and a base point. Divide the trunk into three or four tiers, with the lowest tier widest and each higher tier narrower. For a hypothetical example on A4 paper, place the top at 4 cm from the page top and the base at 24 cm, giving a 20 cm trunk. Tier heights might be 5 cm each.
For each tier, draw a shallow downward curve from the trunk outward on both sides. The branch line should droop slightly at the tip. Keep the scaffold light so it can be adjusted. Check that the left and right branch lengths are similar within each tier, and that lower tiers extend farther than upper tiers.
- Draw a light vertical trunk line and mark top and base points.
- Divide the trunk into three or four equal-height tiers.
- Draw a shallow drooping branch line outward from each tier on both sides.
- Compare tier widths: lowest widest, highest narrowest.
Add needle strokes with a consistent convention
Define your needle-stroke convention before drawing: a short mark that begins at the branch line and travels outward, tapering as the pencil lifts. Strokes should fan slightly around the branch, not cross the trunk. Work in small groups along each branch, leaving gaps for air and cone placement.
Use a sharp pencil and light pressure. For a hypothetical example, make strokes about 1 cm long on lower branches and 0.6 cm on upper branches. Vary stroke length slightly to avoid a mechanical look. Check direction by looking along each branch: strokes should point away from the trunk and follow the branch angle.
- Choose a stroke length for lower and upper branches.
- Start at the branch line and stroke outward, lifting at the tip.
- Fan strokes slightly around the branch direction.
- Leave small gaps between stroke groups for air.
Place cones and refine contrast
Draw cones as small oval or teardrop shapes hanging near the trunk where branches meet. Add a few short scale marks on each cone, using curved lines that follow the cone surface. Keep cones sparse: two or three per tier is enough for a clear pine character.
Refine contrast by darkening the trunk edges and the undersides of branch tiers. Keep the needle strokes lighter than the trunk so the tree does not become muddy. Check that cones are attached to a branch or trunk line, not floating.
- Draw small oval cones near the trunk at branch junctions.
- Add short curved scale marks on each cone.
- Darken trunk edges and branch undersides lightly.
- Confirm every cone touches a branch or trunk line.
Worked example
On a 20 cm trunk divided into four 5 cm tiers, the lowest tier extends 6 cm each side and the next tier 4.5 cm each side. If each higher tier is 1.5 cm shorter per side than the one below, what is the total width of the top tier?
Worked answer
The top tier extends 1.5 cm each side, so its total width is 3 cm.
Why: Tier widths per side: 6, 4.5, 3, 1.5 cm. The top tier is 1.5 cm per side, and total width is 1.5 + 1.5 = 3 cm.
Check: Subtract 1.5 cm three times from 6 cm to reach 1.5 cm, then double the per-side value.
Four practice exercises
Exercise 1
A pine tree has a 16 cm trunk divided into four equal tiers. The lowest tier extends 5 cm each side. Each higher tier is 1 cm shorter per side. What is the total width of the second tier from the bottom?
Show answer and check
8 cm.
Why: Second tier per side is 5 - 1 = 4 cm. Total width is 4 + 4 = 8 cm.
Check: Add the two per-side lengths: 4 cm + 4 cm = 8 cm.
Exercise 2
You plan needle strokes 1 cm long on lower branches and 0.6 cm long on upper branches. If a lower branch has 12 stroke groups and each group uses 3 strokes, how many lower-branch strokes are drawn?
Show answer and check
36 strokes.
Why: 12 groups times 3 strokes per group equals 36 strokes.
Check: Multiply groups by strokes per group: 12 x 3 = 36.
Exercise 3
A cone is drawn as an oval 2 cm tall and 1 cm wide. If you place three cones per tier on a four-tier tree, how many cones are drawn in total?
Show answer and check
12 cones.
Why: Three cones per tier times four tiers equals 12 cones.
Check: Multiply cones per tier by number of tiers: 3 x 4 = 12.
Exercise 4
A branch line droops 1 cm over a 6 cm horizontal run. If you shorten the horizontal run to 3 cm while keeping the same droop ratio, what is the new droop in centimetres?
Show answer and check
0.5 cm.
Why: The ratio is 1 cm droop per 6 cm run. Half the run gives half the droop: 3 cm run gives 0.5 cm droop.
Check: Divide the run by 6 and multiply by 1 cm: 3 / 6 x 1 = 0.5 cm.
Common mistakes
- Drawing all branch tiers the same width. Make lower tiers wider and upper tiers narrower; check widths against the trunk height.
- Needle strokes crossing the trunk or pointing inward. Start each stroke at the branch line and travel outward, lifting at the tip.
- Cones floating in empty space. Attach each cone to a branch junction or the trunk line.
- Making needle strokes too dark and uniform. Use light pressure and vary stroke length slightly within each group.
Self-check rubric
- Trunk is vertical and tier heights are clearly marked.
- Lower tiers are wider than upper tiers, with left and right lengths similar.
- Needle strokes follow the defined convention: start at branch line, travel outward, taper at tip.
- Stroke direction is consistent along each branch and does not cross the trunk.
- Cones touch a branch or trunk line and include simple scale marks.
- Contrast is controlled: trunk edges darker, needle strokes lighter.
- Valid alternatives are accepted if direction, spacing, and attachment are clear.
Questions and answers
How many tiers should the pine tree have?
Three or four tiers work well. Use fewer for a simple tree and more for a taller silhouette, keeping lower tiers wider.
What is the needle-stroke convention?
A short tapered mark from the branch line outward, with the pencil lifting at the tip. Strokes fan slightly around the branch direction.
Do I need to draw every needle?
No. Draw grouped strokes along each branch and leave gaps. The goal is a clear pine texture, not a complete needle count.
How do I check cone placement?
Each cone should touch a branch or trunk line. If a cone floats, move it to a junction or remove it.