Free original lessons
Draw a Realistic Cowboy Boot: Leather Shading and Stitch Detail
Learn to construct a cowboy boot silhouette, apply leather tonal shading, and place stitch lines with a clear convention and checkable rubric.
Free lesson
Four exercises
Worked answers
Object Drawing Lessons
This lesson teaches a repeatable method for drawing a realistic cowboy boot with leather shading and stitching. You will build the silhouette from simple measured proportions, establish a light direction, layer leather values, and add stitch lines using an explicitly defined convention. The convention is: stitches are short evenly spaced marks that sit on the surface, with each mark angled to follow the seam direction; spacing is measured in millimeters on your paper and may be adjusted for scale. Because letter styles and x-height vary, the rubric rewards consistent, intentional choices rather than one universal answer. All numerical values below are hypothetical examples; measure your own paper and tools before committing to a scale.
Practice materials: Printable downloads are not available for this lesson yet. Use the instructions and four exercises below.
Reference illustration
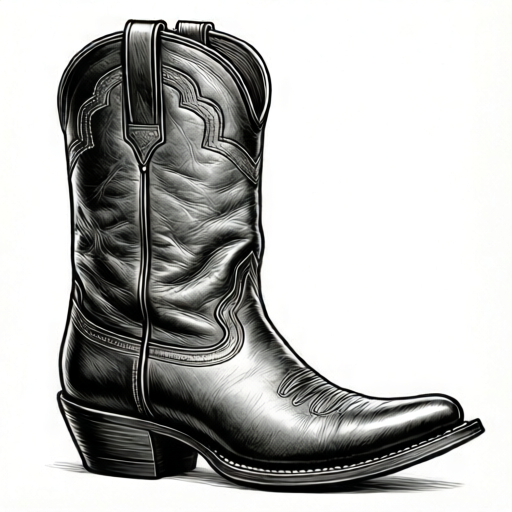
Use the stated measurements and conventions for each exercise.
Construct the boot silhouette from measured proportions
Begin with a vertical center line for the boot shaft. Choose a shaft height in millimeters, for example 120 mm, and mark it. The foot length is typically about 1.4 to 1.6 times the shaft height in a stylized realistic boot; for this example use 170 mm. Mark the toe tip and heel back on a horizontal baseline. The heel block height is about one third of the foot length, so 55 mm in this example. The toe spring rises about 15 mm above the baseline.
Draw the shaft as two gently curved sides that taper slightly toward the ankle. The ankle width is roughly half the shaft top width. Connect the ankle to the foot with a smooth curve, then shape the toe as a rounded wedge and the heel as a stacked block with a slight backward lean. Keep all curves continuous; avoid sharp corners except at the heel base and the top opening.
- Mark a vertical center line and a horizontal baseline on your paper.
- Measure and mark shaft height (example 120 mm), foot length (example 170 mm), heel height (example 55 mm), and toe spring (example 15 mm).
- Draw the shaft sides with a slight taper toward the ankle.
- Connect ankle to foot with a smooth curve, then shape toe and heel block.
- Check that the foot length is about 1.4 to 1.6 times the shaft height and adjust before shading.
Establish a light direction and leather value scale
Choose one light direction and state it, for example upper left. Leather is a semi-gloss material, so it shows a broad mid-tone, a soft core shadow, a narrow highlight, and reflected light near the lower edge. Make a five-step value scale on scrap paper: lightest highlight, light mid-tone, mid-tone, dark mid-tone, and core shadow. Label each step with a number 1 to 5 so you can check consistency.
Apply values in layers. First block the mid-tone over the whole boot except the highlight zone. Then add the dark mid-tone on the side away from the light. Finally add the core shadow along the underside of the toe, the back of the heel, and the inner shaft curve. Keep the highlight narrow and place it on the upper-left of the shaft and the top of the toe. Reflected light is a thin lighter band just inside the core shadow; it should never be as light as the highlight.
- State the light direction in one sentence before shading.
- Create and label a five-step value scale.
- Block mid-tone over the boot, leaving the highlight zone clear.
- Add dark mid-tone away from the light and core shadow under toe and heel.
- Add a narrow highlight and a thin reflected-light band, then check values against the scale.
Place stitch lines with a defined convention
Use the convention: stitch marks are short dashes about 2 mm long with 2 mm gaps, angled to follow the seam direction. On a 170 mm foot, 2 mm marks with 2 mm gaps give roughly 42–43 marks along a full seam; this is a hypothetical example, so measure your own spacing and keep it consistent. Place stitch lines along the shaft top opening, the side seam from ankle to shaft top, the vamp seam across the instep, and the heel block edge.
Stitches should sit on the surface, not float beside the seam. Draw them after shading so they remain visible; use a slightly darker value than the surrounding leather. Vary stitch angle only when the seam curves, and keep spacing even. Check by counting marks over a 20 mm section: with 2 mm length and 2 mm gap you should count about five marks. Adjust spacing if the count is inconsistent.
- Mark seam paths lightly before adding stitches.
- Draw short dashes angled along each seam with even spacing.
- Use a darker value than the leather beneath.
- Count marks over a 20 mm section to check spacing consistency.
- Confirm stitches follow seam curves without crossing the seam line.
Refine edges, heel stack, and final contrast
Strengthen the silhouette by darkening the outer contour only where the form turns away from the light. The heel stack should show two or three horizontal layers; draw thin darker lines between layers and keep the front edge lighter. The toe box needs a soft gradient from highlight to core shadow, not a hard line. Finally, compare the darkest core shadow to the lightest highlight: the contrast should be clear but not pure black against pure white.
Check the whole drawing at arm's length. If the boot reads as flat, increase the dark mid-tone on the shadow side. If stitches disappear, darken them slightly or widen the gap. If the heel looks unstable, check that the heel base sits on the baseline and the backward lean is consistent with the shaft curve.
- Darken contour only on the shadow side.
- Add two or three heel stack layers with thin darker lines.
- Soften the toe gradient and keep the highlight narrow.
- Compare darkest and lightest values for clear but not extreme contrast.
- View at arm's length and adjust flatness or stitch visibility.
Worked example
A boot with shaft height 100 mm, foot length 150 mm, heel height 50 mm, and light from upper right. Describe the shading and stitch placement.
Worked answer
Foot length is 1.5 times shaft height, which fits the 1.4 to 1.6 range. Place the highlight on the upper-right shaft and top-right toe. Put core shadow on the left side of the shaft, under the toe, and at the back of the heel. Add a thin reflected-light band inside the left core shadow. Draw stitch lines along the shaft top, the left side seam, the vamp seam, and the heel block edge, using short dashes angled along each seam with even spacing. Keep stitches darker than the leather and count about five marks per 20 mm section if using 2 mm marks and 2 mm gaps.
Four practice exercises
Exercise 1
A boot has shaft height 90 mm and foot length 135 mm. Is the foot length within the 1.4 to 1.6 ratio? Show the arithmetic.
Show answer and check
Yes. 135 divided by 90 equals 1.5, which is within 1.4 to 1.6.
Why: Divide foot length by shaft height to get the ratio, then compare to the stated range.
Check: Recompute 90 times 1.5 to confirm 135 mm.
Exercise 2
Using 2 mm stitch marks and 2 mm gaps, how many marks fit in a 20 mm seam section?
Show answer and check
About five marks.
Why: Each mark plus gap uses 4 mm, so 20 divided by 4 equals 5.
Check: Multiply 5 marks by 4 mm to confirm 20 mm total.
Exercise 3
A boot has foot length 160 mm and heel height 50 mm. Is the heel about one third of the foot length? Show the arithmetic.
Show answer and check
Yes. 160 divided by 3 is about 53.3 mm, and 50 mm is close to one third.
Why: One third of foot length is foot length divided by 3; compare the result to the heel height.
Check: Multiply 50 mm by 3 to get 150 mm, which is close to 160 mm.
Exercise 4
Light comes from upper left. Name where the highlight, core shadow, and reflected light should go on the shaft and toe.
Show answer and check
Highlight on upper-left shaft and top-left toe; core shadow on right side of shaft and under the toe; reflected light as a thin band inside the right core shadow.
Why: The side facing the light receives the highlight, the opposite side receives core shadow, and reflected light sits just inside the core shadow.
Check: Confirm that highlight and core shadow are on opposite sides and that reflected light is lighter than core shadow but darker than highlight.
Common mistakes
- Making the foot too short relative to the shaft, so the boot looks like a tube. Measure foot length and shaft height; adjust foot length to about 1.4 to 1.6 times shaft height before shading.
- Using multiple light directions, which flattens the leather. State one light direction and place highlight, core shadow, and reflected light consistently from that direction.
- Drawing stitches as a continuous dashed line that floats off the seam. Lightly mark the seam first, then place short dashes on the seam with even spacing and a darker value.
- Making the heel a single flat block with no layers. Add two or three horizontal stack layers with thin darker lines and keep the front edge lighter.
Self-check rubric
- Silhouette proportions: foot length is about 1.4 to 1.6 times shaft height, heel height about one third of foot length, and toe spring is visible.
- Light direction: one direction is stated and highlight, core shadow, and reflected light are consistent with it.
- Leather values: at least four distinct values from the five-step scale are used, with a narrow highlight and a soft core shadow.
- Stitch convention: short dashes sit on seams, follow seam direction, have even spacing, and are darker than the leather.
- Heel stack: two or three layers are shown with thin darker lines and a lighter front edge.
- Alternative choices: any consistent scale, spacing, or light direction is acceptable if the drawing follows the stated convention and remains checkable.
Questions and answers
Do I need special paper or tools?
No. Use any paper and a pencil or pen. Measure your actual paper and tools, and label any chosen numerical values as hypothetical examples.
How long should stitches be?
Use the convention of about 2 mm marks with 2 mm gaps as a hypothetical example, then measure your own spacing and keep it consistent.
Can I change the light direction?
Yes. Choose one direction and keep highlight, core shadow, and reflected light consistent with it throughout the drawing.
What if my boot looks flat?
Increase the dark mid-tone on the shadow side and narrow the highlight. Check values against your five-step scale.