Free original lessons
Realistic Owl Face Drawing: Facial Disk, Eye Rings, and Beak Placement
Learn to draw a realistic owl face close-up with a proportion guide, eye-ring construction, beak placement, and tonal shading steps using a simple convention.
Free lesson
Four exercises
Worked answers
Object Drawing Lessons
This lesson focuses on the close-up structure of an owl face: the facial disk, the eye rings, and the beak. You will use a defined drawing convention to place features proportionally, build the eyes with layered rings, and shade the facial disk to suggest soft feathers without drawing individual feather texture. All measurements are relative to the face width you choose, so the method works at any scale. The resources described are planned as free printables but are not yet produced; the instructional text below is self-contained and can be followed with plain paper and a pencil.
Practice materials: Printable downloads are not available for this lesson yet. Use the instructions and four exercises below.
Reference illustration
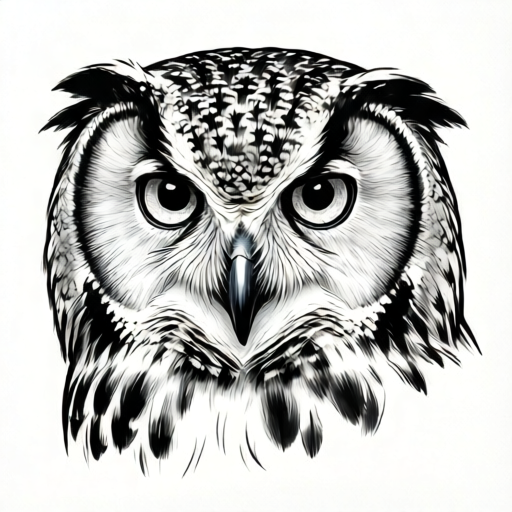
Use the stated measurements and conventions for each exercise.
Setting Up the Facial Disk Proportion Guide
Begin by drawing a light vertical center line and a horizontal midline. The facial disk is the shallow heart-shaped or rounded region that frames the owl's face. For this convention, define the face width as the distance between the outer edges of the facial disk at its widest point. Mark the top of the head and the bottom of the chin so the face height is about 1.2 times the face width. This ratio is a hypothetical example chosen for a rounded owl face; measure your own drawing to keep it consistent.
Place the eye line slightly above the horizontal midline, at roughly 45 percent of the face height from the top. The beak base sits on the vertical center line about 60 percent of the face height from the top. These positions are conventions, not universal truths; different owl species vary. Keep your chosen values labeled as hypothetical examples and check them with simple arithmetic before committing to dark lines.
- Draw a light vertical center line and a horizontal midline on your paper.
- Mark the face width between the widest points of the planned facial disk.
- Set the face height to 1.2 times the face width and mark top and chin.
- Place the eye line at 45 percent of face height from the top.
- Mark the beak base on the center line at 60 percent of face height from the top.
Constructing the Eye Rings and Eye Detail
Each eye is built from concentric rings. First draw a light circle for the outer eye ring, with a diameter about 30 percent of the face width. Inside it, draw the iris circle at about 60 percent of the outer ring diameter, and the pupil at about 35 percent of the iris diameter. These percentages are hypothetical examples for a forward-facing owl; adjust them if your reference shows a different eye size, but keep the arithmetic checkable.
The pupil should sit slightly toward the center line to suggest focus. Add a small highlight as an unfilled shape at the upper edge of the pupil. The eye ring is not a perfect circle in many owls; you may use a slightly oval or tilted ring, and that is a valid alternative under this convention. Shade the iris with light strokes that follow the ring direction, leaving the highlight clear.
- Draw the outer eye ring at 30 percent of face width.
- Add the iris at 60 percent of the outer ring diameter.
- Add the pupil at 35 percent of the iris diameter, offset slightly toward the center line.
- Leave a small highlight unfilled at the upper pupil edge.
- Shade the iris with curved strokes that follow the ring, keeping the highlight clear.
Placing the Beak and Shading the Facial Disk
The beak is a short, downward-pointing wedge centered between the eyes. Its base width is about 15 percent of the face width, and its visible length is about 20 percent of the face height. Draw the beak after the eyes so you can judge the gap between the eye rings and the beak. A small gap of about 5 percent of face width on each side keeps the features from crowding.
Shade the facial disk with soft, directional strokes that radiate outward from the eyes and beak. Use three tonal zones: light near the center, medium at the sides, and dark at the outer edge. Do not draw individual feather shapes across the disk; the goal is a smooth tonal gradient that suggests soft plumage. Keep the eye rings and beak edges crisp by shading around them rather than over them.
- Draw the beak base at 15 percent of face width and length at 20 percent of face height.
- Check a 5 percent face-width gap between each eye ring and the beak.
- Shade the center of the facial disk lightly with radiating strokes.
- Add medium tone at the sides and dark tone at the outer edge.
- Refine the eye ring and beak edges by shading around them, not across them.
Worked example
A face width is 10 cm. Using the convention, find the face height, eye line position from the top, outer eye ring diameter, iris diameter, pupil diameter, beak base width, and beak length. Show the arithmetic.
Worked answer
Face height = 1.2 × 10 = 12 cm. Eye line from top = 0.45 × 12 = 5.4 cm. Outer eye ring diameter = 0.30 × 10 = 3 cm. Iris diameter = 0.60 × 3 = 1.8 cm. Pupil diameter = 0.35 × 1.8 = 0.63 cm. Beak base width = 0.15 × 10 = 1.5 cm. Beak length = 0.20 × 12 = 2.4 cm. Check: the gap between each eye ring and the beak is about 0.05 × 10 = 0.5 cm, so the two eye rings plus beak base plus gaps should fit within the face width: 3 + 3 + 1.5 + 0.5 + 0.5 = 8.5 cm, leaving 1.5 cm for outer margins, which is consistent.
Four practice exercises
Exercise 1
A face width is 8 cm. Calculate the face height, eye line from the top, outer eye ring diameter, iris diameter, and pupil diameter using the lesson convention.
Show answer and check
Face height = 9.6 cm; eye line from top = 4.32 cm; outer eye ring = 2.4 cm; iris = 1.44 cm; pupil = 0.504 cm.
Why: Multiply face width by 1.2 for height, then height by 0.45 for eye line. Multiply face width by 0.30 for outer ring, then outer ring by 0.60 for iris, then iris by 0.35 for pupil.
Check: Recompute each value and confirm the pupil is smaller than the iris, which is smaller than the outer ring; sum the two outer rings plus beak base and gaps to ensure they fit within 8 cm.
Exercise 2
A face width is 12 cm and face height is 14.4 cm. Find the beak base width, beak length, and the gap on each side between an eye ring and the beak. Then state whether two 3.6 cm eye rings plus the beak base and two gaps fit within the face width.
Show answer and check
Beak base width = 1.8 cm; beak length = 2.88 cm; gap each side = 0.6 cm. Two eye rings = 7.2 cm; plus beak base 1.8 cm plus two gaps 1.2 cm equals 10.2 cm, which fits within 12 cm with 1.8 cm remaining for outer margins.
Why: Use 0.15 of face width for beak base, 0.20 of face height for beak length, and 0.05 of face width for each gap. Add the components and compare to face width.
Check: Verify the arithmetic: 7.2 + 1.8 + 1.2 = 10.2, and 12 − 10.2 = 1.8. Confirm the remaining margin is positive and roughly balanced on both sides.
Exercise 3
An eye ring is drawn as an oval 4 cm wide and 3 cm tall. Using the lesson percentages measured from the ring width, find the iris width and pupil width. Explain whether an oval ring is allowed.
Show answer and check
Iris width = 2.4 cm; pupil width = 0.84 cm. An oval ring is allowed as a valid alternative under the convention.
Why: Measure the iris at 0.60 of the ring width and the pupil at 0.35 of the iris width. The convention explicitly permits oval or tilted rings.
Check: Check that 2.4 is 60 percent of 4, and 0.84 is 35 percent of 2.4. Confirm the pupil is centered within the iris and the highlight remains clear.
Exercise 4
A drawing has a face width of 9 cm. The eye line is placed at 5 cm from the top and the face height is 11 cm. Using the lesson convention, calculate the correct eye line from the top and state the difference. Then calculate the outer eye ring diameter and the beak base width.
Show answer and check
Correct eye line = 0.45 × 11 = 4.95 cm; difference = 5 − 4.95 = 0.05 cm. Outer eye ring = 0.30 × 9 = 2.7 cm; beak base width = 0.15 × 9 = 1.35 cm.
Why: The eye line is a percentage of face height, not face width. Subtract the correct value from the placed value to find the difference. Use face width for ring and beak base percentages.
Check: Recompute 0.45 × 11 and 0.30 × 9 and 0.15 × 9. Confirm the difference is small and that the ring and beak values are consistent with the face width.
Common mistakes
- Making the facial disk a perfect circle. Use a shallow heart or rounded shape that is slightly wider at the eye line and narrows toward the chin; check the width at three heights.
- Placing the eyes too low or too close to the beak. Re-measure the eye line at 45 percent of face height and keep a 5 percent face-width gap between each eye ring and the beak.
- Drawing individual feathers across the facial disk. Shade with soft radiating strokes in three tonal zones instead of outlining feather shapes.
- Making the pupil too large and losing the iris ring. Keep the pupil at about 35 percent of the iris diameter and leave a clear highlight at the upper edge.
Self-check rubric
- Facial disk width and height follow the chosen ratio within 10 percent.
- Eye line and beak base positions match the stated percentages within 10 percent.
- Eye rings are concentric and the iris and pupil percentages are measured from the outer ring.
- A clear highlight is left unfilled at the upper pupil edge.
- Beak base width and length match the stated percentages within 10 percent.
- Facial disk shading uses three tonal zones with radiating strokes and no individual feather outlines.
- Valid alternatives such as oval eye rings or a slightly asymmetric facial disk are accepted if the proportional checks still pass.
Questions and answers
Do I need a reference photo?
A reference helps, but the proportion guide and ring construction in this lesson are self-contained. You can draw from the described convention and adjust values if you have a reference.
Can the eye rings be oval instead of circular?
Yes. The convention allows slightly oval or tilted rings as valid alternatives, as long as the iris and pupil percentages are measured from the outer ring.
How do I keep the shading smooth without feather texture?
Use light pressure and radiating strokes, building from light center to dark edge in three zones. Blend by overlapping strokes rather than erasing.
What if my face width changes mid-drawing?
Re-measure all percentages from the new face width and adjust the eye line, beak base, and ring sizes with simple arithmetic before darkening lines.