Free original lessons
Realistic Sloth Drawing: Fur Direction and Face Rendering
Learn to draw a realistic sloth head and body with correct fur-stroke direction, tonal shading, and expressive facial features using a clear proportion guide.
Free lesson
Four exercises
Worked answers
Object Drawing Lessons
This lesson focuses on the two elements that make a sloth drawing read as realistic rather than cartoonish: the direction and texture of its fur, and the careful rendering of its face. You will work from a simple head-and-body proportion guide, follow fur-stroke direction arrows, apply tonal shading, and practice on a blank sloth outline. The convention for fur strokes is explicit: each stroke is a short, slightly curved line that begins at the skin surface and tapers toward the tip, drawn in the direction the fur naturally lies. Because individual letter styles and stroke habits vary, the rubric rewards consistent direction and believable taper rather than a single exact line shape. All measurements and numerical examples are hypothetical and should be checked against your own paper and tools.
Practice materials: Printable downloads are not available for this lesson yet. Use the instructions and four exercises below.
Reference illustration
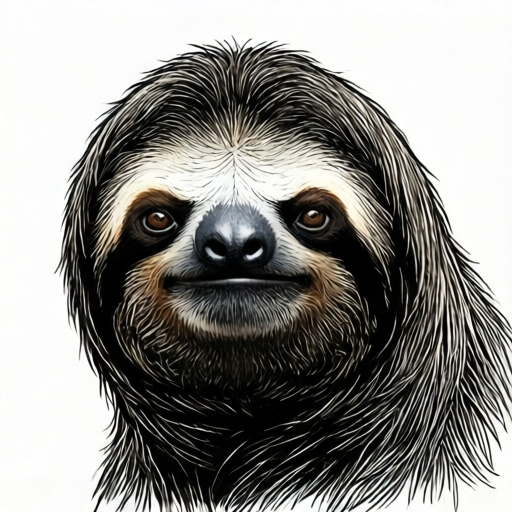
Use the stated measurements and conventions for each exercise.
Proportion Guide for a Sloth Head and Body
Begin by establishing a simple framework. Draw a large oval for the body and a smaller circle for the head, overlapping slightly at the neck. A useful hypothetical proportion is a body oval about twice as wide as the head circle, with the head positioned slightly forward and low. Mark a vertical midline through the head and body to keep symmetry, then a horizontal midline across the face at eye level.
Place the eyes as two small ovals on the horizontal midline, spaced about one eye-width apart. The nose sits below the eyes on the vertical midline, and the mouth is a short curve beneath the nose. Keep the ears small and rounded, set high and slightly back on the head. These guides are starting points; adjust them to match the specific sloth reference you are drawing.
- Draw a large body oval and a smaller head circle overlapping at the neck.
- Add a vertical midline through both shapes and a horizontal eye-level line on the head.
- Mark eye positions, nose, mouth, and small rounded ears.
- Lightly indicate the long front limbs hanging from the shoulders.
Fur-Stroke Direction and Texture
Sloth fur lies in distinct directions across the body. On the head, strokes generally flow from the forehead down and outward toward the cheeks. On the body, strokes sweep from the spine downward and slightly outward, following the curve of the torso. On the limbs, strokes run lengthwise from shoulder to paw. Use short, tapered strokes rather than long continuous lines; overlapping them in layers creates depth.
Define your stroke convention clearly: each stroke starts with slight pressure at the skin end and lifts gradually to a fine tip. Vary stroke length and spacing to suggest clumps of fur. Avoid drawing every hair; instead, group strokes into patches that follow the underlying form. A hypothetical example is three to five strokes per small patch, with gaps between patches to suggest shadow.
- Lightly draw direction arrows on your guide: down-and-out on the head, down-and-out on the body, lengthwise on limbs.
- Practice short tapered strokes on scrap paper, checking that each starts firm and ends fine.
- Layer strokes in patches, leaving small gaps for shadow.
- Refine edges so fur follows the curve of the body rather than lying flat.
Tonal Shading and Facial Rendering
Shading gives the sloth form. Decide on a light source, for example from the upper left, and shade the opposite side of the body and the underside of the head. Use gentle gradients: darker near the spine and under the chin, lighter on the forehead and upper cheeks. Keep the eyes dark and glossy with a small highlight, and render the nose as a soft rounded shape with a subtle shadow beneath it.
The face should remain the focal point. Draw the eye patches as darker fur areas that frame the eyes, and keep the muzzle lighter. Add a few fine strokes around the eyes and mouth to suggest short facial fur. Check that the shading supports the fur direction: strokes in shadowed areas can be denser and slightly darker, while lit areas use fewer, lighter strokes.
- Choose a light source and mark shaded areas lightly.
- Build tonal layers from light to dark, keeping edges soft.
- Render eyes with a dark iris and a small highlight; shape the nose with a soft shadow beneath.
- Add fine facial fur strokes around eyes and muzzle, then check contrast against the body.
Worked example
Using the proportion guide, draw a sloth head and upper body with fur direction arrows and one light source from the upper left. Apply short tapered strokes and shade the lower right side.
Worked answer
The drawing shows a body oval about twice the width of the head circle, with the head low and forward. Eyes are small ovals on the eye-level line, the nose sits below, and small ears are set high. Fur strokes on the head flow down and outward; body strokes sweep down and outward from the spine; limb strokes run lengthwise. Shading is darker on the lower right and under the chin, with lighter strokes on the upper left. The face remains the focal point with dark eye patches and a small highlight in each eye.
Four practice exercises
Exercise 1
Draw only the head of a sloth using the proportion guide. Place the eyes on the horizontal midline, add the nose and mouth, and draw fur strokes that flow down and outward from the forehead to the cheeks. Use one light source from the upper right.
Show answer and check
A head circle with a vertical midline and a horizontal eye-level line. Two small eye ovals sit on the midline, spaced about one eye-width apart. The nose is below the eyes on the vertical midline, and the mouth is a short curve beneath. Fur strokes taper from forehead down and outward toward the cheeks. Shading is darker on the lower left, lighter on the upper right.
Why: This isolates facial proportion and head fur direction, the two features most responsible for a realistic look. The light source is fixed so shading can be checked consistently.
Check: Verify that eyes lie on the horizontal midline, the nose is on the vertical midline, and every fur stroke tapers and points down-and-out. Check that the darker shading is on the side opposite the upper-right light.
Exercise 2
Draw a body oval with a spine line down the center. Add fur strokes that sweep from the spine downward and slightly outward on both sides. Use three to five strokes per patch and leave small gaps between patches. Shade the lower half more densely than the upper half.
Show answer and check
A body oval with a central spine line. Strokes on each side begin near the spine and sweep down and outward, grouped in patches of three to five tapered strokes with gaps. The lower half has denser, slightly darker strokes; the upper half has fewer, lighter strokes.
Why: This practices body fur direction and tonal grouping without the distraction of the face. Patch density is a simple, checkable way to build shadow.
Check: Count strokes in a few patches to confirm three to five per patch. Check that all strokes point down and outward from the spine and that the lower half is visibly denser or darker.
Exercise 3
Draw a front limb hanging from the shoulder. Use lengthwise fur strokes from shoulder to paw, with a light source from the left. Add a darker band of strokes along the right edge of the limb.
Show answer and check
A tapered limb shape from shoulder to paw. Fur strokes run lengthwise, starting firm near the shoulder end and tapering toward the paw. The left side is lighter with fewer strokes; the right edge has a denser, darker band of strokes.
Why: Limb fur direction differs from body fur, so this exercise checks that the student can switch direction and still apply the taper convention.
Check: Confirm strokes are lengthwise, not diagonal or horizontal. Check taper at the paw end and verify the darker band is on the right edge, opposite the left light source.
Exercise 4
Combine head and body into one drawing. Use the proportion guide, add direction arrows before drawing fur, and apply shading from a single light source. Then write one sentence explaining how your fur direction matches the arrows.
Show answer and check
A complete head-and-body drawing with a body oval about twice the head width, eyes on the eye-level line, and fur strokes following the arrows: down-and-out on the head, down-and-out from the spine on the body, and lengthwise on the limbs. Shading is consistent with one light source. The sentence explains that head strokes flow toward the cheeks, body strokes sweep from the spine outward, and limb strokes run from shoulder to paw.
Why: This integrates proportion, direction, taper, and shading, and the written sentence makes the student's reasoning checkable.
Check: Compare the drawing to the guide for head-to-body ratio and eye placement. Trace a few strokes to confirm they match the arrows. Read the sentence and check it names the three fur directions correctly.
Common mistakes
- Drawing fur as long, straight parallel lines across the whole body. Use short tapered strokes grouped in patches that follow the body's curves and the direction arrows.
- Making the eyes too large and perfectly round, giving a cartoon look. Keep eyes small ovals on the eye-level line and add dark eye patches to frame them realistically.
- Shading evenly everywhere so the form looks flat. Choose one light source and vary stroke density and tone, leaving lighter areas on the lit side.
- Ignoring the proportion guide and letting the head become too large. Recheck the head-to-body ratio against your guide and adjust the head circle before adding detail.
Self-check rubric
- Proportion: head and body sizes match the guide within a reasonable adjustment, and eye placement is on the eye-level line.
- Fur direction: strokes consistently follow the defined arrows on head, body, and limbs.
- Stroke convention: strokes start firm at the skin end and taper to a fine tip; valid alternative stroke shapes are accepted if taper and direction are consistent.
- Shading: one clear light source is evident, with darker tones on the shaded side and softer edges.
- Face rendering: eyes are small with highlights, nose is soft and rounded, and facial fur frames the features without overwhelming them.
Questions and answers
Do I need a reference photo to draw a realistic sloth?
A reference helps, but the proportion guide and direction arrows in this lesson are enough to practice the key skills. Use the guide to check head size, eye placement, and fur flow.
How do I know if my fur strokes are in the right direction?
Compare them to the arrows: head fur flows down and outward, body fur sweeps down and outward from the spine, and limb fur runs lengthwise. Consistent direction matters more than exact stroke shape.
Can I use a different stroke style and still meet the rubric?
Yes. The convention defines taper and direction, not a single line shape. Any stroke that starts firm at the skin end and tapers toward the tip, following the correct direction, is valid.
What should I check before calling the drawing finished?
Check proportion against the guide, fur direction consistency, one clear light source, and a face that reads as the focal point with small eyes and a soft nose.