Free original lessons
Draw a Shed Front Elevation: Door, Window, and Roof
Learn to draw a simple shed front view with correct proportions, a door, a window, and roof planes using a clear step-by-step convention.
Free lesson
Four exercises
Worked answers
Object Drawing Lessons
This guide teaches a front-elevation drawing of a shed: a flat, straight-on view showing the wall, door, window, and roof planes without perspective. You will use a simple convention: all vertical lines stay vertical, horizontal lines stay horizontal, and roof slopes are drawn as straight lines meeting at a ridge or peak. Measurements are given in hypothetical units so you can scale them to your paper. The goal is a clear, checkable drawing, not a photorealistic one. Letter styles and small details may vary; the rubric accepts valid alternatives that keep the structure readable.
Practice materials: Printable downloads are not available for this lesson yet. Use the instructions and four exercises below.
Reference illustration
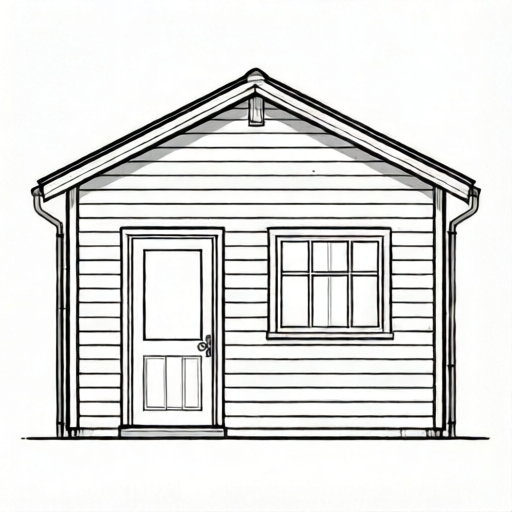
Use the stated measurements and conventions for each exercise.
Set the wall and roof proportions
Start with a rectangle for the front wall. A practical hypothetical example is a wall 12 units wide and 8 units high. Mark the baseline and the top wall line lightly. The roof sits above this rectangle. For a simple gable roof seen from the front, draw two straight sloping lines from the top corners of the wall to a peak centered above the wall. The peak height is a design choice; a hypothetical rise of 3 units above the wall top gives a clear roof shape. Keep the left and right slopes equal so the shed looks balanced.
Check that the wall rectangle has square corners. Use a corner of your paper or a folded edge to test. If the roof peak is centered, the horizontal distance from each wall corner to the peak line should match. Label your units lightly at the side so you can check proportions later.
- Draw a light rectangle 12 units wide and 8 units high for the front wall.
- Mark the center of the top wall line.
- Draw two straight roof slope lines from the top wall corners to a peak 3 units above the center mark.
- Check that both slopes are straight and meet at one peak.
Place the door and window
The door is a rectangle standing on the baseline. A hypothetical door 3 units wide and 6 units high leaves 3 units of wall on each side if centered. Mark the door center on the baseline, then measure half the door width to each side. Draw vertical lines up 6 units and connect them with a horizontal top line. The window is a smaller rectangle above or beside the door. A practical choice is a window 3 units wide and 2 units high, placed 1 unit above the door top and centered on the same vertical line. Keep the window edges parallel to the wall edges.
Do not draw perspective: the door and window should not taper or slant. Their top and bottom lines stay horizontal, and their side lines stay vertical. If you add a door handle or window crossbar, keep them simple and inside the rectangles.
- Mark the door center on the baseline.
- Measure 1.5 units left and right for a 3-unit door width.
- Draw vertical door sides 6 units high and a horizontal top line.
- Mark a window 3 units wide and 2 units high, centered above the door with a 1-unit gap.
- Check that all door and window lines are parallel to the wall edges.
Finish roof planes and ground line
The front elevation shows the roof as two sloping planes meeting at the peak. Add a horizontal line at the peak only if your design has a ridge cap; otherwise the two slopes meet at a point. Draw a ground line below the baseline, parallel to it, to anchor the shed. A hypothetical 1-unit gap between baseline and ground line is enough. Keep the roof overhang simple: extend each slope slightly past the wall corners if you want an overhang, but keep the extension equal on both sides.
Use a consistent line weight: light construction lines can remain faint, while final wall, door, window, and roof outlines are darker. Erase or ignore construction marks that confuse the structure. The drawing should read as a flat front view, not a three-dimensional box.
- Draw a ground line parallel to the baseline, about 1 unit below it.
- If adding an overhang, extend both roof slopes equally past the wall corners.
- Darken the final wall, door, window, roof, and ground outlines.
- Check that the roof slopes are straight and the peak is centered.
Worked example
Using the convention above, describe a front-elevation shed drawing with a 10-unit-wide wall, 7-unit-high wall, a centered door 2 units wide and 5 units high, and a centered window 2 units wide and 1.5 units high placed 1 unit above the door. The roof peak is 2.5 units above the wall top. State the key measurements and checks.
Worked answer
Wall rectangle: 10 units wide, 7 units high. Door center at 5 units from either side; door sides at 4 and 6 units from the left wall edge; door top at 5 units above baseline. Window centered at the same vertical line; window sides at 4 and 6 units from the left wall edge; window bottom at 6 units above baseline (5 + 1 gap); window top at 7.5 units above baseline. Roof peak centered above the wall at 2.5 units above the wall top, so peak height is 9.5 units above baseline. Checks: wall corners square; door bottom on baseline; window sides parallel to wall sides; roof slopes equal and meeting at the centered peak.
Four practice exercises
Exercise 1
A shed front wall is 8 units wide and 6 units high. A centered door is 2 units wide and 4 units high. Where are the door sides measured from the left wall edge, and where is the door top measured from the baseline?
Show answer and check
Door sides are at 3 units and 5 units from the left wall edge. Door top is 4 units above the baseline.
Why: The wall center is 4 units from the left edge. Half the door width is 1 unit, so the sides are 4 minus 1 = 3 and 4 plus 1 = 5. The door height is 4 units, measured up from the baseline.
Check: Add the door width: 5 minus 3 = 2 units, matching the given width. Confirm the door is centered: 3 units of wall on the left and 8 minus 5 = 3 units on the right.
Exercise 2
A front-elevation shed has a 12-unit-wide wall and a roof peak 3 units above the wall top. If the wall is 8 units high, what is the peak height above the baseline? Describe how to check that the peak is centered.
Show answer and check
Peak height is 11 units above the baseline. To check centering, measure 6 units from each top wall corner to the peak's vertical line; both distances should match.
Why: Peak height above baseline equals wall height plus roof rise: 8 + 3 = 11 units. The wall center is half of 12, which is 6 units from either corner.
Check: Subtract the wall height from the peak height: 11 minus 8 = 3 units, matching the roof rise. Compare the two horizontal distances to the peak line; they should both be 6 units.
Exercise 3
A window is 3 units wide and 2 units high. It is centered above a door whose top is 5 units above the baseline, with a 1-unit gap between door top and window bottom. What are the window bottom and top heights above the baseline, and what are the window side positions if the wall is 10 units wide?
Show answer and check
Window bottom is 6 units above the baseline; window top is 8 units above the baseline. Window sides are 3.5 units and 6.5 units from the left wall edge.
Why: Window bottom equals door top plus gap: 5 + 1 = 6 units. Window top equals bottom plus window height: 6 + 2 = 8 units. The wall center is 5 units from the left edge; half the window width is 1.5 units, so sides are 5 minus 1.5 = 3.5 and 5 plus 1.5 = 6.5.
Check: Check window height: 8 minus 6 = 2 units. Check window width: 6.5 minus 3.5 = 3 units. Check centering: 3.5 units of wall on the left and 10 minus 6.5 = 3.5 units on the right.
Exercise 4
A shed drawing uses a 1-unit grid. The wall is 9 units wide and 7 units high. The roof peak is 2 units above the wall top. A door 3 units wide and 5 units high is centered. A window 2 units wide and 1 unit high is centered 1 unit above the door. List the key heights above the baseline and the horizontal positions from the left wall edge for the door and window sides.
Show answer and check
Door sides: 3 units and 6 units from the left edge; door top: 5 units above baseline. Window sides: 3.5 units and 5.5 units from the left edge; window bottom: 6 units above baseline; window top: 7 units above baseline. Roof peak: 9 units above baseline.
Why: Wall center is 4.5 units from the left edge. Door half-width is 1.5 units, so door sides are 4.5 minus 1.5 = 3 and 4.5 plus 1.5 = 6. Window half-width is 1 unit, so window sides are 4.5 minus 1 = 3.5 and 4.5 plus 1 = 5.5. Door top is 5 units. Window bottom is 5 + 1 = 6 units; window top is 6 + 1 = 7 units. Roof peak is 7 + 2 = 9 units above baseline.
Check: Check door width: 6 minus 3 = 3 units. Check window width: 5.5 minus 3.5 = 2 units. Check window height: 7 minus 6 = 1 unit. Check roof rise: 9 minus 7 = 2 units. Confirm centering by comparing left and right wall margins: door has 3 units on each side; window has 3.5 units on each side.
Common mistakes
- Drawing the roof slopes at different angles or with a peak off-center. Measure from each top wall corner to the center mark and make the peak height the same on both sides.
- Making the door or window slant to suggest depth. Keep all door and window sides vertical and all top and bottom lines horizontal; this is a front elevation, not perspective.
- Placing the door partly off the baseline or floating above it. Set the door bottom exactly on the wall baseline and measure the door height upward from there.
- Using inconsistent units when checking proportions. Choose one unit (for example, one grid square) and label all measurements in that same unit before drawing.
Self-check rubric
- Wall is drawn as a rectangle with vertical sides and horizontal top and bottom lines.
- Roof is shown as two straight slopes meeting at a single peak; peak is centered or clearly balanced.
- Door is a rectangle standing on the baseline with vertical sides and a horizontal top.
- Window is a rectangle with sides parallel to the wall and does not overlap the door.
- Ground line is parallel to the baseline and does not slant.
- Construction lines are light and final outlines are clear enough to read the structure.
- Valid alternative layouts are accepted if the door, window, and roof remain readable and the lines stay parallel or straight as required.
Questions and answers
Do I need to draw the roof in perspective?
No. This task is a front elevation, so the roof is shown as two straight sloping lines meeting at a peak. Perspective drawing is outside this guide.
Can the door and window be in different positions?
Yes, as long as the structure stays readable and the door sits on the baseline. The rubric accepts valid alternatives, but check that the door and window do not overlap and that their lines stay parallel to the wall.
What if my paper is a different size?
Scale all hypothetical units by the same factor. For example, if 1 unit equals 1 cm on your paper, a 12-unit wall is 12 cm wide. Keep the same ratios.
How do I know the drawing is accurate enough?
Check that the wall is a rectangle, the roof peak is centered, the door stands on the baseline, and the window is a rectangle with parallel sides. These checks are simple arithmetic and visual comparisons.